Submitted by LibRaw on
Some Internet discussions claim that it is easier to push shadows up on one camera model compared to another one. Turns out, such an impression may result from a certain trick. First, let’s see the trick, and next we will expose it.
Das Kunststück, or, The Trick
Let’s take a RAW file (from an Olympus E-M1, first version of the camera) and two DNGs derived from it via different means.
You can see for yourself that the RAW data in those three files is totally identical (click on the images to see better):
Figure 1. RawDigger. RAW Histograms for the original ORF file (left), Adobe converted DNG (middle), digiCam converted DNG (right)
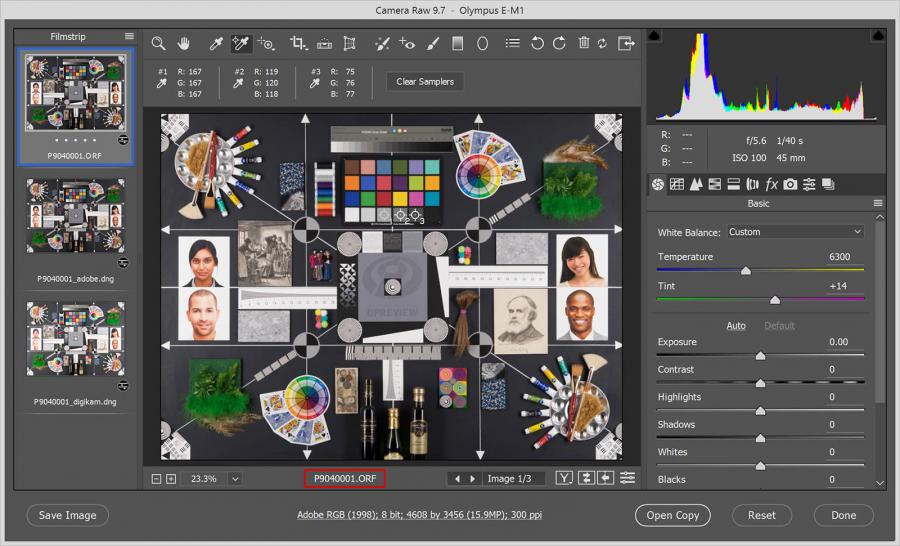
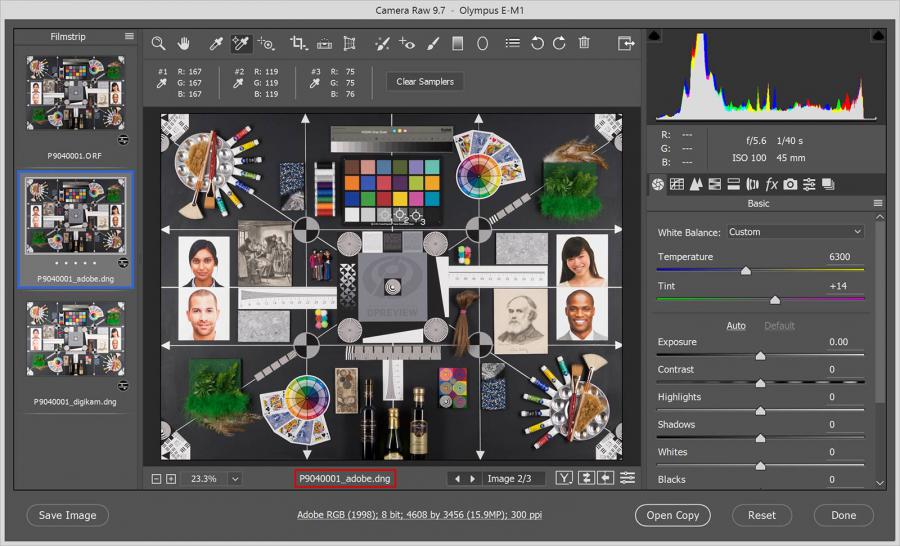
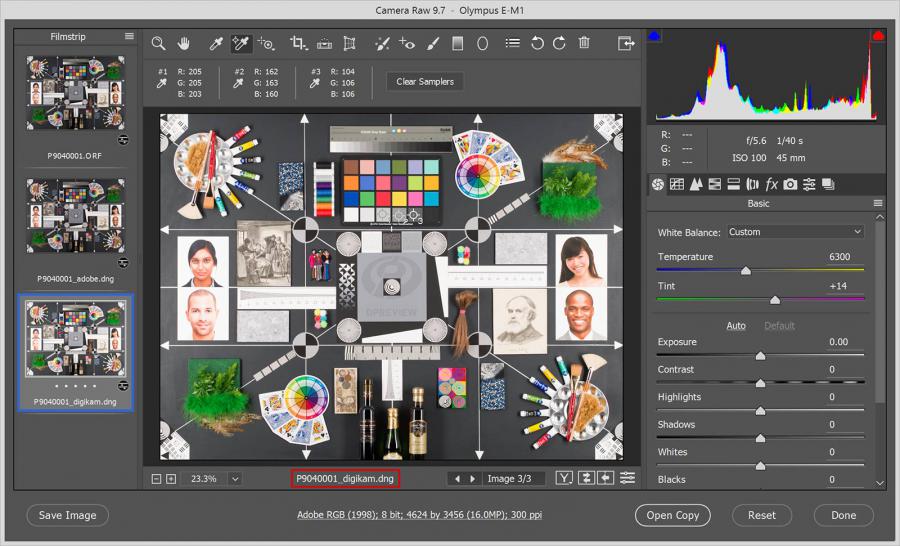
Now let’s open those files in Adobe Camera Raw and see how they look (again, you can click to zoom):
Figure 2. ACR 9.7. Original RAW (ORF) file
Figure 3. ACR 9.7. DNG file converted from original ORF file using Adobe DNG Converter
Figure 4. ACR 9.7. DNG file converted from original ORF file using digiKam
The difference is immediately visible to the eye (even in the preview), but to facilitate the comparison we’ve set three samplers on each of the screens, probing the same three grey patches of the ColorChecker.
Figure 5. ACR. ISO 100. Second samplers' values: for the original ORF (left), Adobe DNG (middle), digiKam DNG (right).
If we take the middle of the three samplers, it’s almost exactly middle grey on the first two files (the value = 119), while the third file (value = 162) has a brightness difference coefficient of 1.97, which constitutes nearly an entire photographic stop: (162/119)^2.2 ≈ 1.97, here we take the ratio to the power of 2.2 to un-do gamma, getting the linear values.
Why is this? Both DNG files result from converting the original ORF file (Figure 1. and Figure 4.) to DNG. The RAW data is preserved and undistinguishable between the three, as we just saw in RawDigger, and yet…
We will answer this one without further ado.
The difference is in the metadata! In particular, the effect above is controlled by the BaselineExposure metadata tag, present in DNG:
- The third file (the brighter DNG) has the following written in this tag:
- | 29) BaselineExposure = 0 (0/100)
- In the second file, it’s not zero (we’ll show what it is a little later)
- The first, meanwhile (the original ORF), doesn’t contain this tag at all, but the Adobe converter “assumes” it.
A careful reader, having looked at the names of the files in the screenshots, will know that the third shot was converted to DNG with the aid of digiKam, the second with Adobe DNG Converter (version 9.7). Correspondingly, the Adobe converter set the necessary tag in the DNG (with a value to replicate their own processing of the original ORF file), while digiKam recorded the value as zero.
More of The Trick
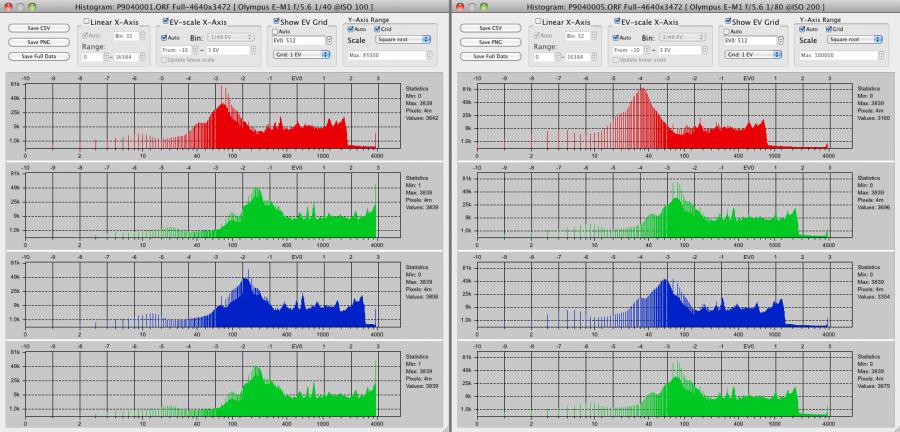
Let’s discuss another shot, taken at ISO 200 and two DNG “derivatives”, obtained using the same two converters as in previous, Adobe DNG Converter and digiKam. The RAW histograms of all three are once again identical, so we are only going to show the histogram of the original RAW (ORF) file:
Figure 6. RawDigger. Histograms of ORF files: ISO 100 (left), ISO 200 (right)
As is plainly visible, the histogram has shifted ~1.2 stops to the left relative of the shot taken at ISO 100 (this can be seen, for example, by looking at the highest peak in the blue channel: it’s around -1.9 EV for ISO 100 and around -3.1 EV for ISO 200).
For the first two, the middle sampler on grey shows the same value of 118 as for the first two from the previous, taken at ISO 100.
For the third file (which has its “hidden exposure compensation” missing), the sampler value is 102, which is (118/102)^2.2≈1.38x below the middle grey, that is about 0.5 stops ( 2.2*log2(118/102) ≈ 0.46 EV ) darker; while in the first case the difference was one stop in the opposite(!) direction.
Figure 7. ACR. ISO 200. Second samplers' values: for the original ORF (left), Adobe DNG (middle), digiKam DNG (right)
The reason is the same:
- digiKam convertor set the BaselineExposure tag to 0;
- Adobe DNG Converter set this tag to non-zero “hidden exposure compensation”;
- The original ORF file doesn’t have such a tag, but it is assumed in ACR.
The Moral of The Story
If we compare two cameras (or different settings for the same camera; or even the same shot from the same camera but processed in different ways), and we’re doing this by looking at two files in a RAW converter, we need to:
- either be sure that those two files were processed identically (and no, that doesn’t mean pushing the same buttons or moving the same sliders in a converter / converters);
- or, if they WERE processed in different ways, understand exactly what the difference is and how to get to the lowest common denominator, if that’s the goal.
Because, you know, pushing the middle grey up and down for a nearly 1.5 stop total difference (as seen in the examples above), that’s a pretty big deal.
This means that, of course, one should first look at the original, unprocessed data (in RawDigger, for example), and only having dealt with the differences there, right in the raw data, to move on to comparing the results of processing.
Exposing The Trick
In this case, the explanation is quite simple:
- The E-M1 camera, in the mode being used, (ISO 100 in EXIF) “overexposes” the shot (similar eccentricity to what Olympus E-M5 has at low ISO settings)
- Adobe compensates for this (using hidden exposure compensation, BaselineExposure)
- digiKam doesn’t.
This becomes possible for the simple reason that “ISO light sensitivity” for RAW data isn’t defined in any way. The existing ISO 12232:2006 standard talks about how the out-of-camera JPEG should behave, but doesn’t mention the RAW.
In practice, the RAW value that corresponds to middle grey is different for different cameras, even if normalized to the maximum and calculated in percent. Moreover, it can even be different for the same camera, depending on settings and algorithms for Auto Exposure. The proverbial 18% is more characteristic for the ISO settings below the base camera ISO. The current mid-grey in RAW is 12.7% and below, with the emphasis on “below”.
Using the Olympus as an example (the vendor puts the “middle grey” value in the second field of the RAW calibration tag (Sensor Calibration on EXIFtool lingo), so one doesn’t have to guess what the manufacturer intended, but can know outright), for the given camera:
- ISO 200 and higher: the middle grey is at level 290 or 7.5% of the camera RAW data maximum (that’s what “below 12.7%” means)
- ISO 100: 646 or 17% (which is to say ~1.25 steps above the norm for this camera).
In practice that means that under the same lighting conditions, using the same exposure meter, but with different camera settings, we can get, for example:
- An ideally exposed shot at ISO 200, the highlights aren’t blown out but are rather hitting the right wall of the histogram.
- Highlight overexposure at ISO 100.
If we take different cameras from the same vendor, then we find out that the middle grey jumps around. For example, the E-M1-II, in regular mode, has it at level 206, which is to say 0.5 steps below than that of E-M1. Meanwhile, ISO 64 mode has the same calibration as that of the camera’s first version (646).
So, when using two cameras simultaneously, old and new, one must remember to set and use the proper compensation to the exposure meter readings, depending on the difference in the ISO speed calibration of the modes being used, and the difference in two cameras in regular (not lowest ISO) mode.
We like it! How about you?
Some might ask: "Why do they (camera manufacturers) do this?
And the answer would be: “Because we can!”
When lowering the calibration level for the middle grey in RAW, two useful effects emerge:
- ISO numbering (for the same operation mode) can be drawn higher, which is useful for marketing.
- The headroom in the highlights increases, we won’t blow out all of the specular highlights, and the highlights can be compressed with an S-shaped curve, making the result closer to what photographers had on a film negative.
But, everything has its cost:
- As a result of the shift in middle grey to an area with weaker signal (in effect, forcing under-exposure), the noise increases.
Modern cameras have little noise (relative to what it was 5-10 years ago) and this cost is considered worth it.
But this cost has to be paid always (when shooting “according to the exposure meter”), even with low contrast scenes, which don’t need extra room in the highlights at all.
What Happens Later, after the Shoot?
The in-camera JPEG engine returns the middle grey to its proper place, because the standard ordered it to.
The designers of RAW converters are forcibly doing the same because their (mass) user expects to see, upon opening the file, the same thing that he sees on the back of the camera (and if that doesn’t happen, then they’re flooded with questions, one of the most common for new RPP users being “why is everything so dark?”).
In the case of Adobe products, this is expressed as:
- For original RAW files (not DNG), hidden exposure compensation is implemented.
- For DNG files, this compensation is written into the BaselineExposure tag. In the case being examined it is:
- ISO 100 Shot:
- | 29) BaselineExposure = -0.84 (-84/100)
- This is in stops, so ACR or Lightroom will “move the Exposure slider” -0.84 stops and display it as “0”
- ISO 200 Shot:
- | 29) BaselineExposure = 0.32 (32/100)
- In this way, the difference in hidden exposure compensations comes to 1.16EV.
While we are on it, let’s take a look, for example, at the RAW values for the green channel on the same grey patch we already sampled in ACR as middle grey, 118.
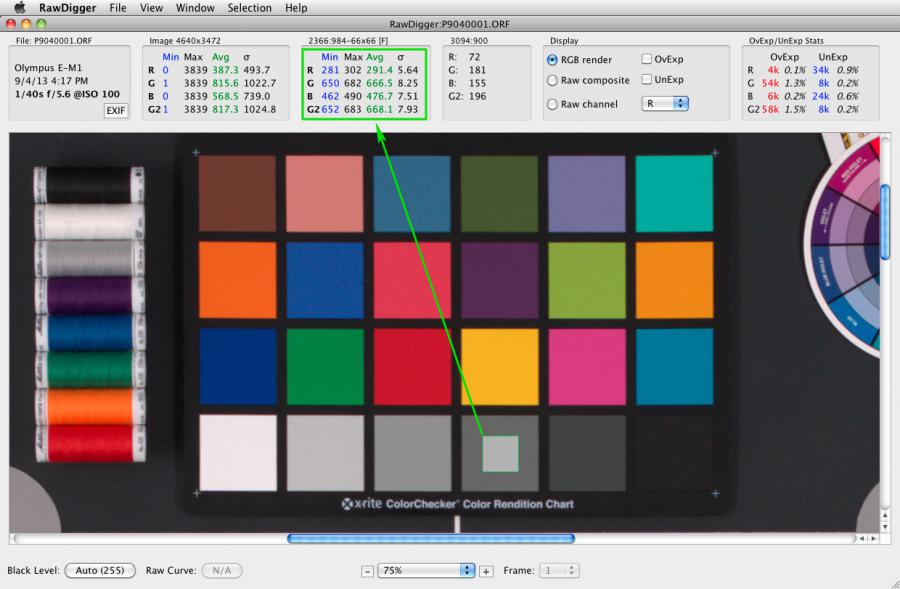
- ISO 100: the average RAW value for the green channel (G) on this patch is 666.5 (Figure 8)
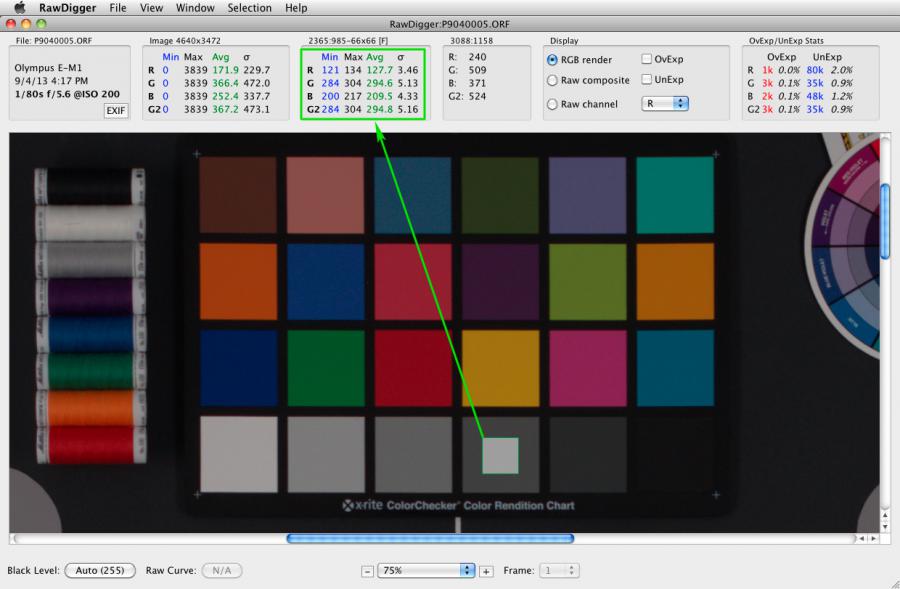
- ISO 200: here the average RAW value for the green channel is 294.5 (Figure 9)
Figure 8. RawDigger. Original ORF file. ISO 100. Sample on the grey patch D4
Figure 9. RawDigger. Original ORF file. ISO 200. Sample on the grey patch D4
This means that it’s a difference of a magnitude of 2.26 or 1.17 stops, which, very accurately, coincides with the difference in the BaselineExposure tags or the above-calculated difference in the SensorCalibration tags in the ORF files.
Meanwhile, if we look at the render of the un-corrected DNG render, we see values of 162 and 102, which, taking gamma 2.2 into account corresponds to 2.77x difference, or almost exactly 1.5 stops. It seems that CameraRaw, by itself, added another 0.3EV to the difference, increasing the contrast (this is with all sliders set to “zero”).
Rhetorical Questions
Consider the following: we’re comparing shots from a Canon and an Olympus E-M1, two shots taken “at ISO 100” (or at least, that’s what the EXIF says). In reality, the Olympus is set to ISO ~220, and the shot was overexposed by 1.25 stops.
So, would it be sensible to compare these shots by their noise?
There are two possible answers here, of course:
- No, we need to try to figure out what’s actually going on here
- The user is lazy and not curious, and is instead interested in the “camera + converter” combination, seeing it as an analog to the “Kodak film + minilab” combination.
Both answers have a right to exist, but the second one, in our view, seriously complicates life for those photographers who use two (or more) cameras at once or are switching between different cameras.
Oh, and as a snack:
- The ISO spinner can be fake, in that it doesn’t change the conversion factor along the chain from the sensor to ADC (but honestly, as usual, communicates the current ISO setting to the exposure meter, thus affecting how exposure is calculated):
- For all ISO settings (Sigma DPx Merrill);
- For high ISO settings (Fuji X-T10 above 1600);
- For low ISO settings (ISO 50 for Canon, Sony, and we suspect for more than just those);
- For some ISO settings (160, 320, 640 for Canon 6D, however, that one also clips data from the top);
- “Clever methods to increase dynamic range” (ADL, DLO, ADO) – in many cases, these are just done by communicating a higher sensitivity value to the exposure meter, so it’s just underexposure by a stop (or more). But there are exceptions here too.
This complicates the problem of finding similar “reference points” even more.
Back to Where We Started
As a matter of fact, this particular text was triggered by a certain rather strongly expressed opinion that Olympus E-M1-II runs circles around original E-M1 when it comes to pushing shadows.
This camera isn’t supported by Adobe yet, and the only way to run its shots through Lightroom/ACR is by converting it with digiKam and thus setting BaselineExposure to 0.
Comparison shots from other cameras, already “known” to Lr/ACR, can be opened directly, without the aid of a third-party DNG converter, and thus (as we discussed above) may have the middle grey calibration point adjusted “the Adobe way”.
As it happens, an Adobe-supported camera, which means that the calibration to the mid-point will be applied in conversion from RAW (easy to figure out the value of this hidden compensation, but nobody seems to bother), could be compared to a new, yet unknown to Adobe software, camera, with 0 compensation for the calibration point.
The results of such a comparison could be as amazing as wrong.




Add new comment