News

RawDigger Histograms, part 3: Overexposure Shapes

RawDigger.

Different cameras, even if based on the same sensor, may render extreme highlights at around clipping point differently, and differently, with different values of clipping points, depending on ISO setting. It is important to recognize the look and calculate the practical clipping point, which is not always the same as the maximum raw value.

Here we will try to demonstrate the typical “looks” of the histogram of the clipping zone.

RawDigger histograms: Part 1. What is the raw data histogram?

RawDigger. What is a histogram?

This article is the first of a series, dedicated to explaining what is the histogram of raw data, what are the various ways of exploring it in RawDigger, how it can help to better understand how your camera functions, and how it can aid in improving your shooting through better understanding of raw data. In this one, we are going show you how to navigate the RawDigger histogram.

Before we get to any of this, however, let’s define what exactly IS a histogram of raw data?

Note: If you know what a histogram is, and know the difference between the histogram on the back of the camera and the histogram of the raw data, feel free to skip to the next part. But maybe even if you think you know all about the histograms the below is worth reading.

Exposure for RAW vs. Exposure for JPEG

RawDigger. Shot exposed for RAW

Adams has prescribed the Zones. 11 of them. This had consequences. In the digital case, it seems, severe ones.

To access all 11 zones on a sensor, the middle tone needs to be placed very low, 5 steps lower than sensor saturation.

The reduced number of tones (or, in other words, limited number of levels per stop or zone) turns into the loss of detail resolution. Pulling details and color from those underexposed middle tones and shadows is very painful. Noise starts to raise its head, color smudges and blotches appear, the details become rough, and the image loses plasticity.

The riddle of the intermediate ISO setting

ISO to Noise Ratio

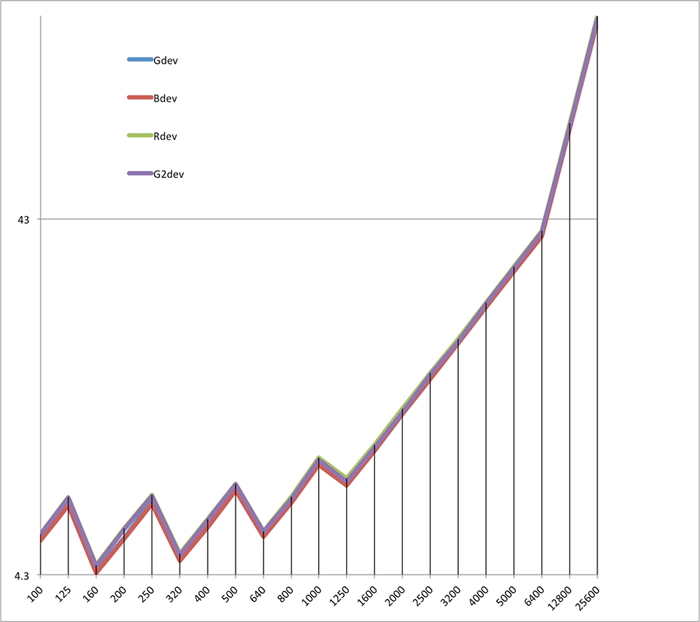
If one is shooting in raw, they may be interested to see if there is any benefit in using intermediate ISO settings, such ISO 125, 160, etc.

There is, however, no single answer to this question. Why? Because everything depends on how you implement these intermediate ISO settings in the particular camera. Sometimes they are implemented the same way as the main ISO settings, but sometimes they are the result of certain manipulations, such as digital multiplication.

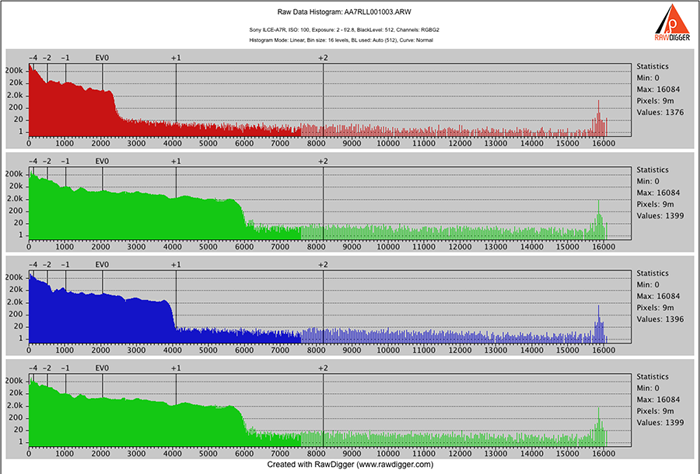
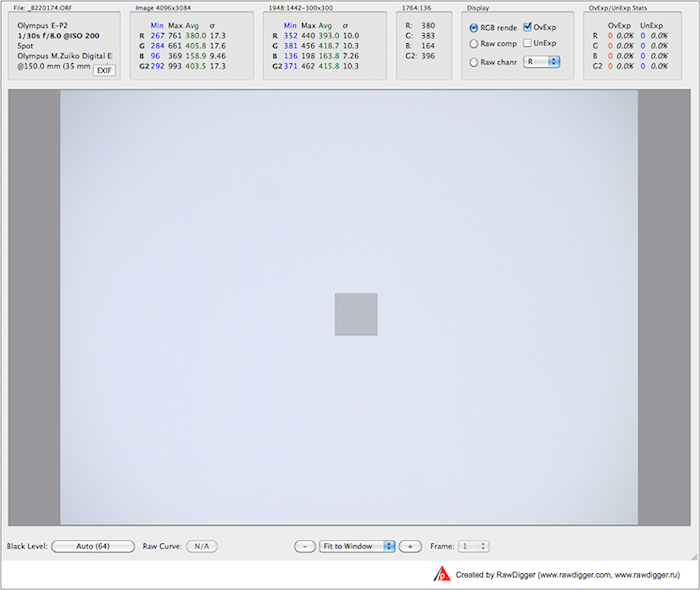
We are going to take series of shots varying ISO settings from the lowest to the highest using, of course, every intermediate ISO setting available. The subject of the shots doesn’t matter – hell; you can even shoot with the lens cap on.

RawDigger 1.0.2

Changes

  • To allow users to activate RawDigger in both trial and fully licensed modes without direct Internet access, manual activation mode is added.
  • Camera support: Nikon Df color data were copied to D4 (the Df device data is better, and the CFAs are practically identical).
  • Bug fix: There used to be a possibility of the program crashing while opening new files in a very rapid succession because the new file was opened before exiftool was finished processing the previous one.
  • Exiftool is updated to version 9.44

RawDigger 1.0.1

Changes

  • Export to TIFF: option ‘Copy EXIF tags from RAW file’
    • for RGB rendering the output files are tagged with sRGB color space
    • for all other modes of export the output files are untagged; you
      may need to assign the proper color space on import to a graphics
      editor program
  • ‘Selection by numbers’ dialog
    • ‘Center selection on image’ checkbox is added to the dialogue; if the
      checkmark is set, the center of selection is aligned to the center of the image
    • For OS X the dialogue is adjusted so that the wording is not truncated
  • Processing of registration information is improved:
    • On license key input all extra characters (spaces, tabulation marks, etc)
      are ignored. Also, lowercase letters are automatically replaced with
      uppercase ones
    • The key is checked at input, if they key does not pass the sanity check,
      a warning is issued
  • Camera support
    • The size of the image area for Nikon Df camera is adjusted
    • Correct RGB rendering for Fujifilm cameras X-E2 and XQ1
    • Correct parameters of Bayer Pattern for Canon A3300 (CHDK)
  • Exiftool is updated to version 9.43

Establishing the in-camera exposure meter calibration point is the way to extract more dynamic range from your camera

RawDigger. Determining the middle grey value

“My camera has not enough dynamic range”

“The numbers on that and that review site suggest that many stops of the dynamic range, but I do not see it, my highlights are blown out, my shadows are noisy and blotchy”

Part of the problem is in how one sets the exposure. To set the exposure correctly it is good to know how the in-camera light meter works, and how it is calibrated. So, what is exposure meter calibration and why is it important?

Understanding of the exposure meter calibration determines the outcome of the exposure.

What does this mean? Well, let’s take a closer look.

Pages

Subscribe to Site news