One Way to Get Spot-On Exposure for Your Shots
Spring is Here!
All LibRaw Products and Bundles - 25% off
Our Special Prices are valid until May 06, 2024.
Practically every day, one can see threads on photographic forums where members discuss the various different modes of automatic exposure, trying to find the right one. As a rule, these discussions result in the same question – what compensation to automatic metering ought one set to get consistently good exposure? It turns out that no autoexposure mode universally guarantees good out-of-box results.
Let’s start by defining “good exposure.”
Good exposure is that exposure which allows you to get high-quality source data – that is to say, with a low noise level and without clipping in the shadows and highlights in all of the elements of the scene that are important to its composition; where you intend not to clip but to keep details and texture (of course, if the dynamic range of the scene is wider than the available dynamic range of the camera, it is a purely subjective decision, based on revisualization; and if the dynamic range of the camera is wide enough, maximizing the exposure, often called ETTR, is the way to go). A shot taken at such exposure can be rendered (with the use of a raw converter and a graphic editor) so that the rendering of the scene will match the intention of the photographer and can be presented in the desired size.
To quickly assess what can be extracted from a shot via a raw converter, we created FastRawViewer. Not only can it quickly render and display the results of simulating exposure correction, applying white balance, contrast curve, etc., but it will also record these adjustments (as well as any ratings, labels, titles, or descriptions) in an XMP file so as to not have to repeat the aforementioned adjustments in Lr/ACR raw converter.
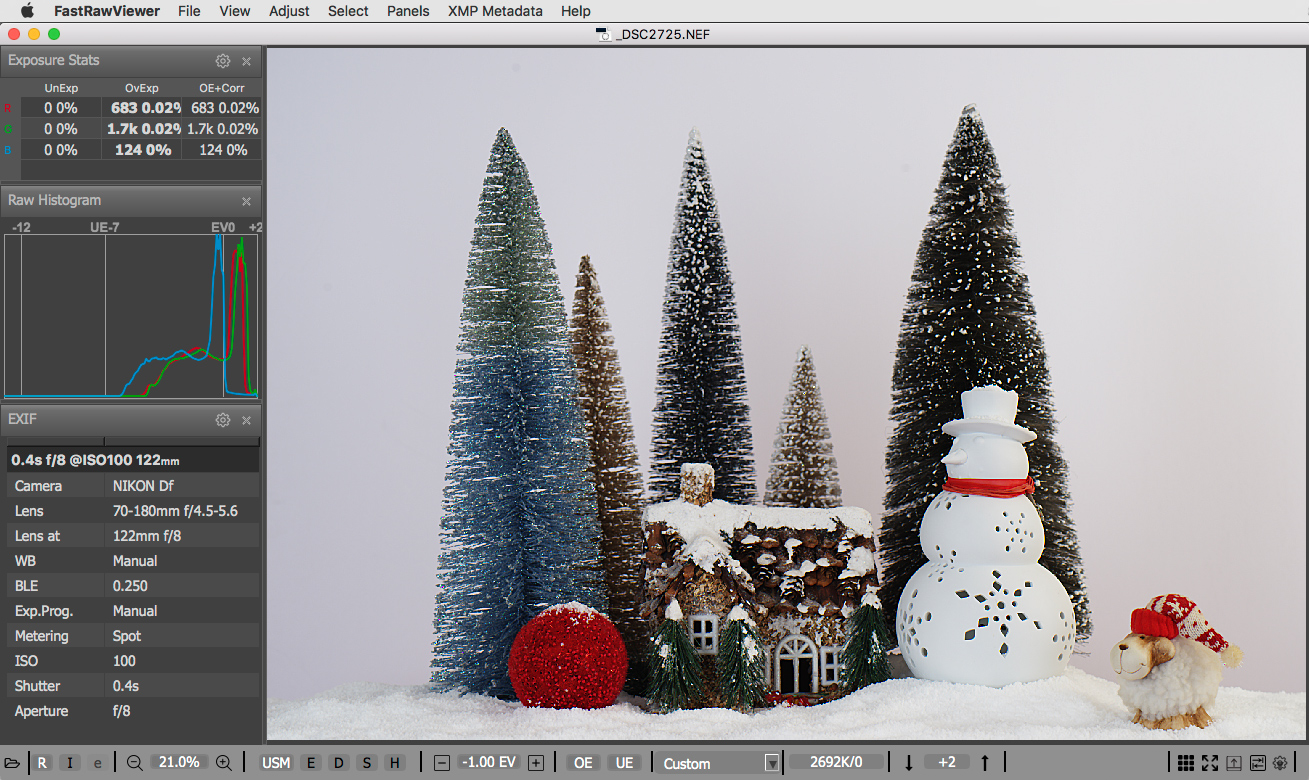
Figure 1. A shot, opened and adjusted in FastRawViewer
However, when enacting an automatic exposure metering, a camera has no way of knowing the intentions of the photographer and therefore correctly understanding which elements of the scene are important to the composition and which aren’t. For example, in a contre-jour shot, ought one preserve the background? The photographer knows the answer to this question, the camera doesn’t. Undoubtedly, we could start demanding that camera manufacturers add settings to menus, additional buttons and various other controls. But all these additional options can only be used if shooting in a very relaxed (shall we say?) manner and with light in the scene not changing at all. (Let us note that for a relaxed shoot, one could dispense with such settings and simply use bracketing and rapid result analysis in, for example, FastRawViewer – that is to say, a trial-and-error approach.)
A photographer, unlike a camera, knows what is important to him in a scene, and therefore when setting exposure, he has the option of using a spotmeter. By default, a camera’s spotmeter is calibrated such that between the exposure recommended by the spotmeter and the maximum exposure in RAW there is approximately 3 EV (2.5 EV for JPEG). The exact value for your camera can be found using the method described in the article Establishing the in-camera exposure meter calibration point is the way to extract more dynamic range from your camera.
One of the ways of getting good exposure is metering while using the in-camera spotmeter on the lightest part of the scene that needs to maintain full detail (white clouds, snow, etc.) and applying the appropriate compensation to the exposure recommended by the spotmeter.
We built a scene similar to a natural winter landscape: the scene has sufficient contrast, has enough white, however, many of the elements of the scene that are compositionally important are darker than the background. One wonders – how will the multi-segment (matrix, evaluative) metering handle this?
The image below was taken in auto multi-segment mode (left part of Fig. 2 is the shot “as is”). As can be easily ascertained, the underexposure comprises about 3 EV (right part of Fig. 2, the brightness has been increased in FastRawViewer by 3 stops).
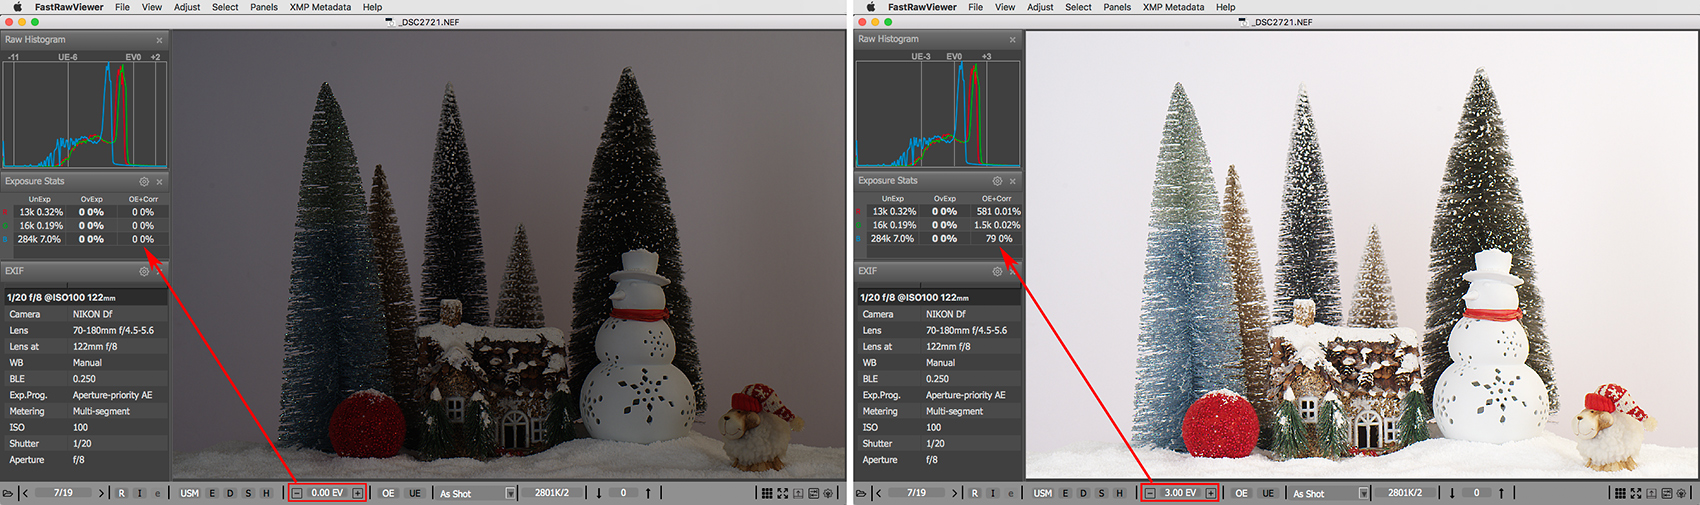
Figure 2. Multi-segment autoexposure mode: left part – the scene “as is”; the right part – brightness correction of +3 EV in FastRawViewer corresponds to the amount of underexposure in the camera
To evaluate underexposure, we raise the brightness in FastRawViewer, simulating positive exposure compensation in the camera (control, usually named “exposure” in RAW converters is marked with the red rectangle), up to the point where the amount of Ov.Exp + Corr reaches a fraction of a percent, making certain that the OE indication doesn’t show up in areas of important highlights; in our case, the snow and the snowman. “Clipping” in the specular highlights can be tolerated almost always.
We can see in the shot that the auto-exposure scrupulously saved all of the specular highlights on the ends of the tree branches (left part of Fig.3, the Exposure Stats panel in the OvExp column displays 0% in every channel), transposing the main bulk of the composition into deep shadows.
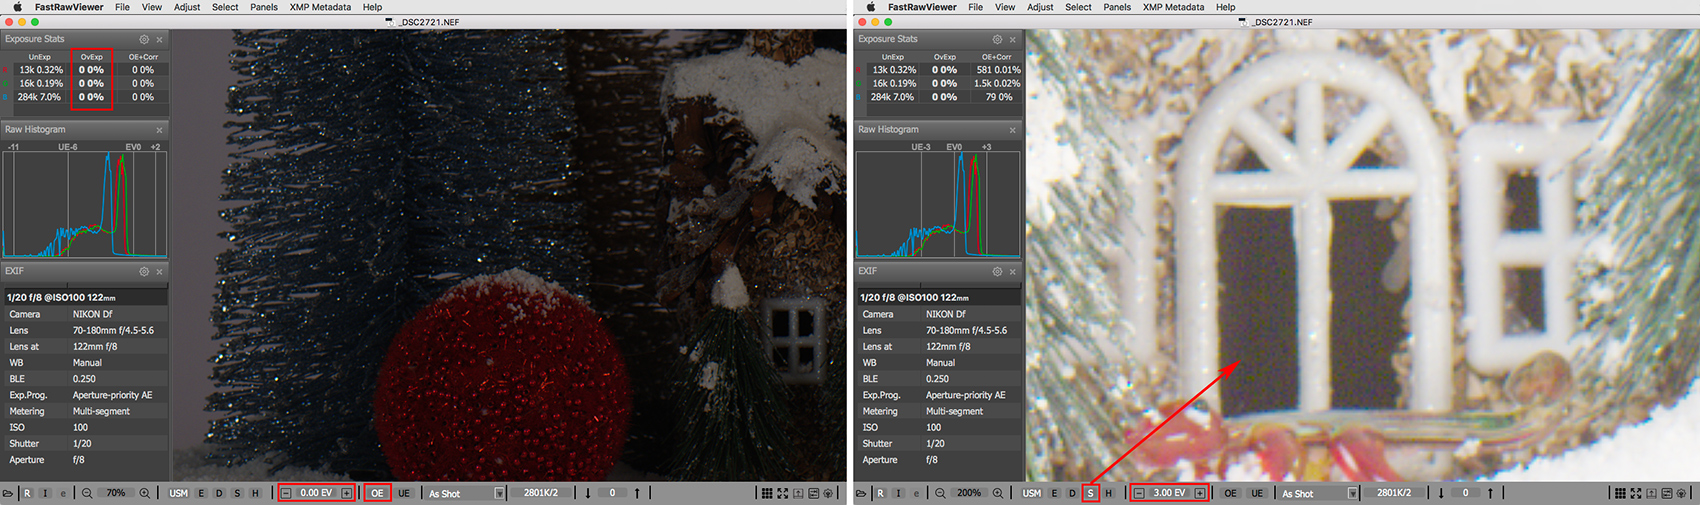
Figure 3. Multi-segment autoexposure mode: left part – completely preserved specular highlights that didn’t have details in any case; right part – significant noise and artifacts in the shadows
Of course, one could hope for and count on the high dynamic range of the camera and on being able to boost the shadows in software with sufficient detail. However, in the vast majority of cases, such correction leads to the details in the specular highlights not being discernible anyway due to rather extreme increase in brightness, while the noise and the artifacts in the shadows will be higher (and, correspondingly, the resolution and aesthetics of the shot will be lower) than would be with good exposure from the very start, without increasing brightness within some software (Fig. 3, right part – the application of Shadow Boost allows us to see the color artifacts and the noise in the shadows).
In actuality, for this scene we want the brightest elements that keep their texture to be the snow and the snowman, not the specular highlights on the spruces. Therefore, as we noted above, having used the in-camera spotmeter to meter the exposure off the brightest compositionally-important part of the scene and having added the correction (+3 EV) to the spotmeter results, we should get near-optimal exposure. Some cameras may not allow setting exposure compensation (EC) to +3 EV, as they go only up to +2.5 EV. You have two options in this case: set the camera to +2.5 EV, or, as I do, switch to manual exposure and dial in a slower shutter speed and / or a faster aperture manually, to get to +3 EV.
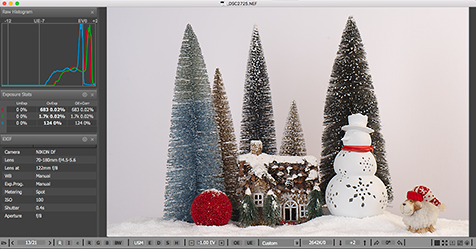
During the shoot of the scene displayed below, the metering was performed off the white top hat on the snowman’s head with a correction of +3 EV in the camera.
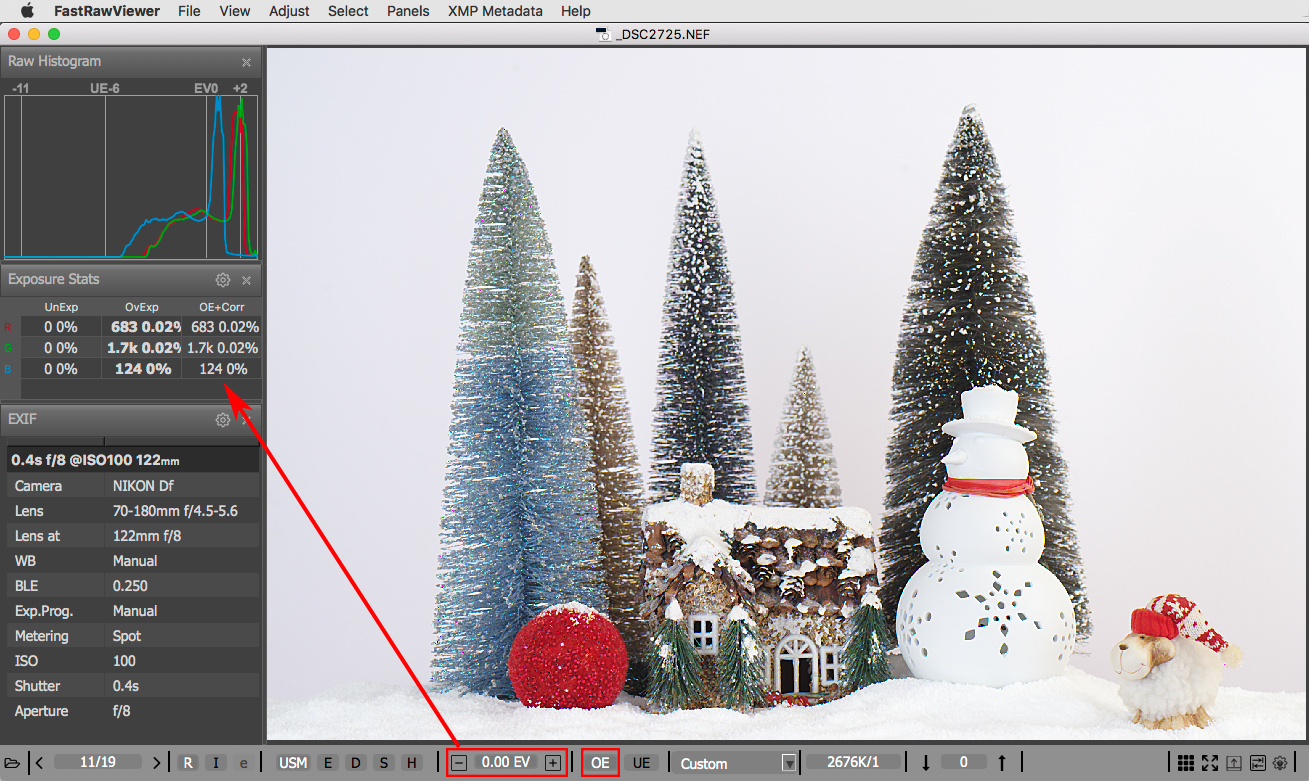
Figure 4. Exposure setting: “spotmeter pointed at the top hat of the snowman and +3 EV correction in the camera”
Yes, we did get a certain amount of blown-out pixels in the areas of the specular highlights on the tips of the spruce trees (in the Exposure Stats panel, OvExp, we can see 0.02% in the R and G channels, 683 and 1.7k pixels correspondingly, and 124 pixels in the blue channel), but these are specular highlights which, in any case, lack any details. However, all of the shadows have been preserved (which can be tested easily, again, using Shadow Boost), as well as the texture of the snow.
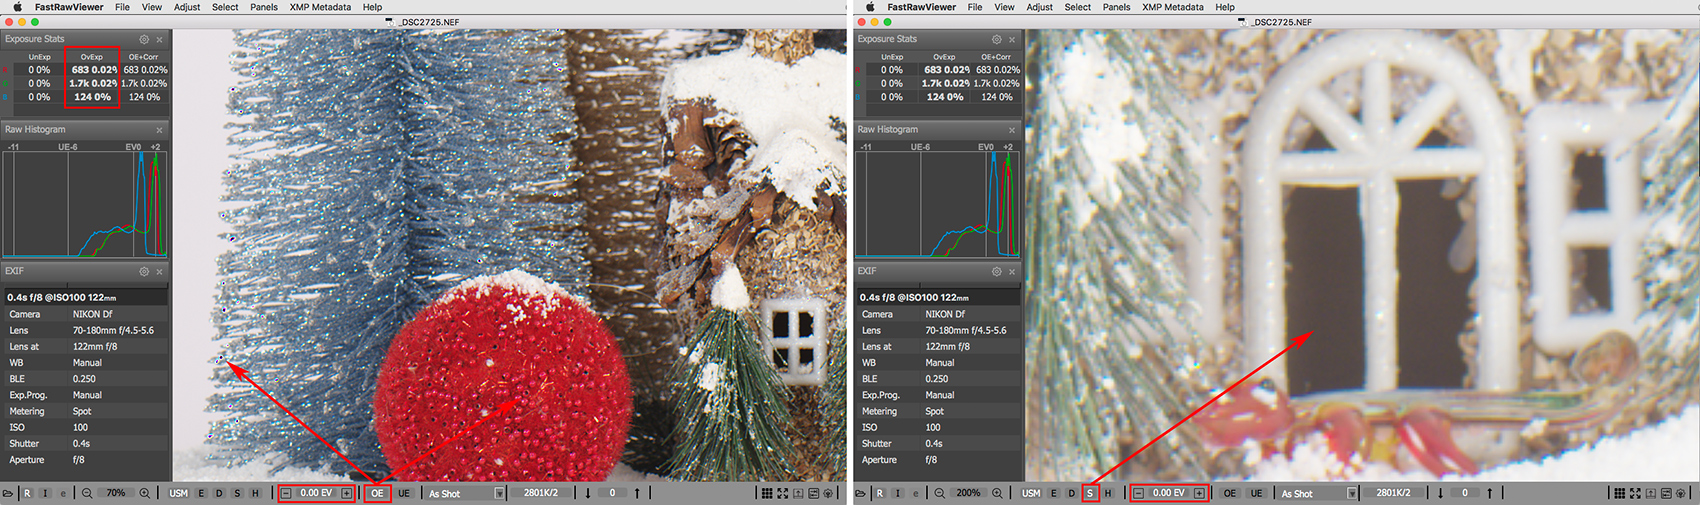
Figure 5. Left – the clipping is only in the specular highlights, as was planned; right – clean shadows.
Later, we can render this RAW according to our desires.
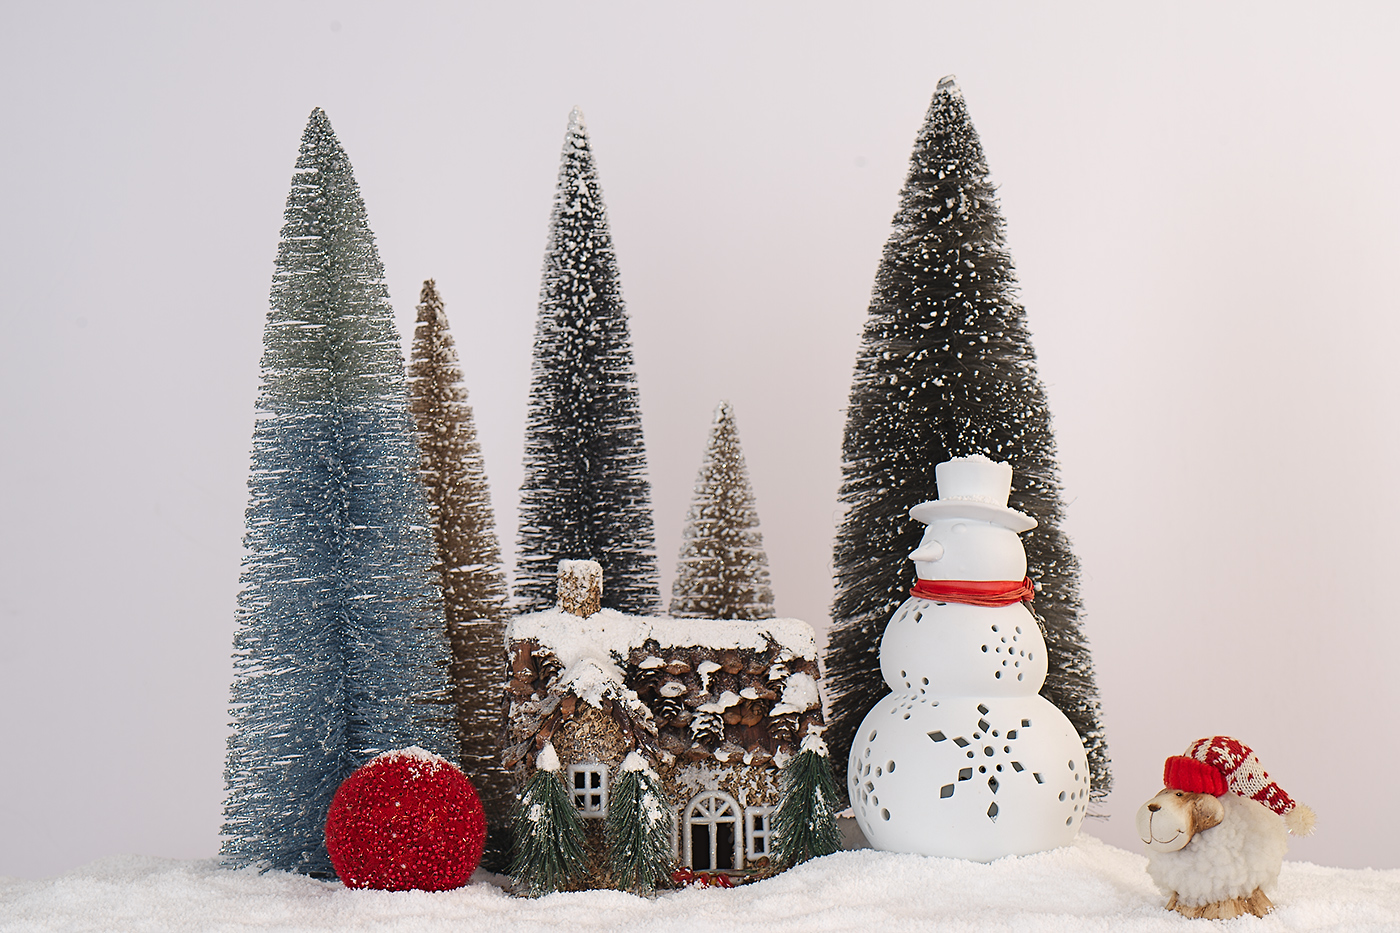
Figure 6. For example, like this...
Could one calculate the constant compensation to autoexposure for multi-segment metering the way we do for the spotmeter?
Unfortunately, this trick doesn’t work well with autoexposure in multi-segment metering mode. Let’s see what happens if we expose according to automatic metering while changing the brightness of the background in the scene by +/-1 EV.
When increasing the brightness of the background by a modest +1 EV, a shot with autoexposure in multi-segment metering mode turned out to be underexposed by 3 1/3 EV, that is to say a third of a stop more than in the previous case.
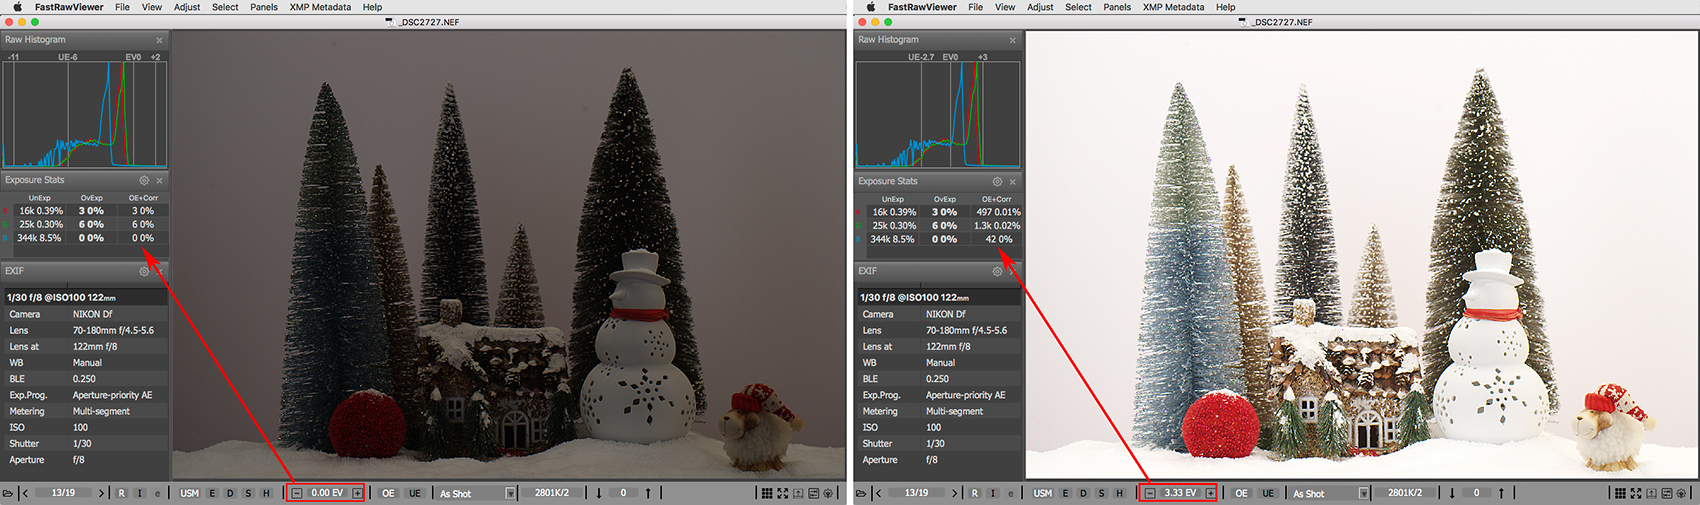
Figure 7. Multi-segment metering mode, the brightness of the background has been increased by 1 EV: the left part – without correction; the right part – the correction of +3 1/3 EV in FastRawViewer shows the amount of the underexposure
When changing the brightness of the background in the scene by approximately -1 EV instead of +1, the shot will be underexposed by about 2 2/3 EV, so by 1/3 of a stop less than the first shot, and should we have the camera set to + 3 EV exposure compensation, some important highlights will be blown out.
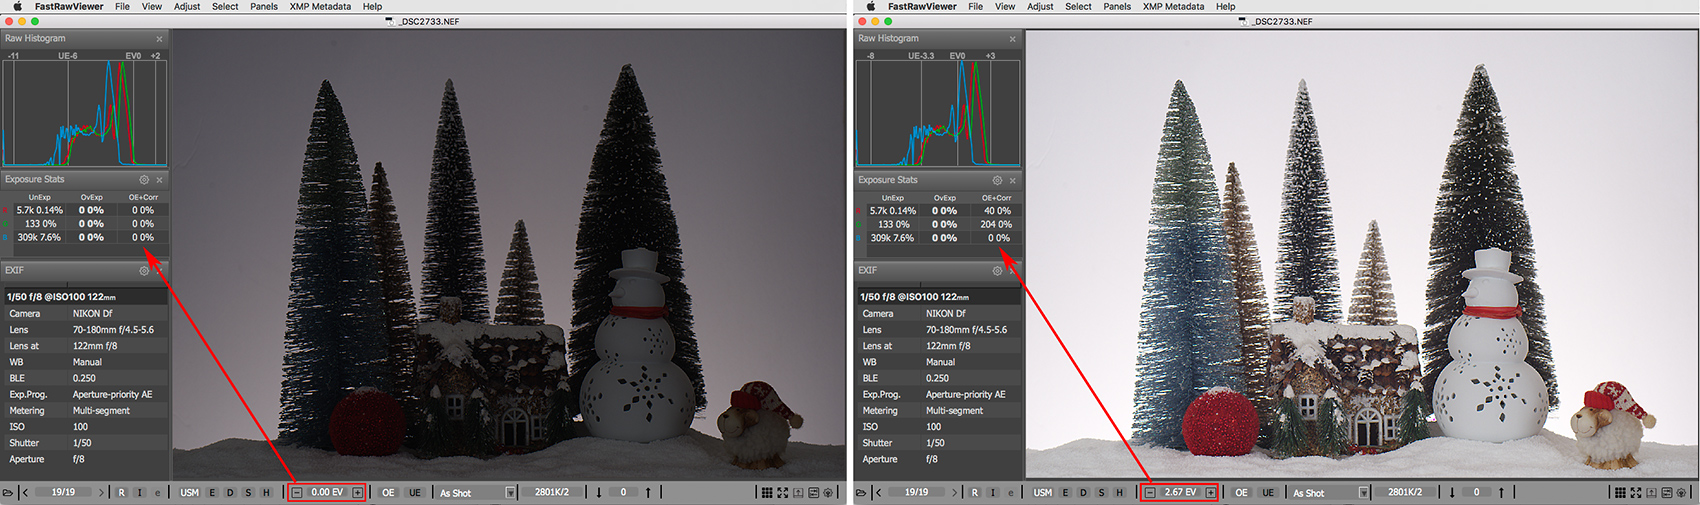
Figure 8. Multi-segment metering mode with background brightness decreased by 1 EV: left part, without correction; right part – correction of +2 2/3 EV determines the amount of the underexposure
Furthermore, if the idea is to shoot in contre-jour light, and preserving the background isn’t necessary, then the underexposure comprises >4 EV.
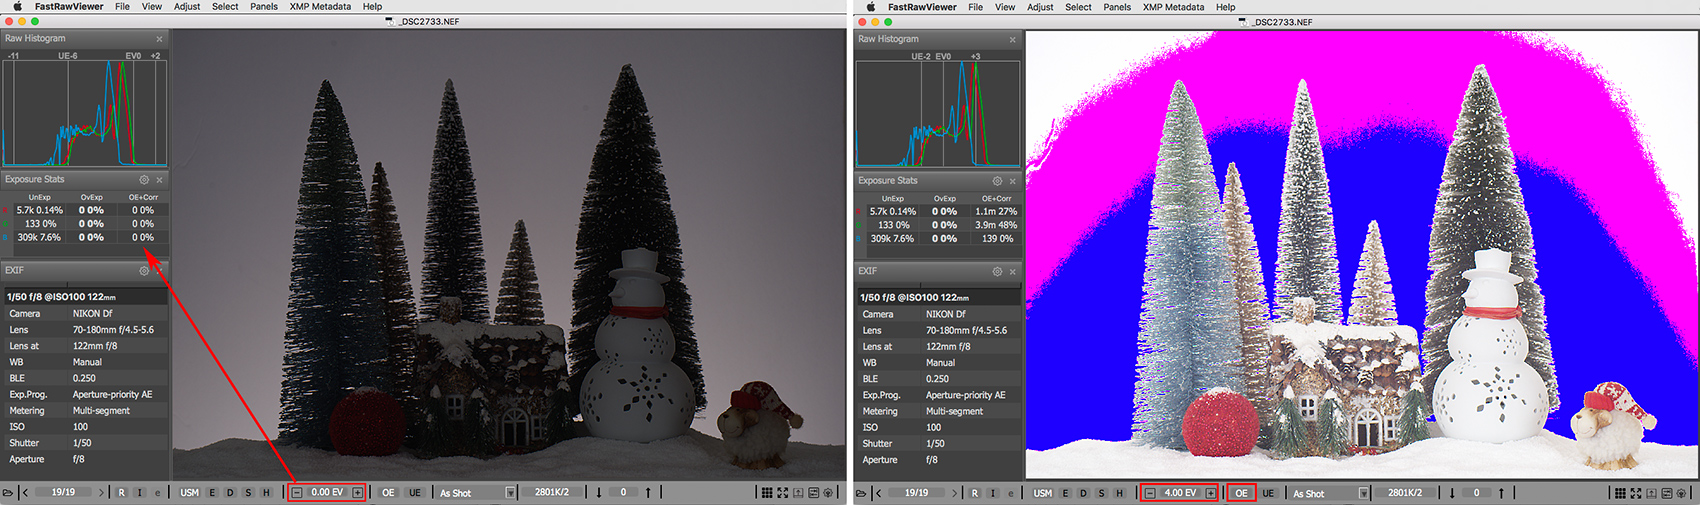
Figure 9. Multi-segment metering mode with brightness of the background decreased by 1 EV: left part, without correction; right part, with a brightness correction of +4 EV, there are no OE indications on any important elements of the scene
Accordingly, we don’t have the option of consistently calculating the standard compensation to autoexposure in multi-segment metering mode. The use of the spotmeter (as described above) eliminates said problem.
We preformed similar experiments with cameras from different manufacturers (Canon / SONY / Olympus / Panasonic), and the results are as follows:
- When changing the brightness of the background, the amount of the necessary compensation to the value suggested by multi-segment metering mode, changes;
- When contrast or absolute brightness of the light in the scene changes, so does the necessary compensation to the exposure suggested by multi-segment metering;
- The amount of the compensation to the value suggested by multi-segment metering is different not only for different manufacturers, but also for different camera models for the same manufacturer;
- When metering using the spotmeter on highlights with a compensation for the exposure meter’s calibration, the exposure is stable and doesn’t depend on the luminance of the background, scene contrast, or levels of light in the scene.
PS. In some cases, there are no areas with obvious compositionally-important highlights in the scene that are big enough to meter off. In such cases, one can spot-meter from the shadows and use a negative compensation, corresponding to the useful dynamic range of the camera at the given ISO. Metering off the shadows guarantees that the shadows are placed where you want them to be, thus you can prevent the shadows from drowning in noise, which is important if you plan to edit them further and want them to have good precision (“enough bits”) to stay sufficiently detailed, artifact-free, and smooth.
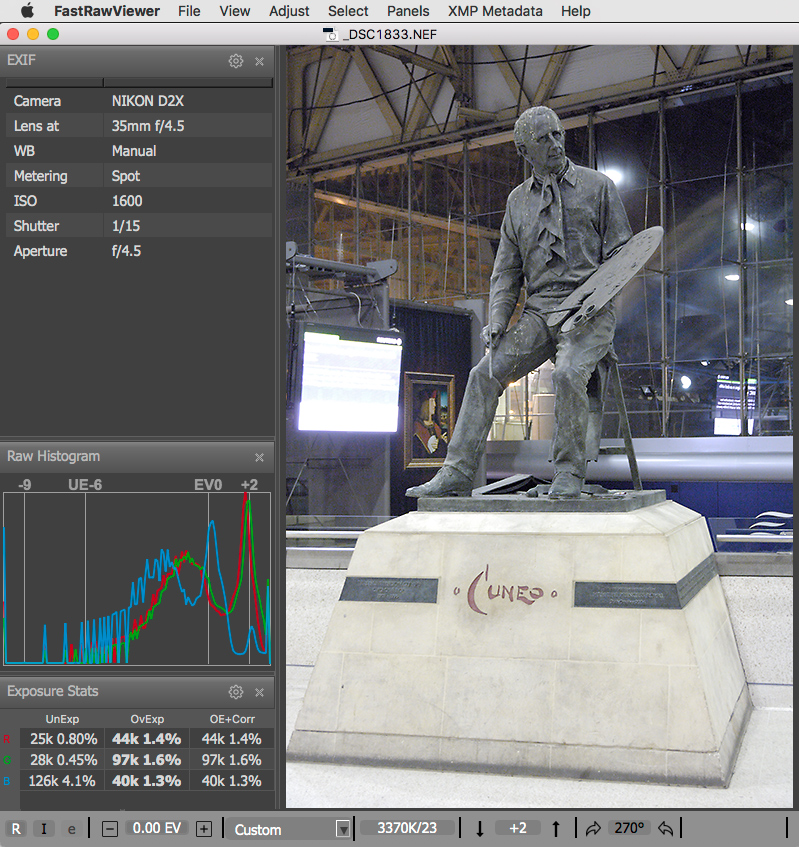
Figure 10. Sculpture of Terence Cuneo (at the moment when it was still standing at London Waterloo station)
In this case, the spotmeter is used on the shadows of the sculpture, with a compensation of -3 EV…
Automatic exposure, even under much more favorable lighting conditions, in this case leads to less successful results.
Undoubtedly, shooting using spot-metering off the shadows, unlike it is with metering off the highlights, requires doing a bit more homework. To calculate correctly the negative compensation needed, one would have to complete an analysis of the dynamic range of the camera for a given ISO, as described in the article How to Use the Full Photographical Dynamic Range of Your Camera (unfortunately, using dynamic range values obtained via the internet can leave one disappointed).
Comments
Pictoraider (not verified)
Thu, 02/08/2024 - 06:46
Permalink
Precise details of your existing light measurement
Hi,
You write and repeat that, generally speaking, between the average exposure recommended by the digital camera's spotmeter and the maximun exposure authorized by the sensot, there is approximately +3EV. Insofar as the average exposure recommended by the digital camera's spotmeter serves as an absolute reference, I feel it's necessary to specify the conditions under which it is obtained.
Let's assume that everything take place indoors, in a studio with black-painted walls and ceiling, with fully controlled homogeneous light such as that provided by a studio contineous lightsource. Based on this, I assume that you determine the exposure addition that leads to optimun exposure for a given digital camera by varying the power of the studio contineous lightsource in 1/10 EV steps until the first signs of clipping appear in the raw file. In any case, we need an absolute regerence, which is either the flashmeter meassurement, or the mesasurement of an 18% mid-gray chart - with precise instructions on how to apply either measurement.
Correct positionning and orientation of the flashmeter in relation to the lightsource is essential. Likewise, the correct positionning and orientation of the plane 2D 18% mid-gray chart in relation to the lightsource, and the correct positionning and orientation of the spotmeter - be it a Sekonic flashmeter or the camera's built-in spotmeter - in relation to this plane chart are equally crucial.
How do you measure light in order to photograph three-dimensional objects and subjects in the case of a frontal mono contineous lightsource positioned in the optical axis, and then in the case of a frontal mono contineous lightsource positioned laterally in relation to the optical axis :
- with a Sekonic flashmeter,
- with a 18% mid-gray chart, which is a 2D plane accessory, using either Sekonic spotmeter and/or camera's buil-in spotmeter.
Best regards,
LibRaw
Thu, 02/08/2024 - 10:11
Permalink
Dear Sir:
Dear Sir:
What is it that a spotmeter measures?
Do you have snow in your place and how do you meter for a snowy scene using a spotmeter?
What did Ansel Adams suggested?
Add new comment