
Submitted by LibRaw on
Fairly often, the dynamic range of a camera is calculated in a perfunctory manner, based only on measurements derived from the sensor and electronics, and ignoring the limitations to the dynamic range imposed by glare and flare.
Glare and flare, two effects very well known in photography, occur due to the reflections and scattering of the light in the optical system comprised of the lens, any filters or adapters on the lens, the camera chamber (which, incidentally, includes the autofocus/autoexposure module located at the bottom of the camera chamber in many dSLRs), and the sensor sandwich itself.
From experience, we all know that there is a significant and non-uniform drop in contrast (haze) across the frame if the sun (or some other light source) is located in the shot, or even worse, slightly outside the scene as it is framed for the shot. We all are also very familiar with the effect of lens flare, present as a series of lens iris shapes, on our shots (Figure 1).
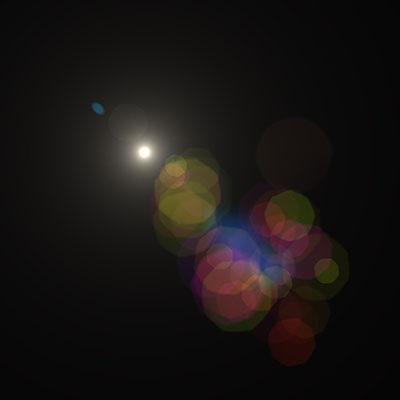
Figure 1. Lens Flare
Unfortunately, these well-known phenomena are usually ignored when estimating the dynamic range. Those very appealing large figures of dynamic range are usually obtained either from only the signal-to-noise measurements, or based on shots of low-contrast scenes. Such figures are not well-correlated with everyday shooting practice.
Of course, flare is estimated when a lens is tested, but not when cameras are tested. Moreover, the flare test results are not quantitative. Instead, they use descriptive terms like, “If the sun is in the corner of the frame, the resulting lens glare looks like this or that.” From experience though, we know it’s hard to predict the strength and position of the glare effects; even a small change in the position of the camera with respect source to the light source can change the effect dramatically.
For the purposes of this article, it is very important to realize that glare effects, being so fluid, are hard to automatically recognize and compensate for in RAW conversion and post-processing. Lens flare changes not only with the position of the camera relative to the light sources, but also with the focus distance, zoom position, aperture number, filter on the lens, amount of dust and fingerprints on the front element, and so on and so forth. To sum this up, if there is flare and glare, it is impossible to automatically compensate for it, and as a result it can’t be discounted when evaluating the practical dynamic range for high-contrast scenes.
Let’s make a rough estimation of the effect of the flare and glare using the following simple method. Let’s compose a scene with a light source and expose it in such a way that the RAW data for the light source is not clipped. We will observe glare and flare effects in the scene, and that will allow us to put a number to the dynamic range limitations. A piece of very dark cardboard with a hole, and a flat stabilized source of light, such as an LCD screen, will be the basic elements of the scene.
A high contrast scene is achieved when the LCD screen shines through the hole (Figure 2).
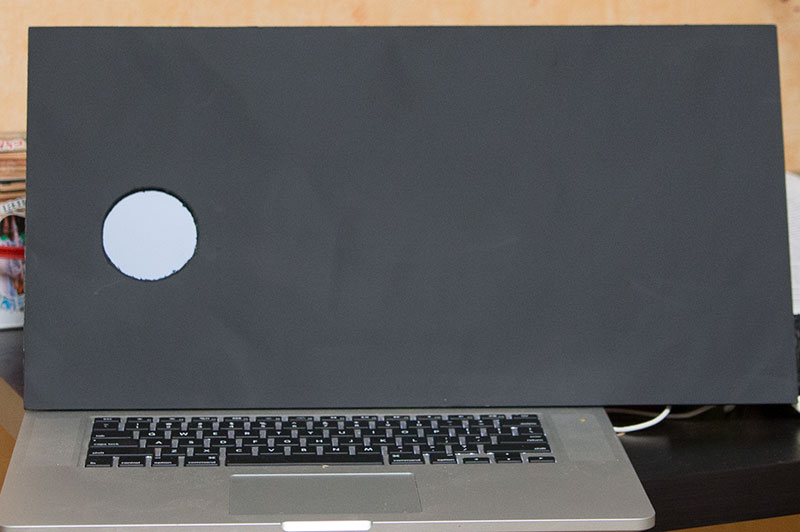
Figure 2. Setup 1 - High Contrast Scene
A low contrast scene is when the LCD screen is completely covered with cardboard (Figure 3).
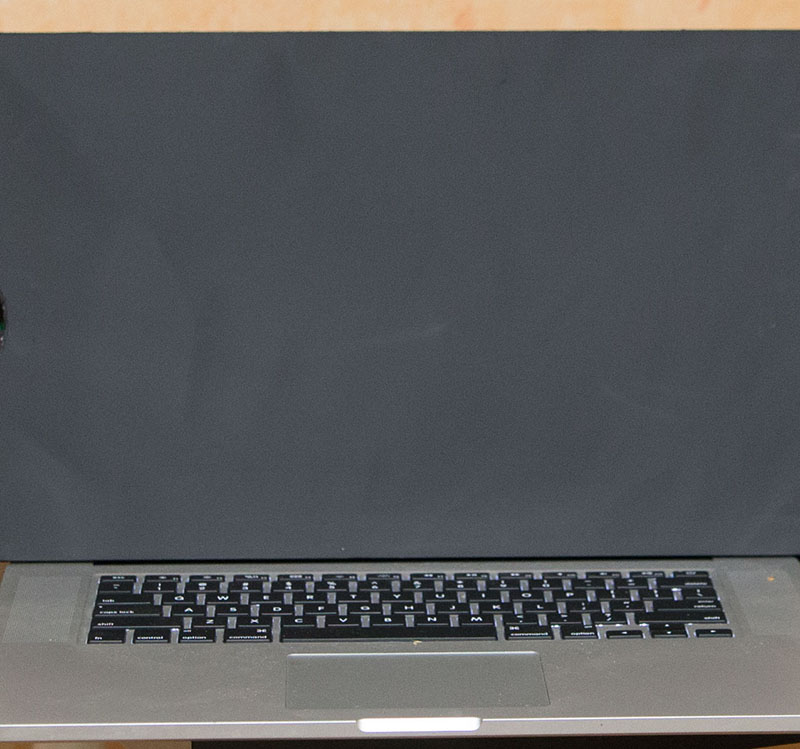
Figure 3. Setup 2 - Low Contrast Scene
We will be shooting in total darkness, covering the keyboard and the Apple logo on the back of the laptop screen with dark cloth, so as to not allow any stray light. We will be making 4 shots. The first shot will be with the LCD screen shining through the hole in the cardboard.
We will open this shot in RawDigger, place some samples around the image of the hole and elsewhere in the field.
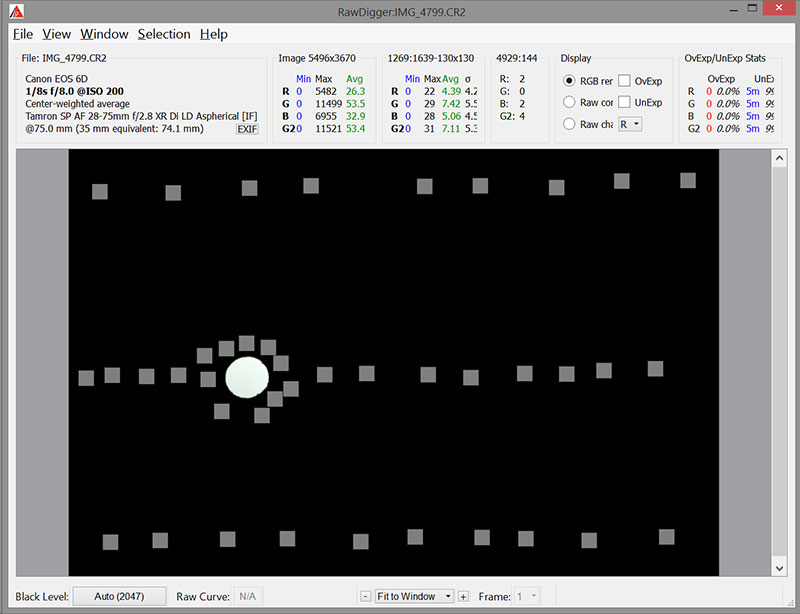
Figure 4. High Contrast Scene in RawDigger
Sampling the image of the hole itself, we can see that the maximum level is about 11,500 raw data numbers (DN, if we follow the accepted terminology), that is, rather far from clipping.
You can bracket for this shot to be sure the data is not clipped, but close enough to clipping (about one third of a stop below the clipping point).
Next, we will take the second shot, with the cardboard fully covering the screen, with the same exposure settings as the previous shot.
After that, the third shot, with the lens cap on. We will use this as a reference for the black level. Opening this shot in RawDigger, we see that the average black level in the shot is about 2 DN.
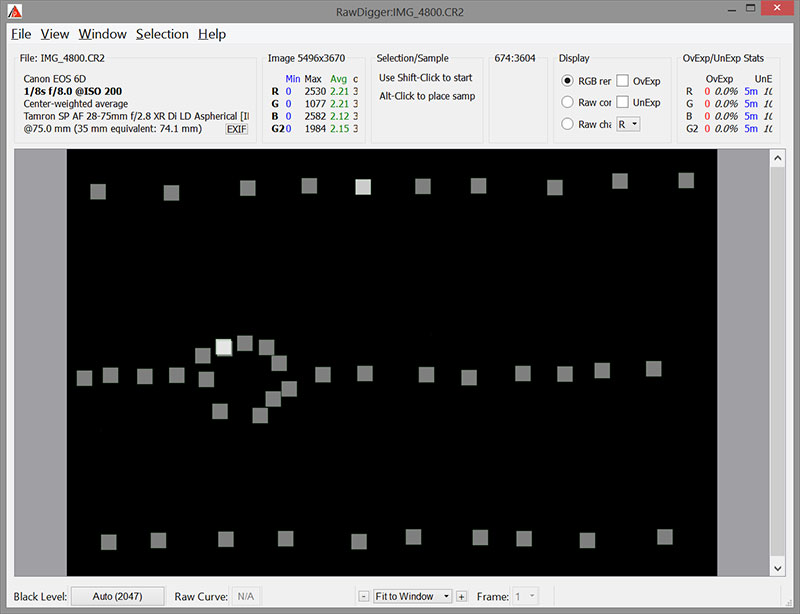
Figure 5. Low Contrast Scene in RawDigger
Finally, the fourth shot. For this one, we will be shooting the monitor shining through the hole, but with exposure seven stops higher (here you can add 6 to 8 stops, usually; we’ve chosen 7) than for the previous three shots. This way, we can plainly see the artifacts of glare and flare and use the locations of those artifacts for placing samples in the first shot.
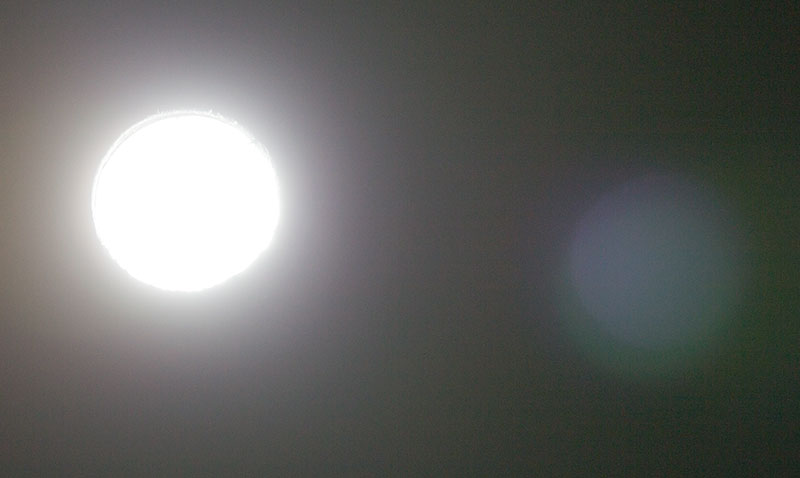
Figure 6. High Contrast Scene Taken with Exposure +7EV
Looking at the numbers, we can see that in the green channel we have an average intensity of 10,500 DN on the bright spot (image of the hole itself) on the first shot (Figure 4). The average intensities on the second and third shots are about 2 DN each (Figure 5). So, essentially, there was no stray light on the second shot and the level of 2 DN represents the base level (sort of base+fog in the traditional, film, densitometry).
Examining the green channel values by placing the samples close to the image of the hole, we can see that a certain amount of veiling due to glare and flare is present:
- For the Tamron 28-75@55mm, the veiling is 11 DN above the base level.
- For the Canon 70-200/4 IS L, the veiling is 18 DN above the base level.
- For the Zeiss 100/2 Macro, the veiling is 7 DN above the base level.
Placing the samples in arbitrary locations in the 1st shot, as well as in particular over the areas where the secondary images of the lens aperture are (those are clearly visible on the 4th shot, and we can determine the necessary locations from here), we can see that veiling intensity is lower, but it is clearly present; 5 DN above base for the Canon lens, and 1-3 for Zeiss and Tamron.
Converting (the above-base DN) into photographic stops, the local dynamic range for the Zeiss lens is about 10.5 stops. For the Tamron lens it is 10 stops, and for the Canon lens it is 9.5 stops. This local dynamic range, that is the dynamic range for the areas close to the image of the bright spot, limits the reproduction of the details for this particular light source. This means that any image details outside this dynamic range will be completely unreliable because they are ‘overlightened’ by the flare and glare, and consist mainly of the artifacts induced by the optical system.
Veiling glare also affects the image areas that are located relatively far from the bright spot, but it still limits the dynamic range to 11 stops for the Canon lens, and 11.5 stops for the Tamron and Zeiss lenses. Details in shadows deeper than that are sunk in the veiling glare.
Another interesting consequence of the black level being effectively several units above base is the skewing of the white balance. Because the veil is affecting all of the “color” channels in raw more or less equally, after white balance is applied, and red and blue channels are boosted while the green is left unaffected by the white balance, deep shadows turn magenta-reddish. For example, if the veil is 5 DN in each channel, and the numbers for the white balance are 1.6 in the red and blue channels, after the application of this white balance, we will have 8 DN in the red and blue channels, but still only 5 DN in the green. That means we have “minus green,” or in other words, magenta-reddish shadows instead of black. This also limits our ability to dig into the shadows, unless we are prepared to preform an editing session specifically to correct the color tint in the shadows.
Quick summary:
- While the engineering dynamic range of the modern full-frame cameras at low ISO is reaching 14 EV according to standard signal-to-noise measurements, for practical shooting it is limited by the drop of the contrast caused by the optical system (and that is not starting on banding and other types of artifacts).
- This reduction of contrast caused by the optical system stands in the way of the multi-shot HDR technique, since the veiling occurs during the time of the exposure. This means that the range between -12 and -14 EV from clipping can hardly be used for the recovery of clean details with natural contrast. For the lenses we tested, this area was polluted with artifacts produced by the optical system.
- The quality of the coating, the cleanliness of the lens and sensor surfaces, and the quality of the black finish of camera chamber and any adapters are all critically important to minimize the contrast loss due to veiling glare and flare and thus to preserve as much of the dynamic range as possible. The design of the camera chamber and the location of the baffle that prevents reflections from autoexposure and autofocus sensors are equally important (as we’ve just seen with Nikon D750).
- Improving the camera electronics and sensors by reducing the level of noise and non-uniformity artifacts allows one to get better details up to approximately -11 EV from the clipping point, but it does not result in the straightforward increase of the photographical dynamic range beyond that. Incidentally, improving exposure technique can easily result in extracting an additional stop from the dynamic range by simply exposing to the right (ETTR).
The Unique Essential Workflow Tool
for Every RAW Shooter
FastRawViewer is a must have; it's all you need for extremely fast and reliable culling, direct presentation, as well as for speeding up of the conversion stage of any amounts of any RAW images of every format.

Now with Grid Mode View, Select/Deselect and Multiple Files operations, Screen Sharpening, Highlight Inspection and more.
2 Comments
Images missing
Submitted by Fabien AUDRY (not verified) on
Hello, thanks for your article(s),
I have not read this one thoroughly yet, but the first thing I notice is that images won't show. The files seem to be missing (or is that a problem of mine ? I tried different web browsers, though).
Kind regards,
Fabien
Thank you for you
Submitted by lexa on
Thank you for you notification!
Pictures magically disappeared from Amazon S3 storage. Recovered from backup. Sorry.
Add new comment