How To Use RawDigger

ISO is Seldom just a Digital Gain

RawDigger. Raw histogram. Digital ISO 25600

Some say, "exactly like dragging exposure slider in Lightroom, ISO ... is just digital gain".

With a few exceptions, this is less than a half-truth.

Though it is often the case that at higher ISO settings digital "gain" is applied (or a converter, using a metadata tag, is instructed to apply it), analog gain still acts first, before "digital gain" (the better word would be "multiplication", not gain, as in electronics "gain" most often pertains to analog domain).

The giveaway for multiplication is deep and regular gaps in the raw histogram that become wider with each increase of ISO setting.

New Old Approach to Dynamic Range

Michal Bednarek (Niserin)

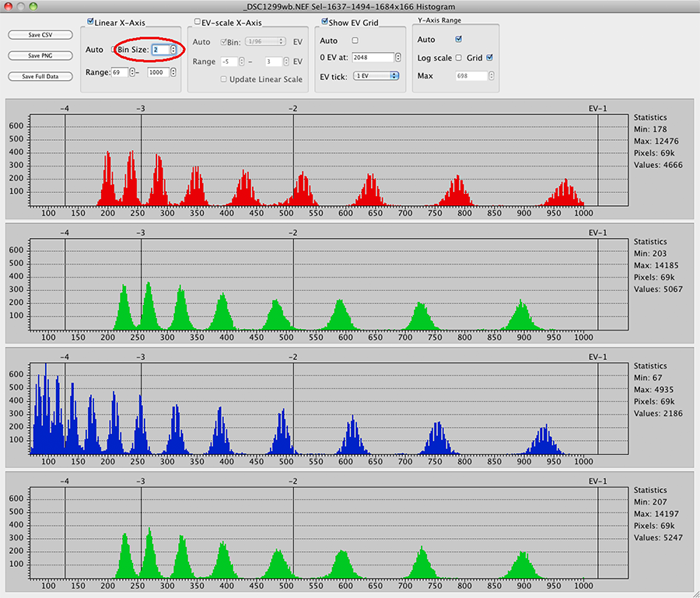
In today's world, "dynamic range" (DR) has become, in the minds of (many) photographers one of the main characteristics of a digital camera.

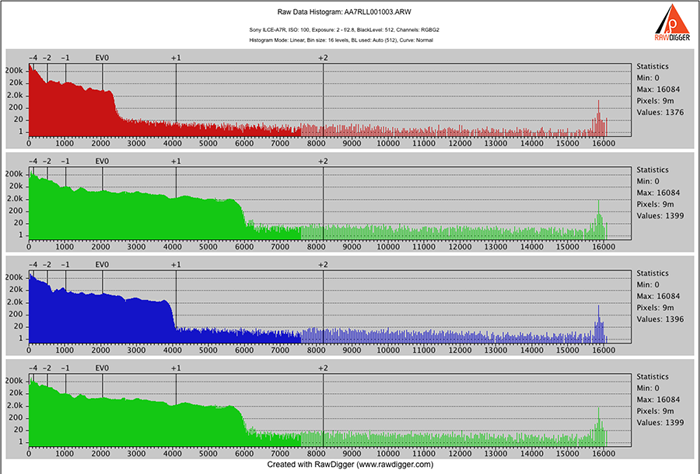
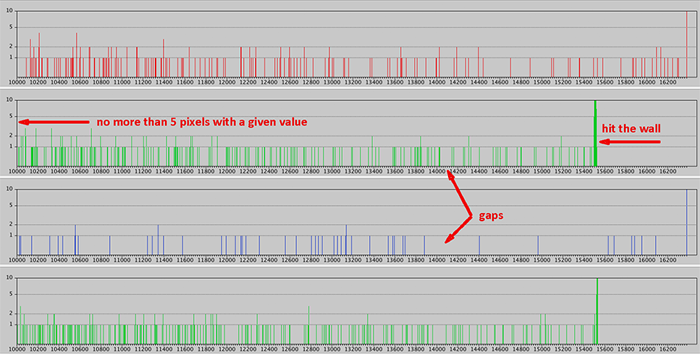
Unfortunately, the public data on DR is limited to "DD - ISO sensitivity" graphs and tables. With this, the nature of noise (for example, random noise, banding) isn't accounted for, however the noise character is important for visual quality.

In reality, any practicing photographer knows that the degradation of the image in the shadows (or because of low exposure) happens gradually, there is no strict demarcating line. It's just that with the lowering of exposure, small details disappear, the contrast between bigger details diminishes, color fidelity becomes worse. Depending on the quality demanded of the image (which will depend on presentation size, viewing distance, other viewing conditions such as screen resolution, etc.,), the practical dynamic range for the specific camera will be different, even for the same ISO setting.

How to Use the Full Photographical Dynamic Range of Your Camera

FastRawViewer. Optimally exposed RAW

Consider the following scenario - you've just found out that your camera, at a certain ISO, has a dynamic range of 11 stops. Now, that's all well and good, but how does one go about using all 11 stops? It's not an automatic process, after all. Our answer? Expose optimally for RAW.

To elaborate on that a little, let's start by showing you the consequences of non-optimal exposure for RAW.

Deriving Hidden Baseline Exposure Compensation Applied by a Raw Converter

ACR Process 2010 Default Settings

As we already mentioned in the previous article “Forcing a Raw Converter to Render Tones Accurately”, most raw converters apply some hidden adjustments to a raw shot, often resulting in a bumped mid-tone, clipped highlights, and compressed shadows. This is done to make the shot look good, but can also lead to all sorts of confusion.

Here, we intend to show you how to determine what sort of unseen exposure correction is being applied to your raw shots by your raw converter.

Forcing a Raw Converter to Render Tones Accurately

"What happens to my mid-tones? I set exposure using exposure meter; open the shot in Adobe Lr (or Adobe Camera Raw, or some other converter) - the shot looks overexposed and everything starting from mid-tone and up looks very flat. If I shoot RAW+JPEG, JPEG looks OK, while RAW is not. Should I expose lower?"

Df_CT02.NEF in ACR - image looks overexposed and flat on the higher tones

Please don't lower the exposure, you will be underexposing by more than 1 stop additionally to the underexposure due to camera meter calibration. Not a great idea, especially if the light is low and you are already above ISO 400.

Instead, change the default settings in your raw converter (read on for a suggestion) or adjust on a per image basis. Having customized defaults, however, will save you a lot of time down the road.

Obtaining Device Data for Color Profiling

RawDigger Target with Grid Placed

The RawDigger Profile Edition is successfully used for creating device data for color profiling of photo cameras; the profiles can be used for RAW conversion.

The Profile Edition allows one to digitize RAW values directly from the shot of the target, and export the results in the standard CGATS format, which can be read by most profiling software, including the free Argyll and DCamProf. The values can also be exported in the CSV format.

Using a separate shot of a grey card, or any matte surface ("Flat field"), compensation for target lighting non-uniformity (both for intensity and for white balance) can be done.

RawDigger Histograms, part 3: Overexposure Shapes

RawDigger.

Different cameras, even if based on the same sensor, may render extreme highlights at around clipping point differently, and differently, with different values of clipping points, depending on ISO setting. It is important to recognize the look and calculate the practical clipping point, which is not always the same as the maximum raw value.

Here we will try to demonstrate the typical “looks” of the histogram of the clipping zone.

RawDigger histograms: Part 1. What is the raw data histogram?

RawDigger. What is a histogram?

This article is the first of a series, dedicated to explaining what is the histogram of raw data, what are the various ways of exploring it in RawDigger, how it can help to better understand how your camera functions, and how it can aid in improving your shooting through better understanding of raw data. In this one, we are going show you how to navigate the RawDigger histogram.

Before we get to any of this, however, let’s define what exactly IS a histogram of raw data?

Note: If you know what a histogram is, and know the difference between the histogram on the back of the camera and the histogram of the raw data, feel free to skip to the next part. But maybe even if you think you know all about the histograms the below is worth reading.

Pages

Subscribe to How To Use RawDigger