Submitted by LibRaw on
We've already received a lot of feedback where the effect of the highlights being preserved in the auxiliary subframe is attributed to the parallax and the razor-thin shape of the highlights in the still-life shot, not to what it really is: a ≈1 stop difference in clipping between main and auxiliary subframes.
Let's clarify the subject.
A Canon 5D Mark IV sensor contains two sets of pixels, A and B. Charge stored in pixels of each set is converted into a 14-bit value. The main subframe is formed by (A + B) values, the auxiliary subframe contains only A pixels values. The CR2 format for the Canon 5D Mark IV is also 14-bit, thus the values in the main subframe are limited by 14 bits, with the maximum allowed number being 16,383.
Given the limitation on the number of bits, when A and B are added together to form the main subframe, the result for each pair of sub-pixels needs to be clipped to 14 bits. In other words, suppose, neighboring A and B sub-pixels have a value of 8,000; the resultant sum in the main frame is 16,000, and this is OK, the result can be represented in 14 bits, because it is less then 16,383. But as soon as the sum is greater then 16,383, the result is clipped to 16,383. For example, if neighboring A and B sub-pixels have a value of 10,000, the resulting sum for those sub-pixels recorded to the main subframe will be not their straight sum, 20,000 (as 20,000 can't be represented in 14 bits, it exceeds 16,383). Instead, the respective resulting value in the main subframe will be clipped to 16,383. In the auxiliary subframe, however, we will have 10,000 and no clipping, since 10,000 < 16,383.
As you can see from the above, where the main subframe contains clipped values, the auxiliary subframe may contain true, non-clipped values. That is how that additional ≈1 stop of headroom in highlights for the auxiliary subframe emerges.
Given the mechanism behind the formation and recording of dual-pixel raw data, there is no relation to the size or shape of the highlight area.
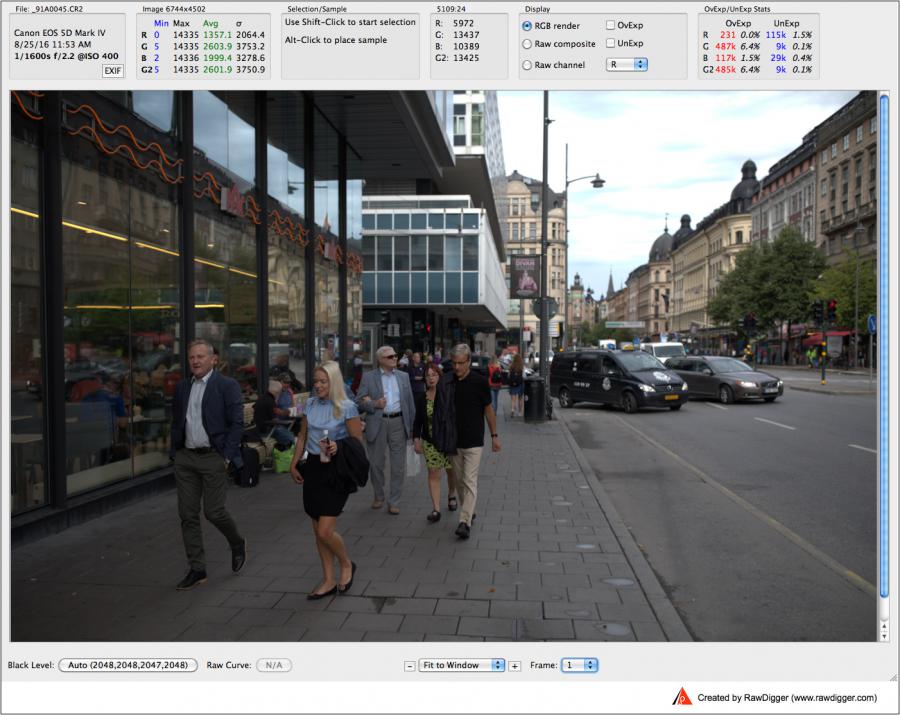
To give an example, please consider this photo by Calle Rosenqvist / Kamera & Bild, a dual-pixel raw taken at ISO 400, (you can download it from page 3 of the article, it is the street scene shot _91A0045.CR2).
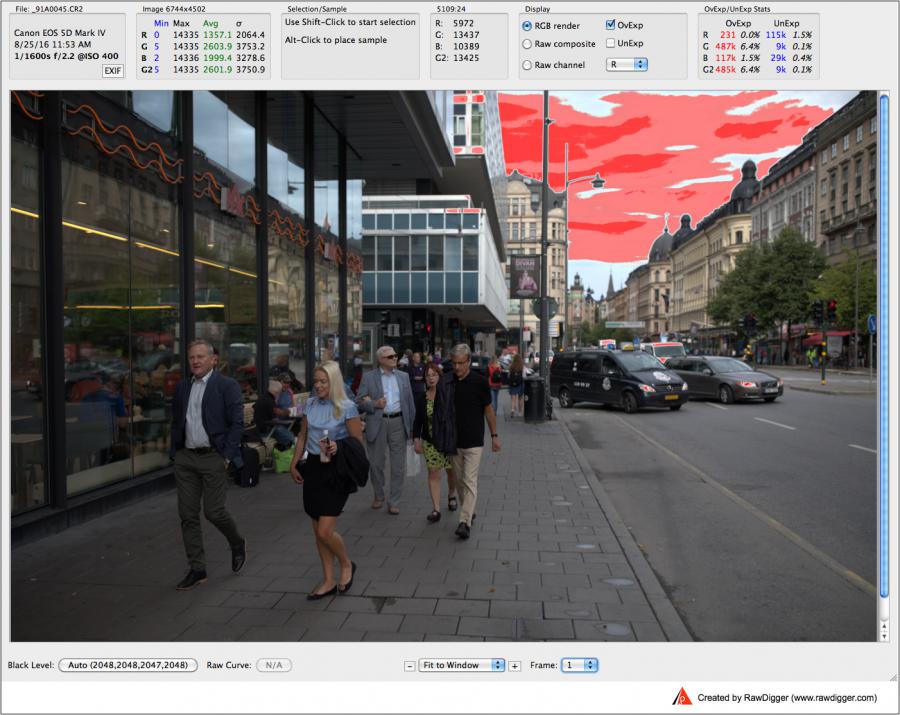
The main subframe of the shot has the sky blown-out:
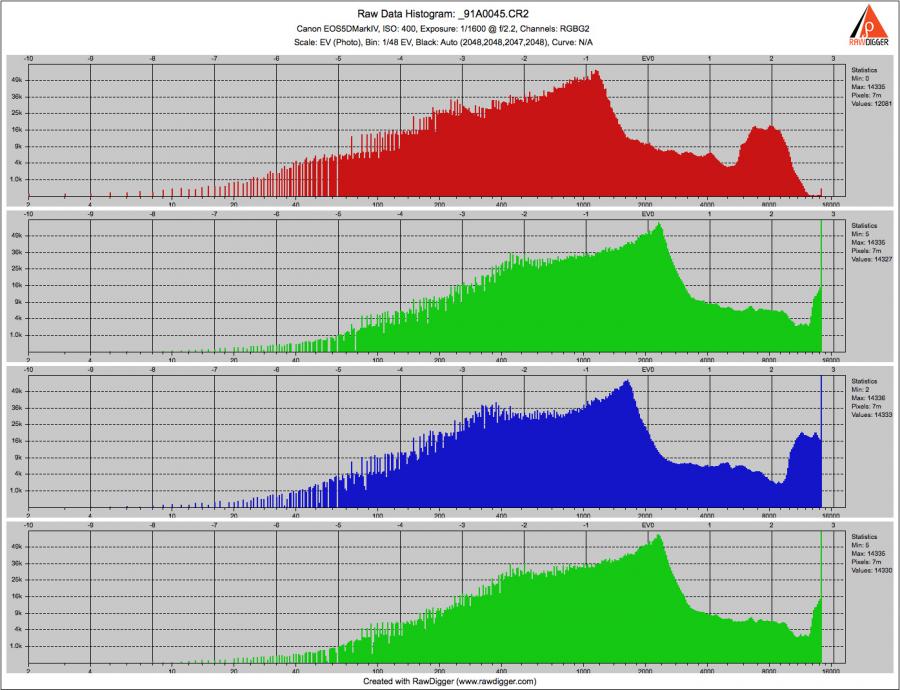
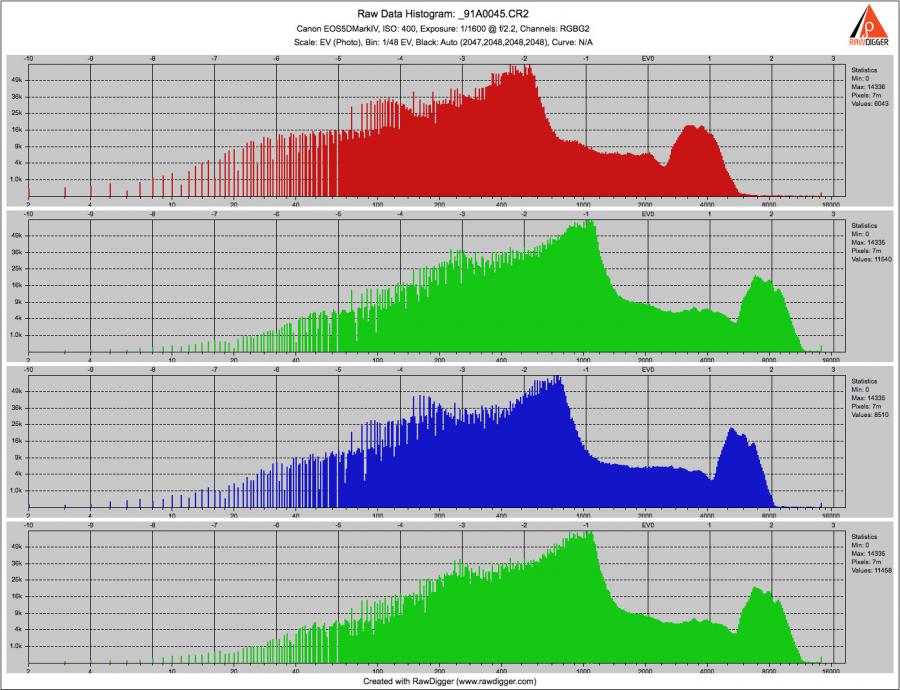
The histogram of the main subframe indicates that common "hit the wall" type of clipping; this clipping is pretty extensive in the both green channels and in the blue channel.
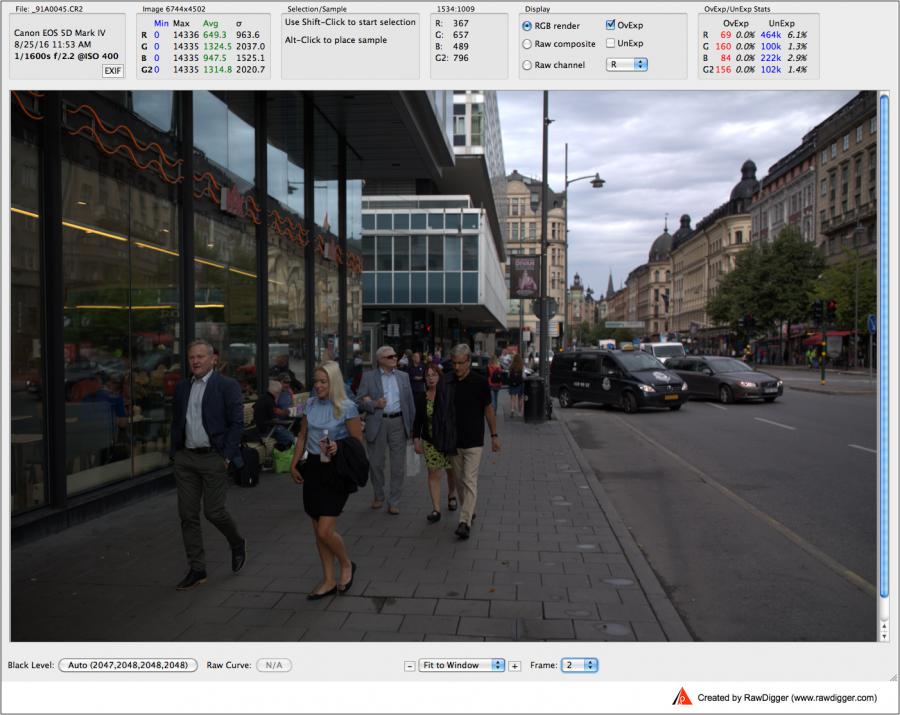
On the auxiliary subframe the clipping is minimal (if you look carefully you will see that there is Overexposure indication on the small part of the headlight of the right car and on the couple more lights in the scene)
Its histogram confirms this statement:
This is definitely not a case with some razor-thin highlights: the main frame has a rather extensive blown out area that, as we see, can be recovered using the data from the auxiliary subframe.
One more thing. When we say that Dual Pixel mode allows an additional ≈1 stop of headroom in highlights for the auxiliary subframe we mean the following: there is about a 2x (a stop) difference between the value 8192 in the A / B pixel sets, where their sum, used to form the main subframe value, starts to clip, and the 14,000..15,000 value where A, and consequently the auxiliary subframe, starts to clip. Thus, it is close to a one-stop difference between clipping in the main subframe containing sums of the values from the "A" and "B" pixel sets and the auxiliary subframe containing the values only from the "A" pixel set.
On a side note, a nice demo of re-focusing on the same street shot using Dual Pixel mode in DPP is on the page 4 of the same article by Calle Rosenqvist.
The Unique Essential Workflow Tool
for Every RAW Shooter
FastRawViewer is a must have; it's all you need for extremely fast and reliable culling, direct presentation, as well as for speeding up of the conversion stage of any amounts of any RAW images of every format.
Now with Grid Mode View, Select/Deselect and Multiple Files operations, Screen Sharpening, Highlight Inspection and more.

6 Comments
How to use aux frame highlights?
Submitted by RK Chamberlain (not verified) on
I understand less than half of this, but... how do we take advantage of the additional highlights in the auxillary subframe?
I downloaded two of the Image Resource files. One with dual pixels, one without. Both ISO 100. Converted each twice in DPP. Once with no highlight recovery, one with max highlight recovery. Unfortunately the 2 images were 1 stop off in base exposure, but I fished around (in Photoshop) on the speculars on the salt shaker to find 3x3 sample points with the same beginning RGB values = 253/253/254.
DPP highlight recovery lowered both sample points by the same amount, about 4 points. Seems that DPP is not taking advantage of the additional range in the dual pixel. I'm not a regular DPP user, just forced to use it for a while. Of course we don't know yet what ACR and other raw converters will do. So is using the additional highlights in the aux frame something we have to wait for until raw converters to catch up?
Dear Sir:
Submitted by Iliah Borg on
Dear Sir:
Let's first establish what is the highlight recovery in DPP for dual-pixel mode. Could you please download the street scene and see if it recovers the sky.
--
Best regards,
Iliah Borg
DPP does not recover any of
Submitted by RK Chamberlain (not verified) on
DPP does not recover any of the highlights in the sky of the Rosenqvist street scene. Even with -5 Highlight and -3 Brightness there is no detail in the sky. Stangely, when you launch the "Dual Pixel Raw Optimizer" within DPP, it shows a preview with good detail in that sky. However, there are no tools in that option to allow highlight recovery. The image returned from that tool does not match the preview inside the tool.
I suspect that means DPP is currently not capable of using the aux frame to recover highlights. So my question remains, how do we access that auxillary subframe. I imagine the answer is, "Wait and see".
Dear Sir:
Submitted by Iliah Borg on
Dear Sir:
> DPP does not recover any of the highlights in the sky of the Rosenqvist street scene
That is my experience too. Thank you for the confirmation. I hope that Canon will be working on it more, and so do other software vendors.
Currently, you can export both sub-frames with RawDigger, and combine in Photoshop.
--
Best regards,
Iliah Borg
Seperate RAW files
Submitted by Felix Winkelnkemper (not verified) on
Do you think it would be possible in the case that Adobe et al won't use this additional data, to somehow split the RAW file into two seperate RAW files with which we could work independently?
Dear Sir:
Submitted by Iliah Borg on
Dear Sir:
Current version of RawDigger will export separate TIFF files to work with.
--
Best regards,
Iliah Borg
Add new comment