
Submitted by Iliah Borg on
First published on PhotographyLife
As we already mentioned in the previous article “Forcing a Raw Converter to Render Tones Accurately”, most raw converters apply some hidden adjustments to a raw shot, often resulting in a bumped mid-tone, clipped highlights, and compressed shadows. This is done to make the shot look good, but can also lead to all sorts of confusion.
If you are using or planning to use some raw converter, you may want to know what “beautifiers” it applies, and their price.
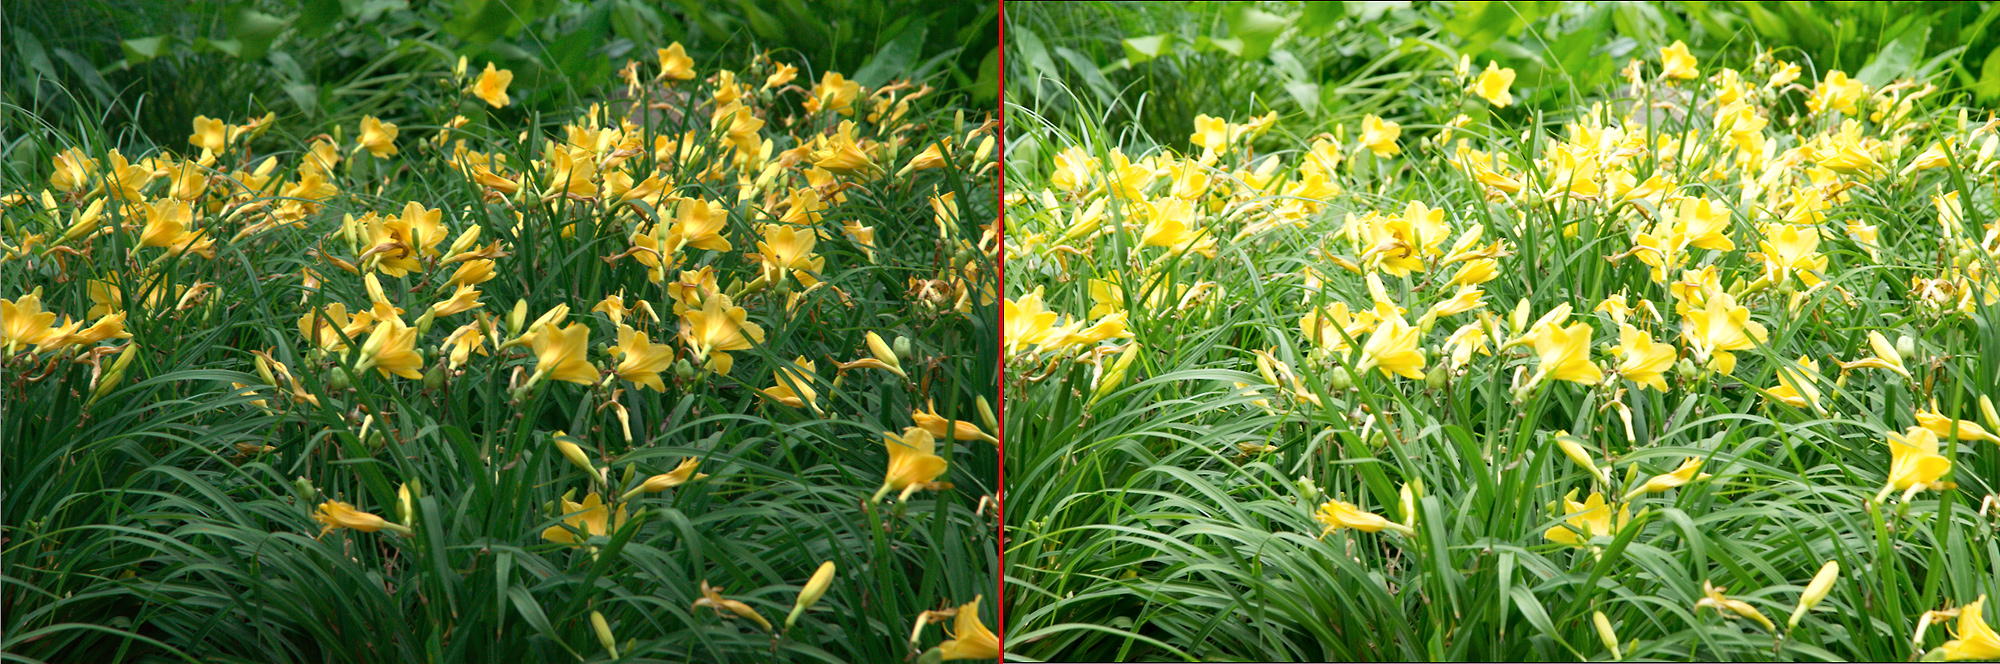
RAW view (left, RawDigger) vs. default preview (right, Adobe Camera Raw)
The brightening of the mid-tones that is done behind the scenes is one of the most common approaches to add punch to a raw image. It often leaves a false impression of properly exposed raw, as we are so accustomed to mixing up exposure and brightness, judging former by the latter. In fact, the shot may be underexposed, sometimes by more than 1 stop, and the price is more noise, more artifacts, less resolution, and, ultimately, getting a new camera, which doesn’t really solve the problem. Even avid ETTR practitioners can get into this trap, as they consider a histogram derived from the in-camera beautified conversion to be an indication of exposure. It isn’t.
The goal of this article is to demonstrate how you can find the hidden exposure compensation your converter is applying to your raw files when opening them. We will be dealing in depth with Adobe’s converters, but the same method stands for any other converter.
There are at least two practical reasons to investigate hidden exposure compensation in raw converters. The first one is to improve exposure practice; the second is to determine which highlights can be brought back safely. That hidden exposure compensation is the exact amount you can pull the exposure slider to get the highlights back, before the software resorts to interpolation to guess what was in the blown-out highlights.
In the previous article, we demonstrated how to linearize (to zero out) the default settings in an Adobe raw converter, or in other words, how to override Adobe’s hidden corrections to contrast, brightness, black level, and tone curve (actually, in film terms, all of the above is characteristic curve).
The algorithm was pretty straightforward:
- Open an Adobe raw converter
- Switch to Process Version 2010 (PV2010) and
- Set the Curve to Linear,
- Set the Black point, the Contrast, and the Brightness all to zero
- Switch back to Process Version 2012 (PV2012); now all of the settings are changed automatically and they replicate the “look of brightness” of the image you previously had in PV2010.
- We demonstrated in the previous article that the brightness is now in “repro”, linear mode, except for Baseline Exposure.
- For Adobe raw converters, the zeroed-out PV2012 (without accounting for Baseline Exposure compensation) has the following settings:
| Exposure = -1 (yes, minus one stop) | |
| Contrast = -33 | |
| Black = +25 | |
| Custom Curve (the converter, be it ACR or Lr, will automatically calculate it for you when switching from PV2010 to PV2012) |
- Subtract Baseline Exposure compensation (BLE) from Exposure, so that now Exposure = -1-BLE
- We didn’t show how to find Baseline Exposure for your camera(s), but for the purposes of the demonstration we used 0.25, since it is Nikon Df’s Baseline Exposure for the ISO we used to make the shots for the experiments
- Save the resulting settings and name them (optionally, you can set them as defaults).
Now, we are ready to find out the value of that important ingredient in Adobe’s hidden corrections recipe, the Baseline Exposure compensation.
How to Find the Value for Baseline Exposure (BLE)?
Let’s start with the problem Baseline Exposure is trying to address:
“Camera models vary in the trade-off they make between highlight headroom and shadow noise. Some leave a significant amount of highlight headroom during a normal exposure. This allows significant negative exposure compensation to be applied during raw conversion, but also means normal exposures will contain more shadow noise. Other models leave less headroom during normal exposures. This allows for less negative exposure compensation, but results in lower shadow noise for normal exposures.
Because of these differences, a raw converter needs to vary the zero point of its exposure compensation control from model to model. BaselineExposure specifies by how much (in EV units) to move the zero point. Positive values result in brighter default results, while negative values result in darker default results.”
Adobe DNG Specification p.38, Version 1.4.0.0, June 2012
It is important to note is that Baseline Exposure (BLE) may depend on the ISO setting, not only on the camera make/model.
Generally, there are two ways to determine the amount of this silent (hidden) exposure compensation (which is applied when the exposure compensation slider is set to zero): (I) to read the Baseline Exposure value from the DNG EXIF data, or (II) to derive it directly from the raw files. The first method is simpler, but the second is more fun as you will learn some interesting things about your camera while following it.
I. Reading Baseline Exposure Value from EXIF Data
Since Baseline Exposure (BLE) data is written in the EXIF metadata, but only for .dng files, to use the first method you have to convert the raw shots to DNG.
There are four caveats here:
- The first is that the EXIF data often contains the average BLE value for a camera 'make/model', while the real life numbers for your particular camera of the same make and model may differ, sometimes by as much as 1/3 EV.
- The second is that sometimes those BLE values in the DNG are incorrect.
- The third is that if you’re the happy owner of a new camera that is currently not supported by a DNG converter, you can't really convert to DNG.
- Finally, what if your converter is not an Adobe one?
II. Determining Baseline Exposure value (BLE) Directly from Original Raw Shots
This method will allow you to get the BLE values exactly for your camera, but it will take a little bit longer.
For either of those two methods you have to start with shooting.
- Note: Given that for many cameras the Baseline Exposure depends on the ISO setting, and that thus for different ISO values in the same camera we might have different BLE values, you may want to have shots from EVERY ISO setting you camera allows.
If you prefer Method II, skip to the Determining Baseline Exposure from the Raw Shots part below.
Reading Baseline Exposure from DNG File and Overriding It in a Raw Converter
1. Shooting
Make a series of shots of whatever subject you like (your lens cap is fine, too), on EACH and EVERY ISO your camera allows, including intermediate ISO values if available (because, as we noted above, Baseline Exposure valued may differ for different ISO values).
2. Converting to DNG
Convert all shots to DNG and keep them in one folder (naming it, say, DNG4experiment)
3. Reading BaselineExposure Values from the EXIF data
Here we have two options:
A. If you are not afraid of the command line
You need to download and install ExifTool (it is free and open source) and run it from command line (start Command Prompt if in Windows, Terminal if in OS X) with the following command line:
| exiftool -csv -make -model -iso -baselineexposure -r -ext dng /Users/il/Pictures/DNG4experiment > /Users/il/Pictures/DNG4experiment/make_model_ISO_BLE.csv |
/Users/il/Pictures/DNG4experiment above is the full address of the folder that contains your dng files you obtained at the previous step. Of course you can use any other name, both for the folder and for the output .csv file.
For the sake of the demonstration, we picked 10 .dng files at random, placed them in the folder named DNG4experiment, and ran ExifTool pasting the above-mentioned command line into the Terminal window:

Figure 1. ExifTool. Reading ISO and Baseline Exposure values from dng files and saving them as a .csv file
… and pressed Enter…

Figure 2. .csv file containing ISO/BLE data for all the .dng files in the folder is created
… resulting in make_model_ISO_BLE.csv file in the same DNG4experiment folder.
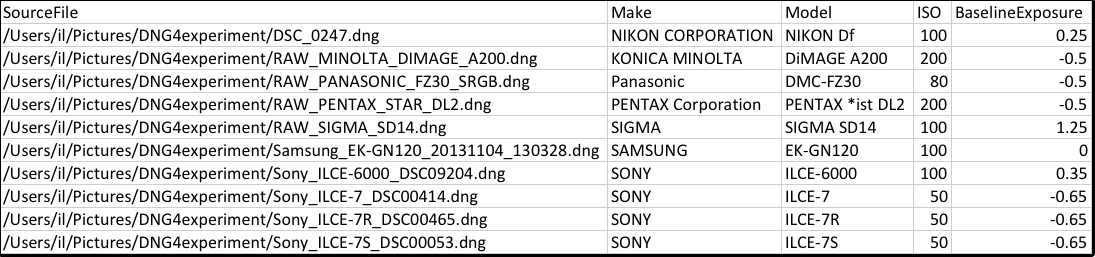
Figure 3. .csv data retrived from .dng files
Thus, you will have ISO/BLE data in one spreadsheet.
B. If you are not comfortable with the command line and prefer a Graphic User Interface
In this case you need RawDigger (you probably can also use some GUI around ExifTool too, instead – look those up on Phil Harvey’s page, under “Related Utilities”), and the lite RawDigger Exposure Edition will suit you perfectly well here. If you are not planning to switch to a new camera in a nearest future, a 30-day free trial should be quite enough for these purposes.
- Open RawDigger and in Preferences --> Misc options, in the 'Command line' field enter the -iso -baselineexposure string and press OK (you can add more parameters, like -model, as necessary; you can always press “Restore defaults” button to get the original line back)
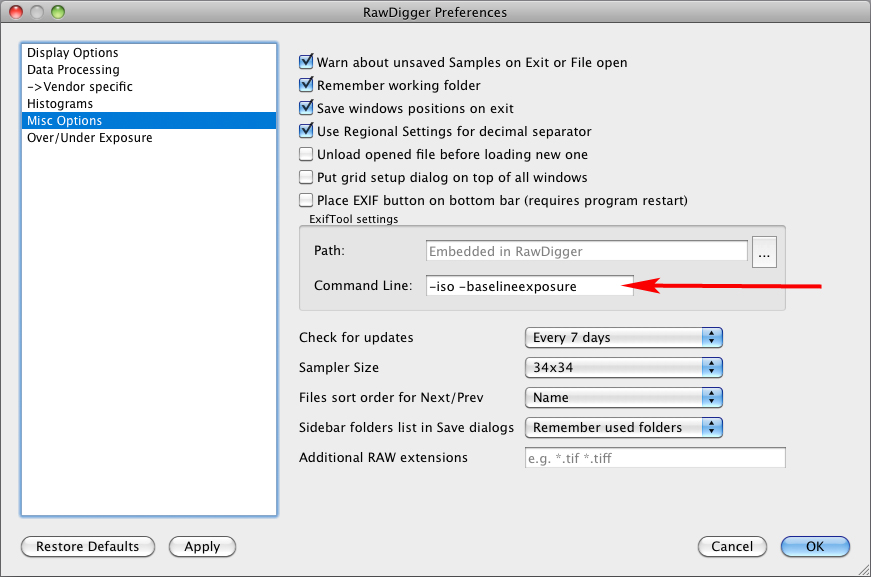
Figure 4. RawDigger. Command line for reading ISO and Baseline Exposure from .dng file
- For the demonstration below, we will use shots of the same scene with several (not all) different ISO settings on a Sony SLT A55V camera.
- Now for every .dng file:
- Open the .dng file in RawDigger and press the EXIF button (by default this button is located at the top bar, but you can change its location to the bottom bar by going to Preferences -> Misc option, checking ‘Place EXIF button on the bottom bar,’ and restarting the program)
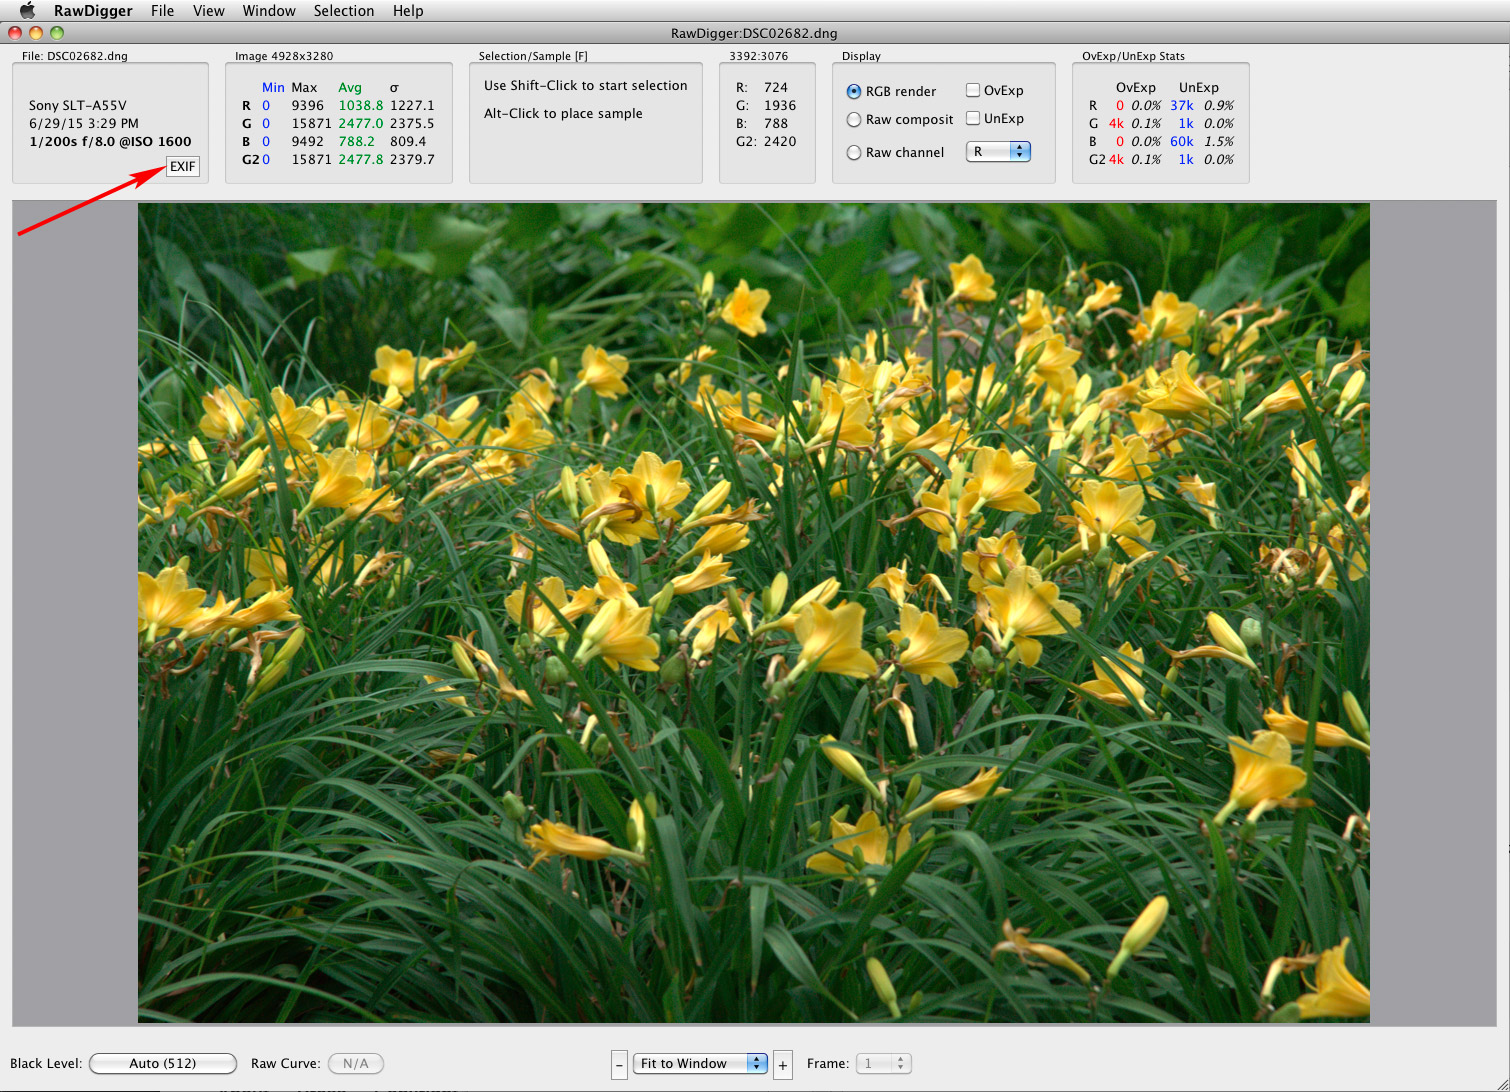
Figure 5. Press EXIF button
- Press the button "Copy to clipboard as text"
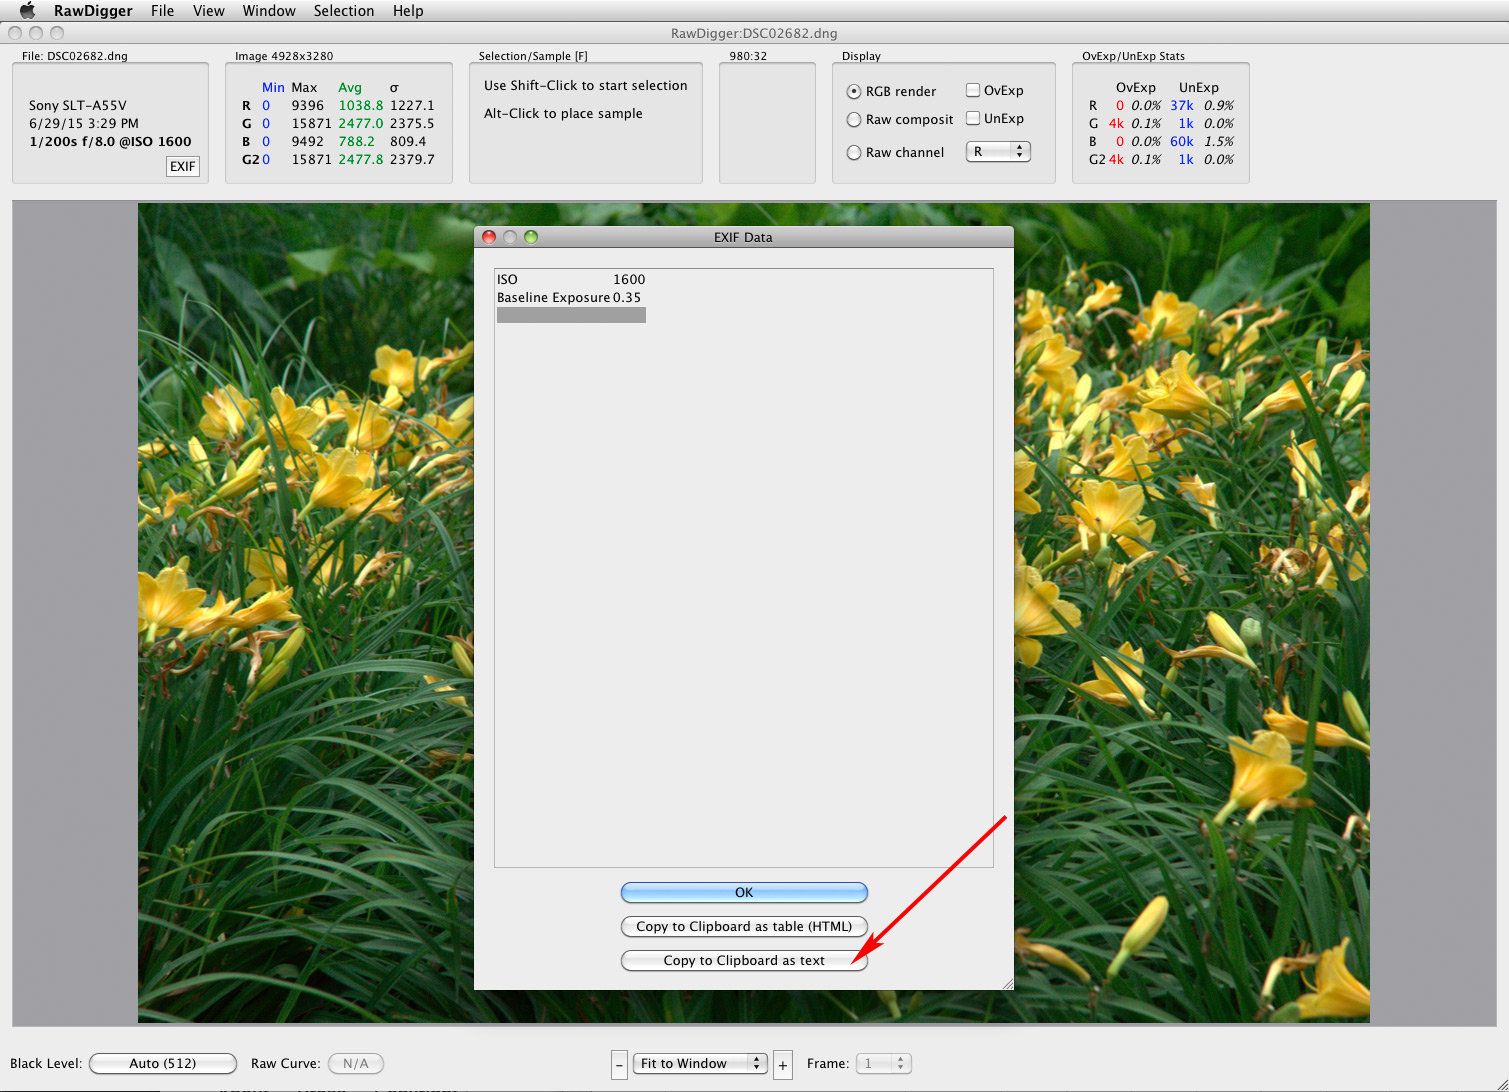
Figure 6. Copy ISO and Baseline Exposure values to Clipboard
- Paste the text from a clipboard to either an Excel spreadsheet or to a designated text document.

Figure 7. Pasted data from the clipboard
- Repeat pp. b.- d. for all .dng files from the folder (thus at the end, after some simple formatting, you will have a document which contains all combinations of ISO/Baseline Exposure)
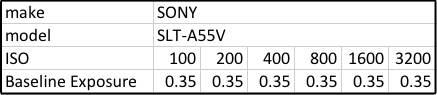
Figure 8. Formated spreadsheet with ISO and Baseline Exposure values
Now you have a full list of ISO/Baseline Exposure combinations for your camera.
4. Overriding Baseline Exposure Values in a Raw Converter
- Open a .dng file in Adobe Raw converter, switch to PV2010 (under “Camera Calibration”)
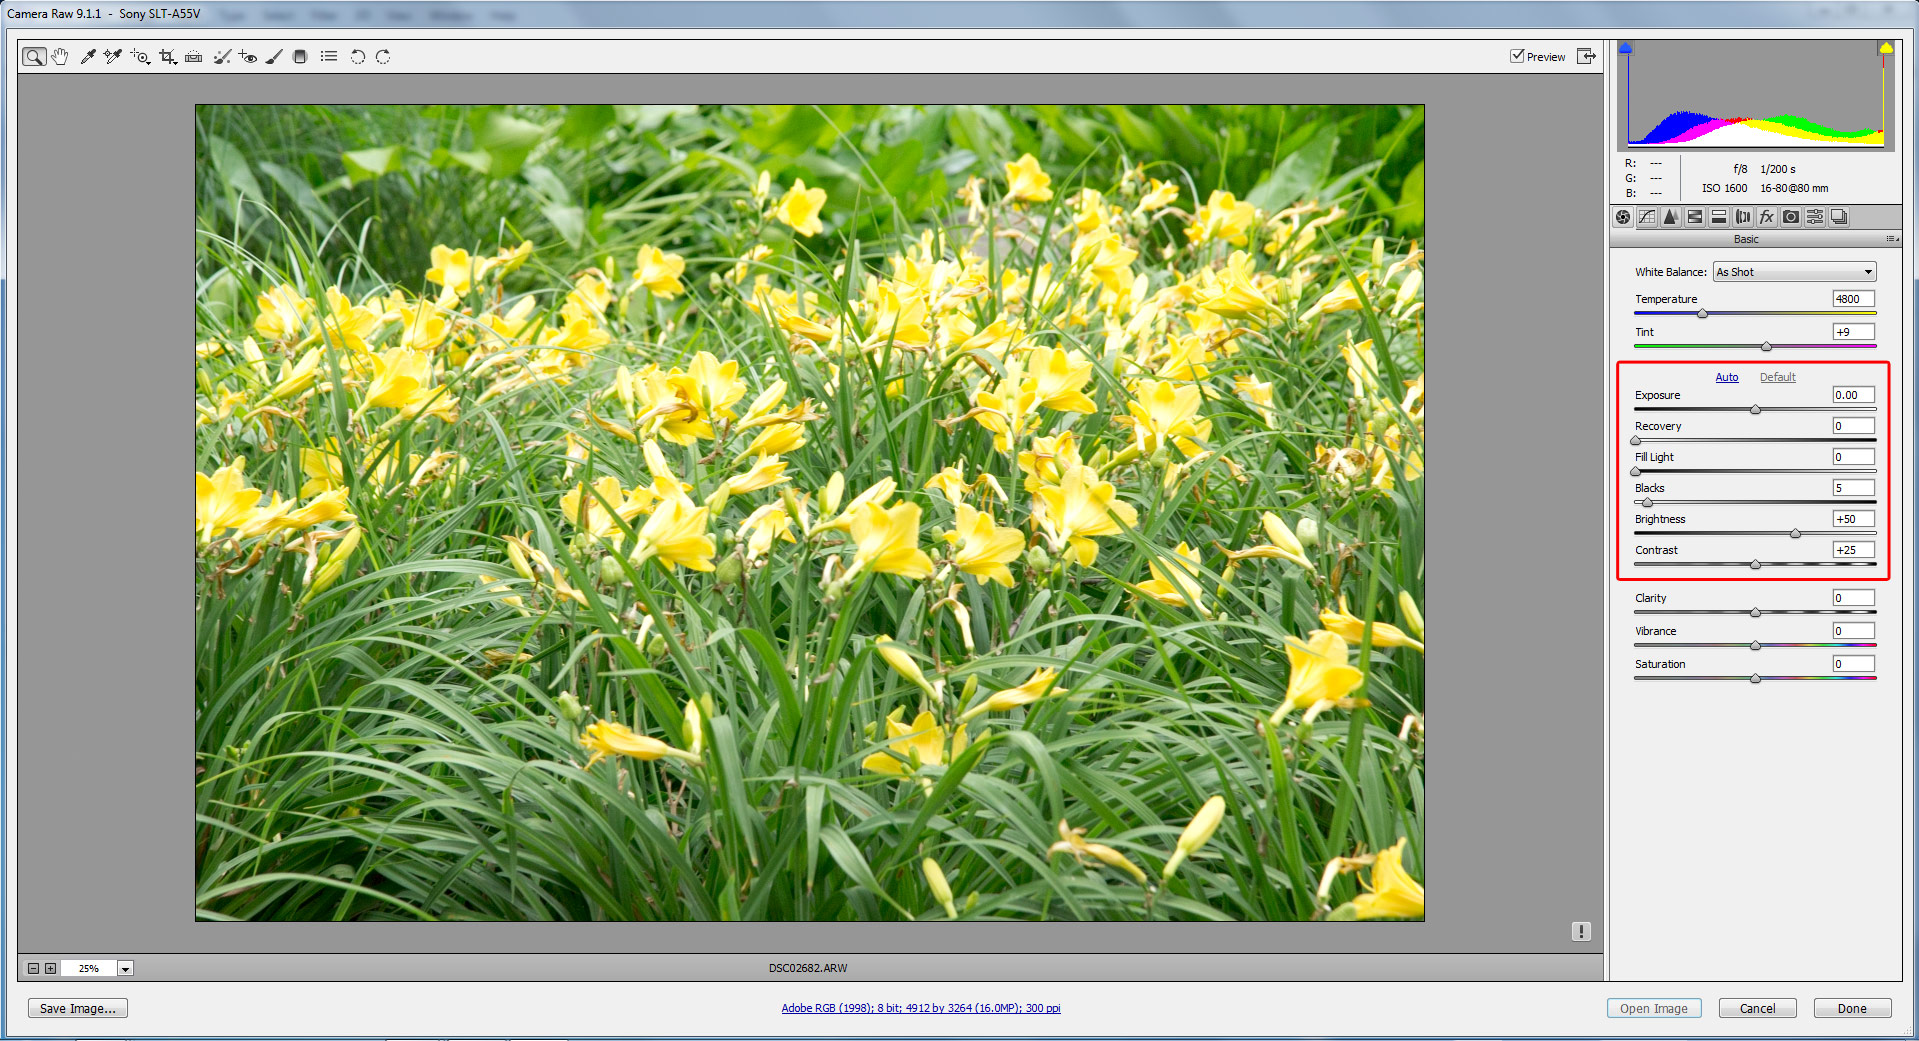
Figure 9. ACR. PV2010, default settings
- … and zero-out the default settings - set the curve to linear, and black point, contrast, brightness all to zero (by the way, see how the image has changed).
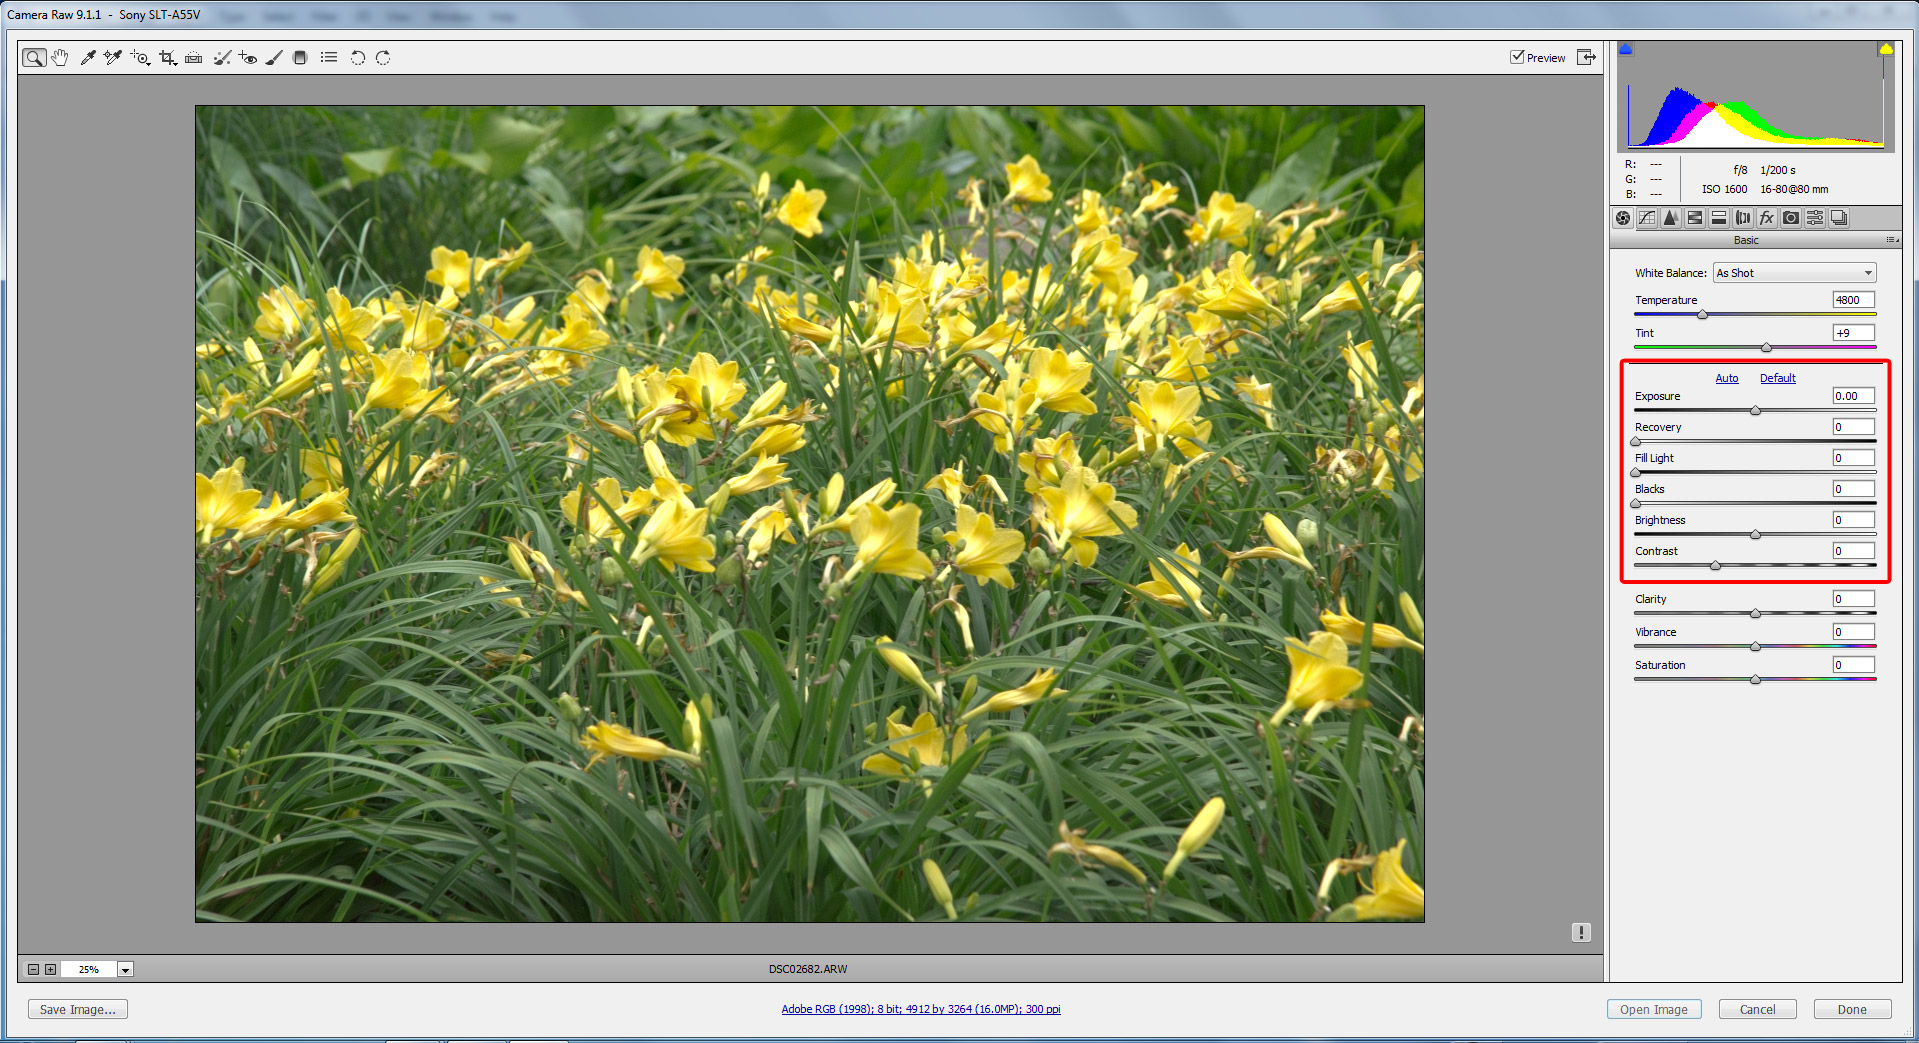
Figure 10. ACR. PV2010, default settings are zeroed-out
- We recommend saving those zeroed-out settings as some intermediate preset, which you can load when opening all other .dng files from this series.
- Subtract Baseline Exposure value from the already zeroed out Exposure value (now you have Exposure = -BLE)

Figure 11. Baseline Exposure =0.35 is subtracted from Exposure
- If you prefer PV2012, then switch back to PV2012; now, all of the settings are changed automatically and they replicate the “look of brightness” the shot previously had in PV2010

Figure 12. Zeroed-out settings for PV2012
- So, as we already mentioned at the beginning of this article, for every ISO value, the zeroed-out/linearized Adobe raw converter settings for PV2012 will look like:
| Exposure = -1 - BLE | |
| Contrast = -33 | |
| Black = +25 | |
| Custom Curve (which can be saved and used as a Tone curve) |
- Far from the factory default “all sliders in zero position”, as you can see. The change is pretty dramatic.
- Save the resulting setting for the given ISO and name it: now you have a custom zeroed-out default for this ISO setting.
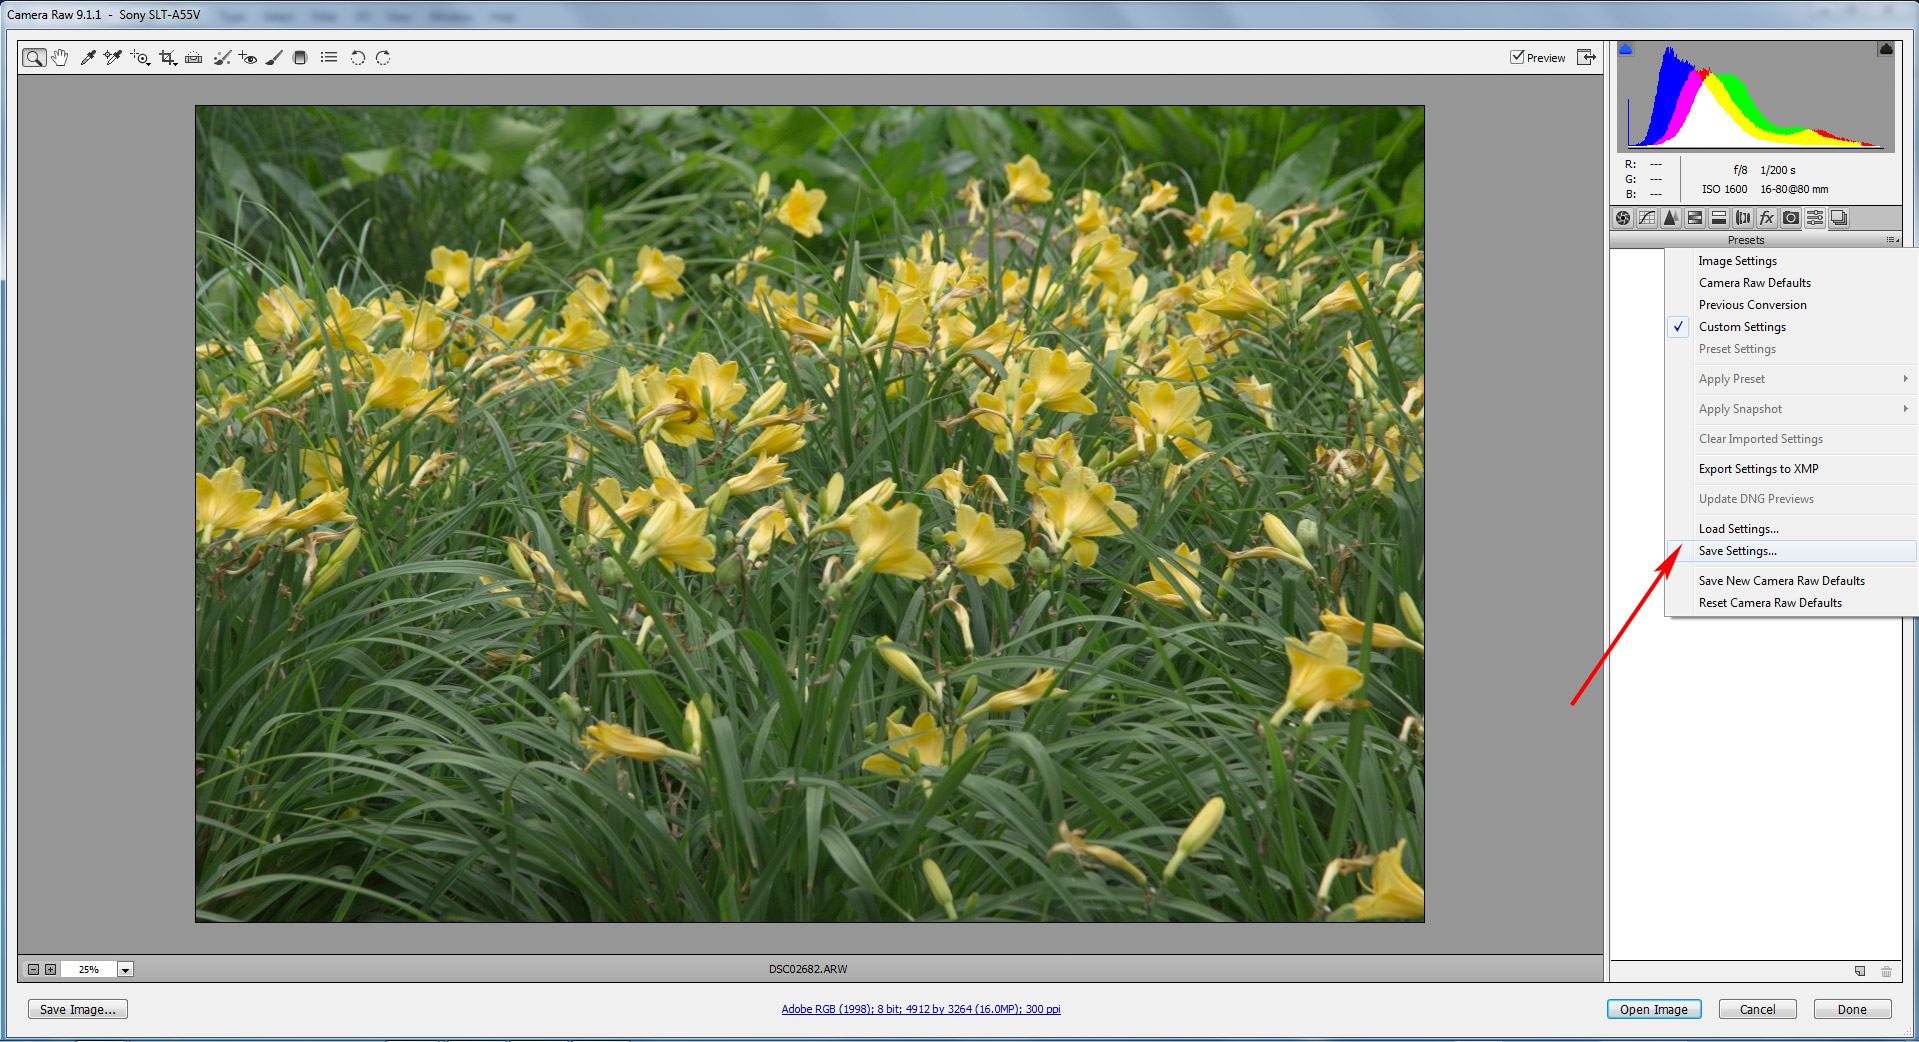
Figure 13. Save zeroed-out settings as the default preset for the given ISO
- Repeat steps a. - d. with the next .dng file.
Later you can group custom zeroed-out defaults for different ISO setting and rename them according to the values of BLE: say, if for the range ISO 200 to ISO 1600 the Baseline Exposure value (BLE) is the same, one preset named something like "CameraModelName_ISO_200_1600" makes sense.
Determining Baseline Exposure Value from the Raw Shots
As we have already mentioned above, the following method will allow you to get accurate Baseline Exposure values for your particular camera body, and not some average value for this model. You may also see that Adobe-suggested value for the Baseline Exposure is not always correct for as given camera, or for some of the ISO settings in your camera, like it is with Hi ISO on Nikon Df.
1. Shooting
Here you also should start by shooting. Using a spot meter make a series of shots – one shot for each ISO setting – of some uniform, evenly-lit surface (a white balance card, a wall, anything) with a piece of curved shiny metal (we used a ball on a Datacolor SpyderCUBE) not far from the center of the shot but outside the spot meter zone. This metal piece will guarantee that you have specular highlights reaching the clipping point, and is thus useful for determining the maximum raw value.
2. Calculating RGB values
- Open RawDigger and in the Preferences:
- In Data Processing tab check the ‘Selection/sample stat: discard abnormal pixel values’ field to filter the outliers off.
Figure 14. RawDigger. Filtering out the outliers
- In Misc Option tab set the Sampler Size to 258x258 pixels
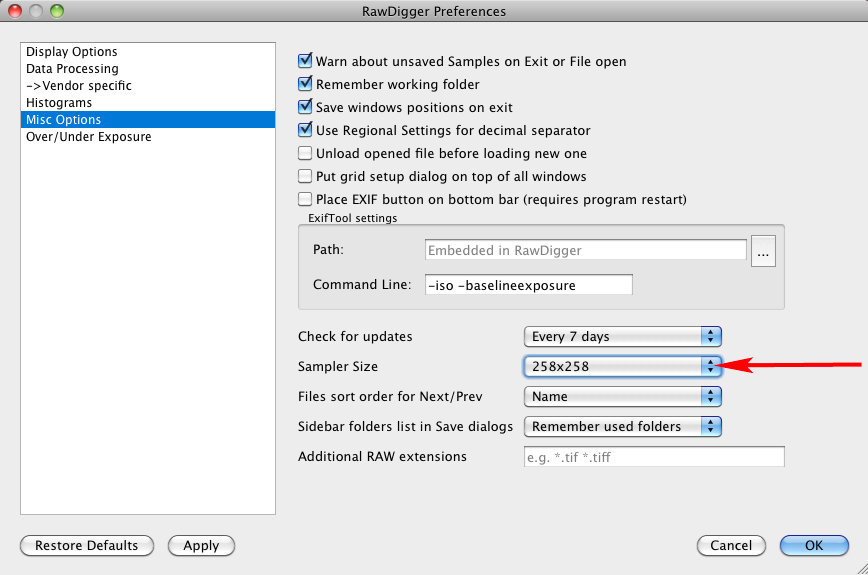
Figure 15. RawDigger. Setting Sampler Size
- Read the max value in the Green channel (Gmax) (that’s why you needed to have a piece of dazzling metal in your scene).
- If your camera has two green channels (most common case in Bayer filter), use the first one.
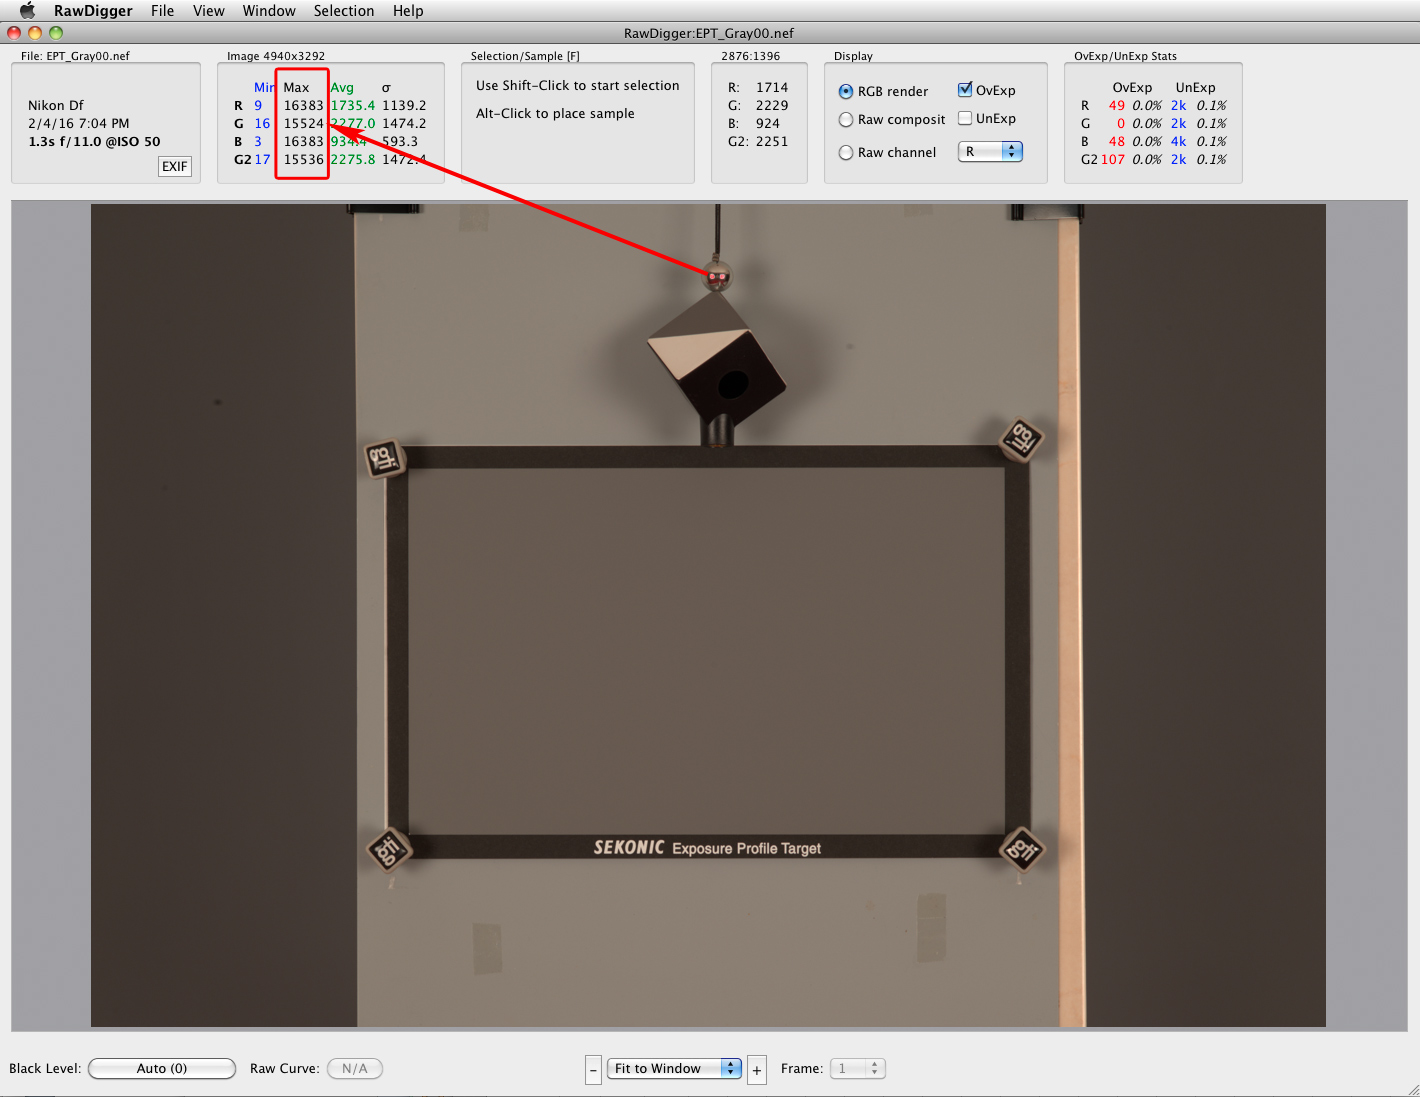
Figure 16. RawDigger. Gmax = 15524
- Place a sample (Alt-click) on the grey surface, and read the average value in the Green channel (Gavg)
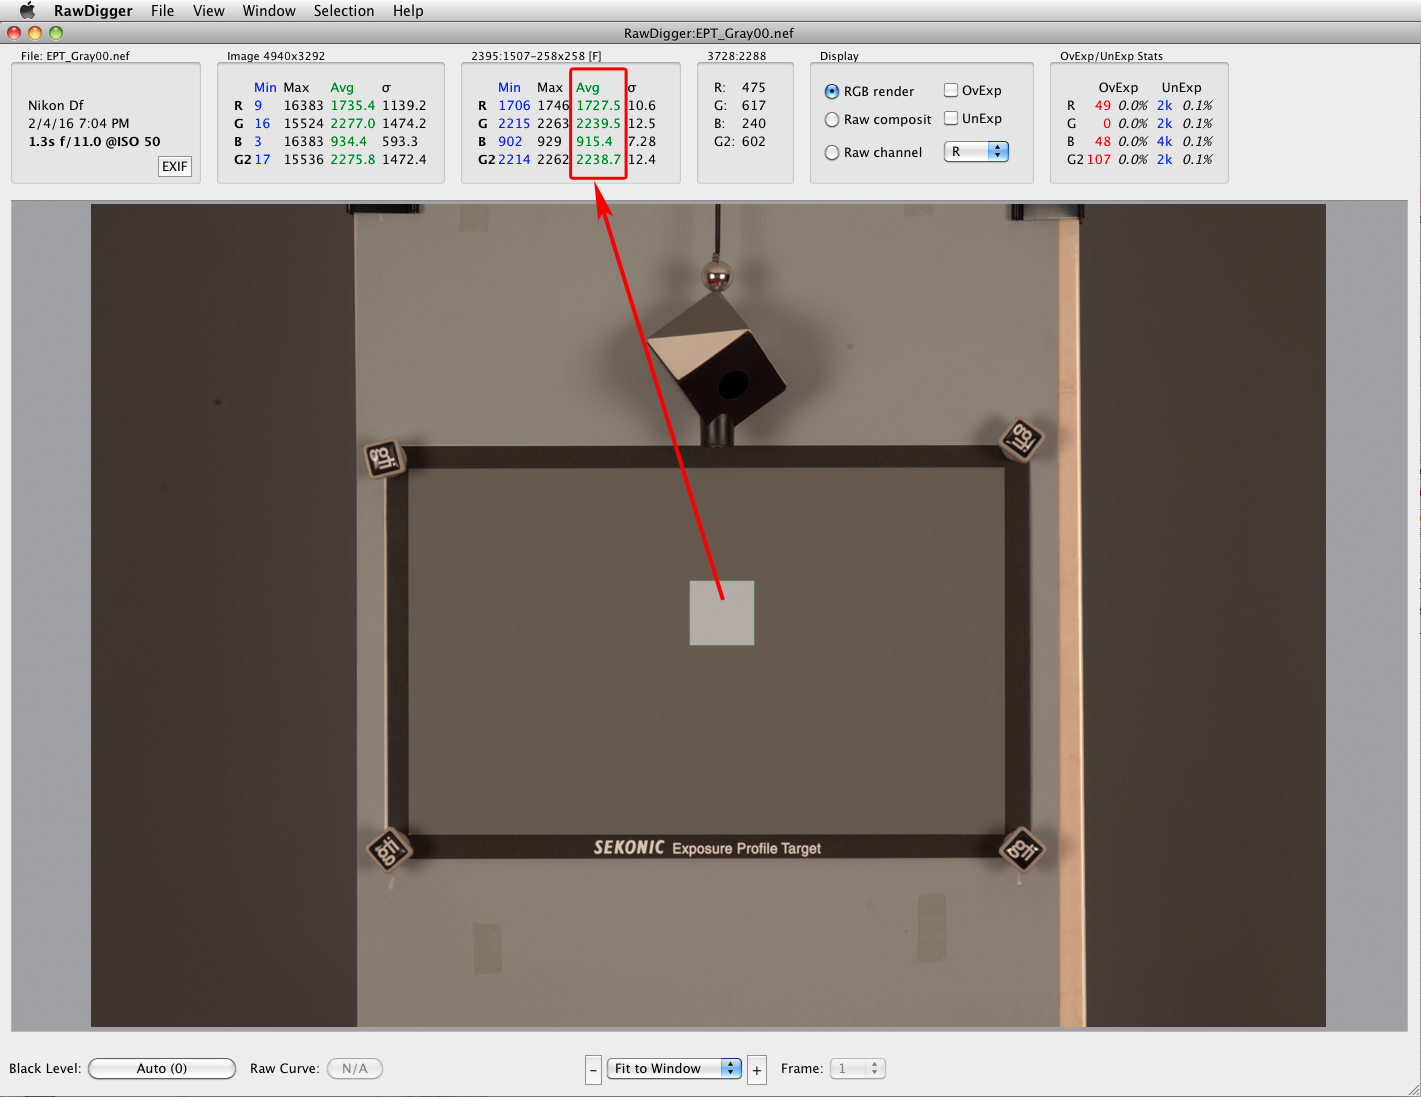
Figure 17. RawDigger. For the sampled area, Gavg = 2239.5
- Calculate the normalized value for the sampled Green channel (for the given ISO).
- To calculate this value we are going to use some formulas (1, 1a-1c).
- Note: You can just download a ready-to-use spreadsheet with all of formulas and enter the values you obtained for your camera into the first three columns – the other columns will be calculated automatically.
| G = [(Gavg/Gmax)^(1/gamma)]*Norm | (1) |
- So, accounting for gamma and Norm[alization] value (255 for 8-bit RGB, 100 if you will be using percent) we’ll have the following formulas:
- For AdobeRGB (gamma=2.2, Norm value = 255)
| G = [(Gavg/Gmax)^(1/2.2)]*255 | (1a) |
- For ProphotoRGB (gamma=1.8, Norm value = 255)
| G = [(Gavg/Gmax)^(1/1.8)]*255 | (1b) |
- For Adobe Lightroom percentage (gamma=2.2, Norm value = 100)
| G = [(G_avg/G_max)^(1/2.2)]*100 | (1c) |
- After repeating steps b. - d. for every raw shot we will have the list of G values – one for every ISO value (the sample stays in place when the next file is opened, so, no need to place the sample each time while on the step 2.3).
- In the spreadsheet below we calculated the G values for gamma 1.8 and 2.2 and for 8-bit RGB and percentage Norm values. You don’t need to calculate them all, of course. Depending on what raw converter and what color space you are going to use, pick one combination.
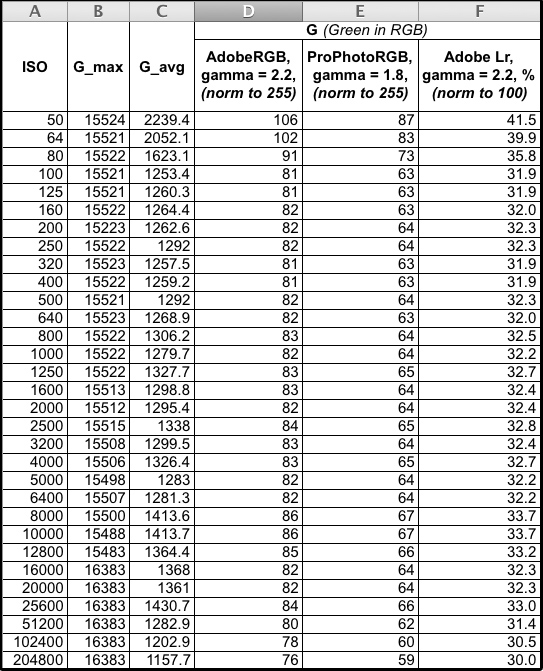
Figure 18. Calculated G values (8-bit RGB and percents) - for different ISO and different gamma
3.Obtaining Baseline Exposure values
We are going to use ACR, setting it to AdobeRGB color space; thus the data (Green channel values, G) comes from the ‘D’ column. The general steps of the algorithm for obtaining the Baseline Exposure values are quite similar for Adobe Lr and other raw converters.
- Open the first shot in an Adobe raw converter, make sure that the color space is set to AdobeRGB, switch to PV2010 and check that Camera Profile is set to Adobe Standard
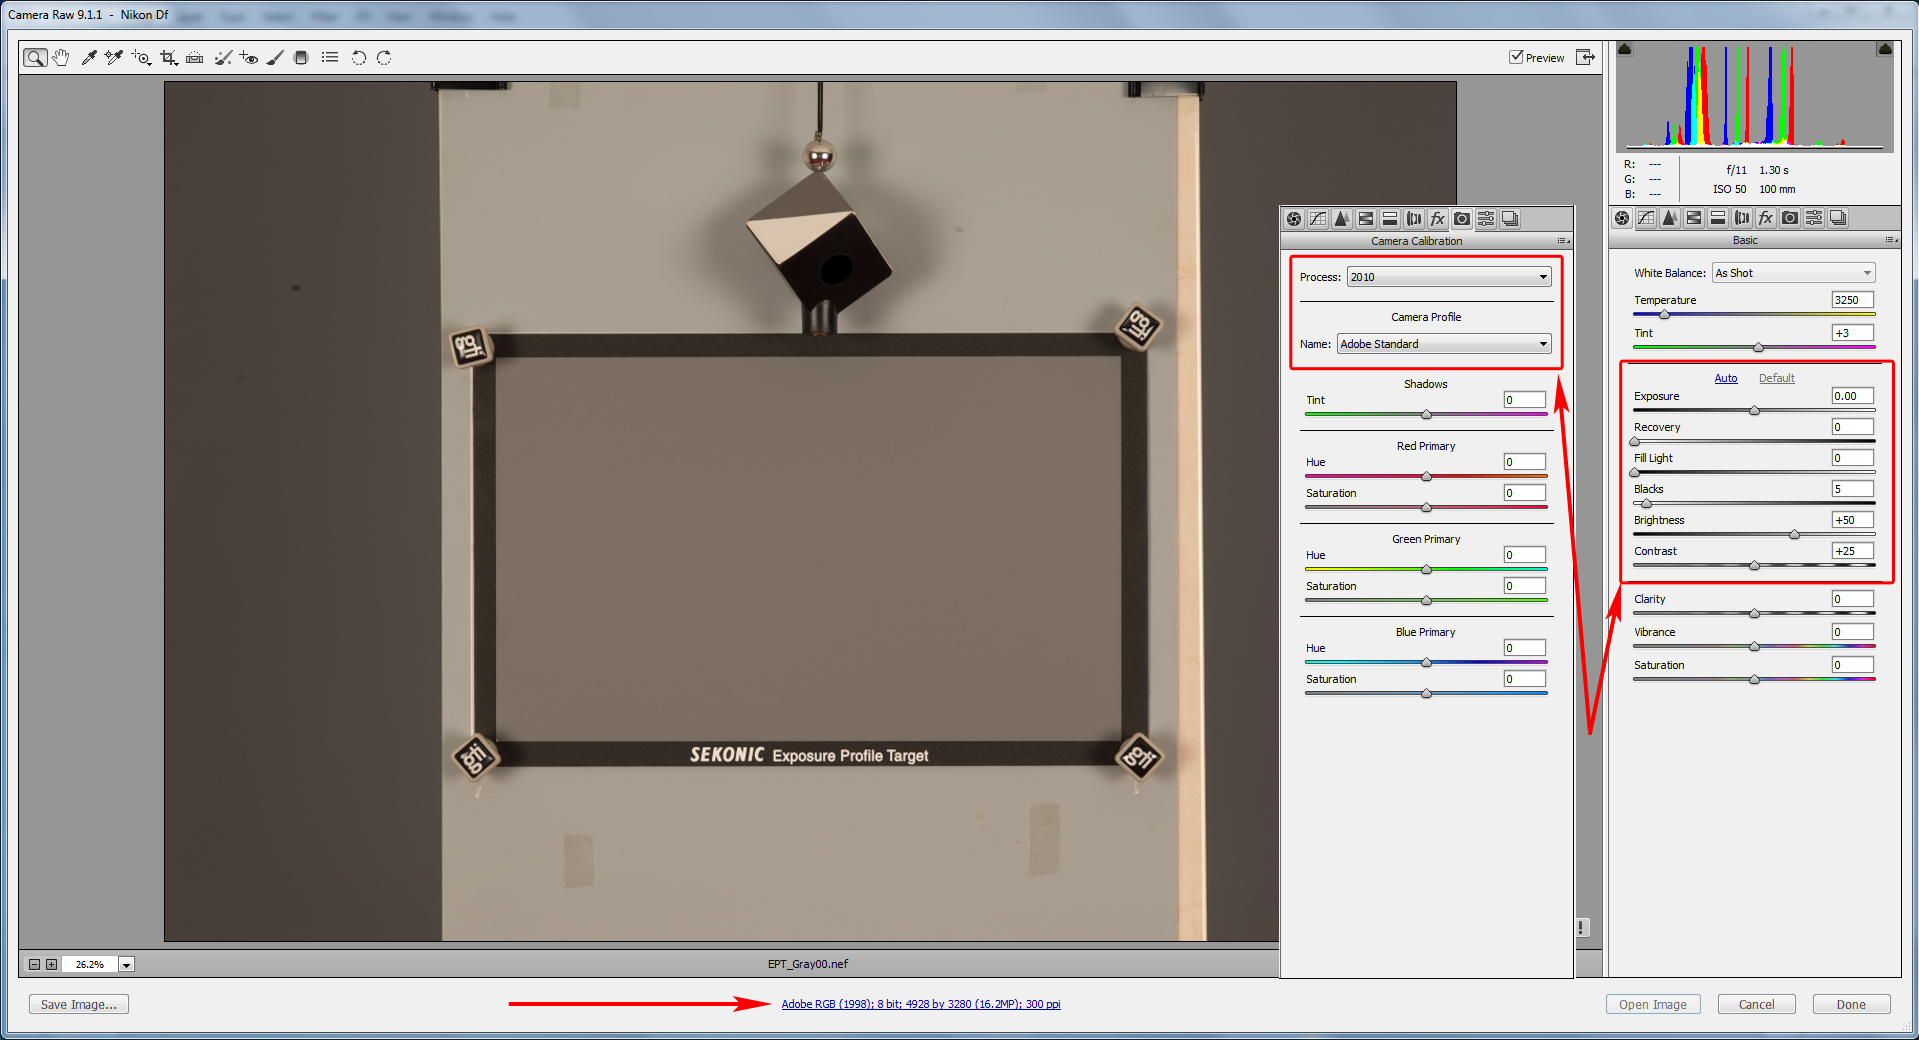
Figure 19. ACR – AdobeRGB, PV2010, Adobe Standard
- Zero out the settings for PV2010: set the curve to linear, set black point, contrast, brightness all to zero
- We recommend saving these zeroed-out settings as some intermediate preset, so for the all other shots you can just upload it.
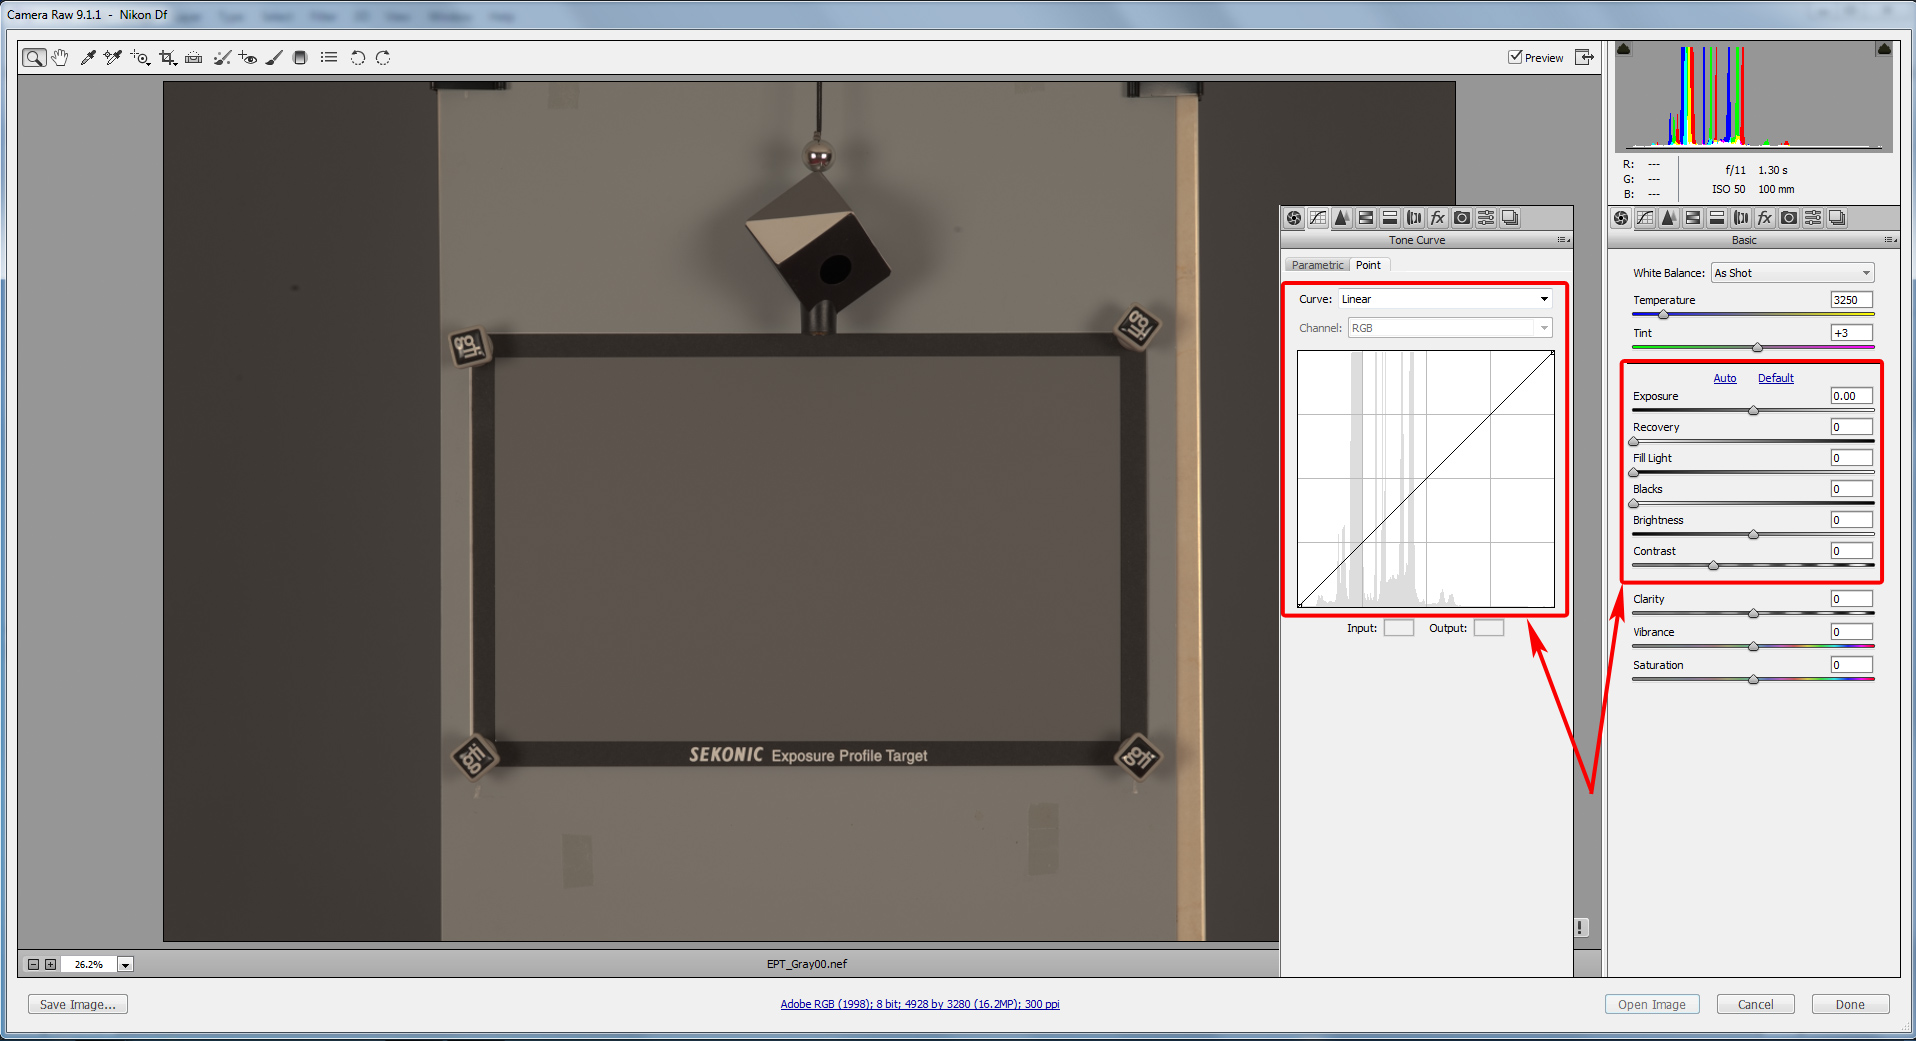
Figure 20. ACR. PV2010. Zeroed-out default settings
- Place the color sampler tool close to the area of the shot you used to make a selection in RawDigger (no need to be very precise since it is a uniform surface)
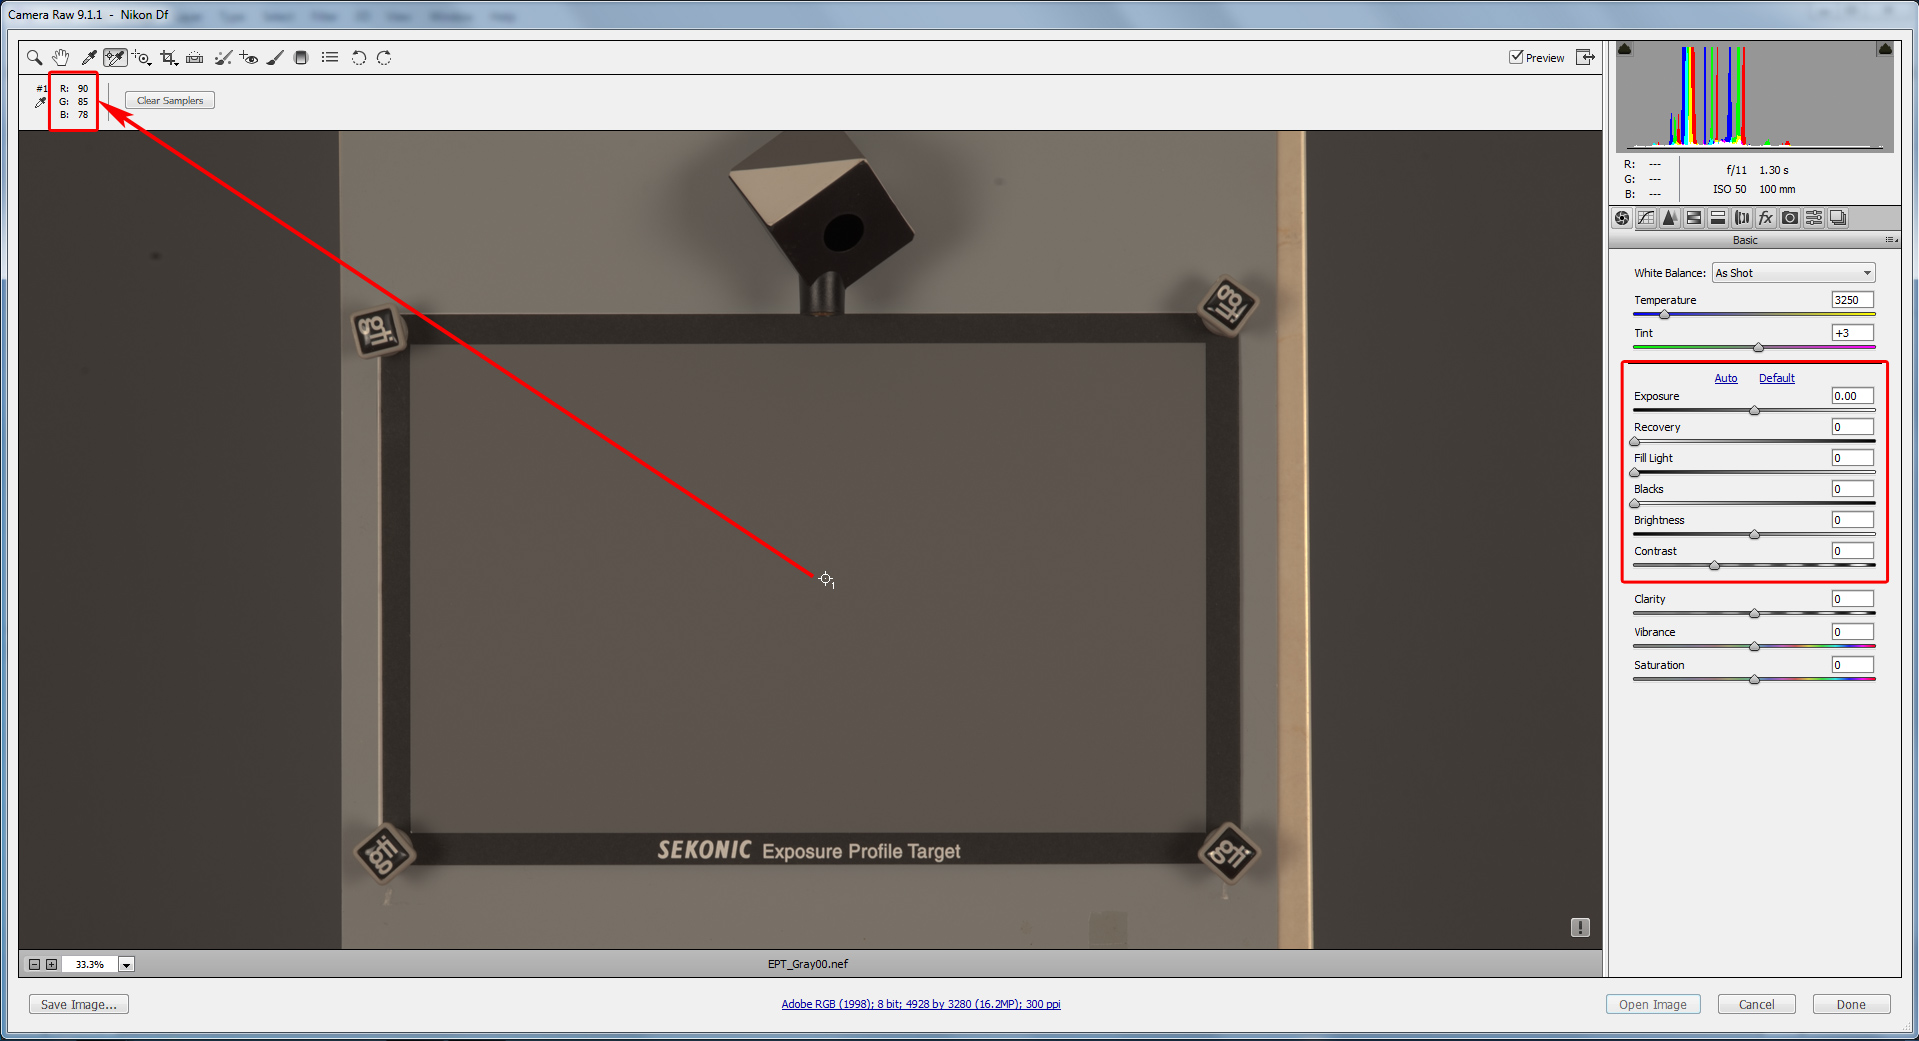
Figure 21. ACR. Gsampler = 85 instead of 106 as it supposed to be at ISO 50
- Move the Exposure slider until you have Gsampler ≈ G from the column ‘D’ (once again, you need to use G for the same ISO as in the shot).
- In our case for ISO 50 G = 106, while Gsampler = 85. So we move Exposure slider to the right (thus, overriding Baseline Exposure) until Gsampler = 106.
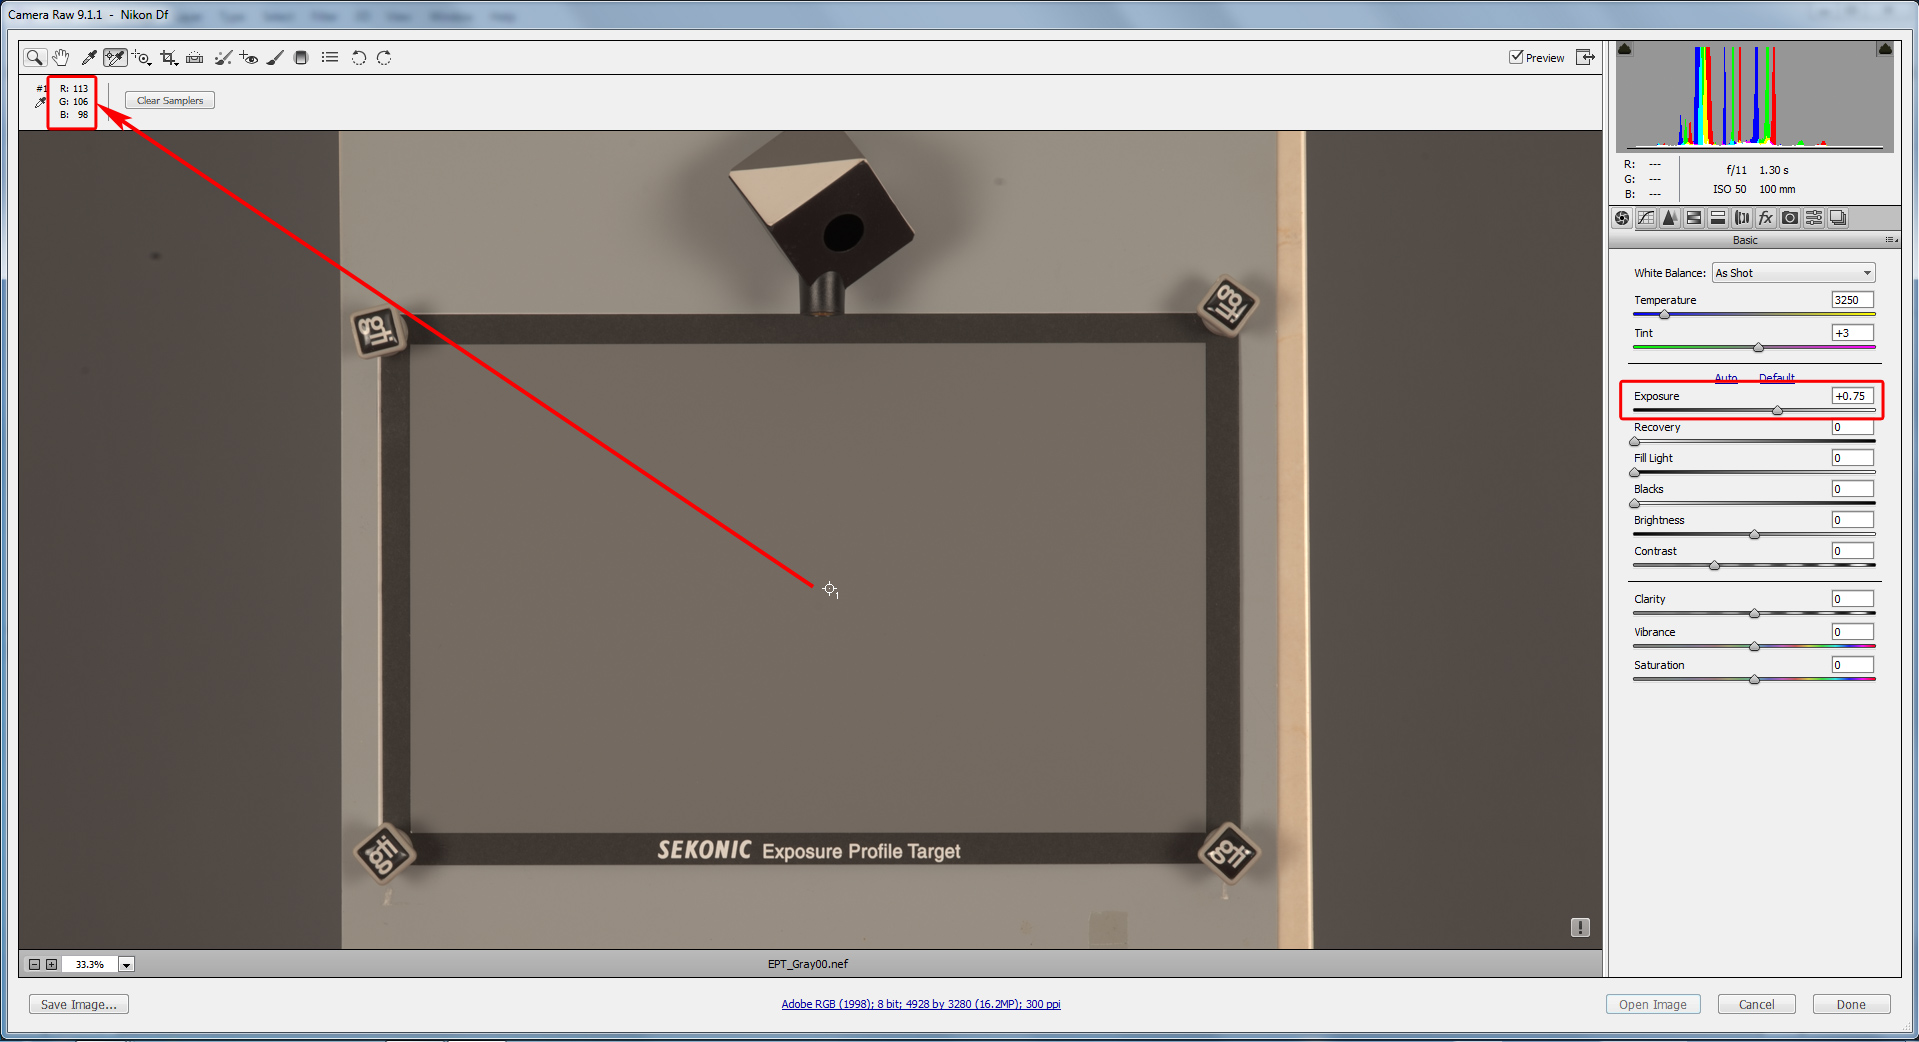
Figure 22. ACR. Gsampler = 106, Exposure = 0.75, so BLE = -0.75
- The value you now have in the Exposure field is the correction of the Baseline Exposure for the given ISO for your particular camera. So for Nikon Df, for ISO 50, BLE=-0.75
- Switch back to PV2012. As we have mentioned above, now the zeroed-out settings are:
| Exposure = -1 - BLE | |
| Contrast = -33 | |
| Black = -25 | |
| Custom Curve (which can be saved and used as a Tone curve) |
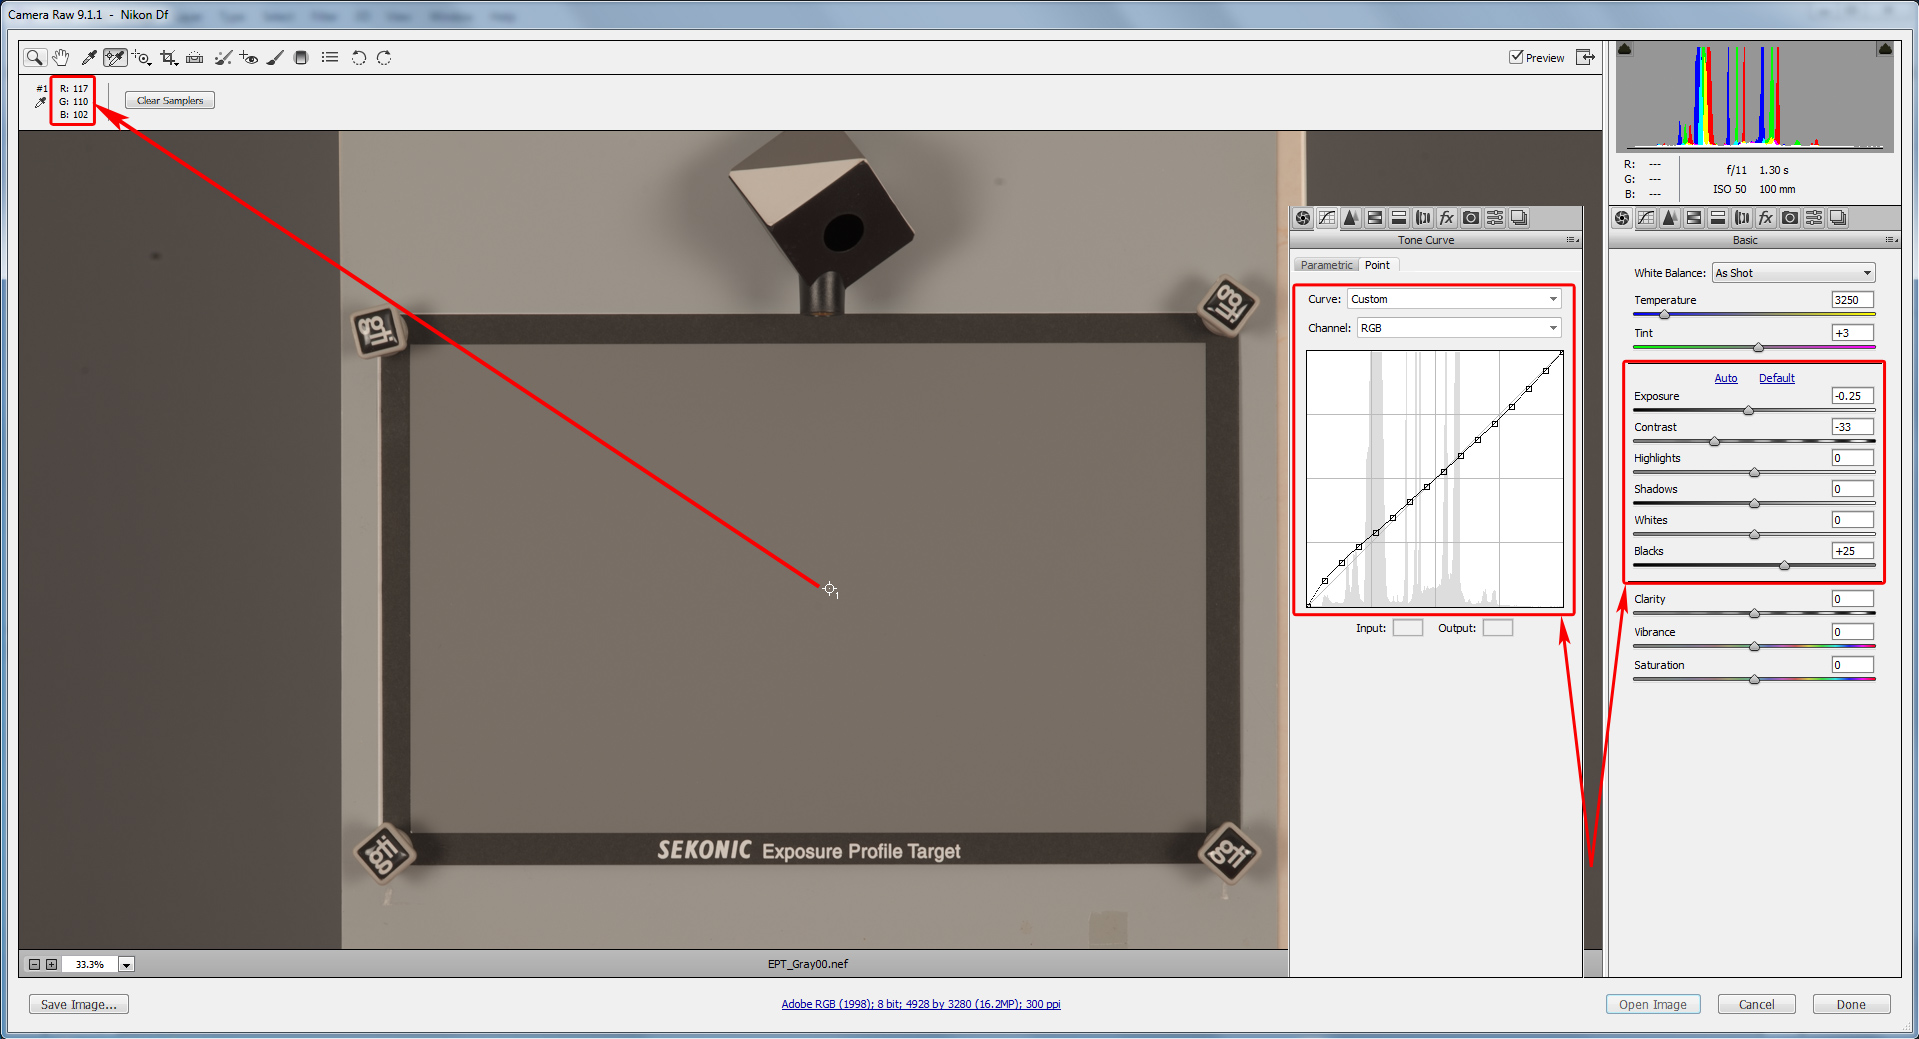
Figure 23. ACR. PV2012.
- Note that the Gsampler value changed from 106 in PV2010 to 110 in PV2012. This is because PV2012 is less linear than PV2010. Moving the Exposure slider while in PV2012 to match Gsampler and G as we did it while in PV2010 won’t do much good. It’s already not only Baseline Exposure that we have to override here, but the tone curve also. That’s a matter for another discussion, however.
- Save the resulting setting for the given ISO and name it (optionally, you can set it as the default).
Let’s show how it looks for ISO 64

Figure 24. PV2010 with zeroed-out defaults. Shot with ISO 64. Gsampler = 90 instead of 102
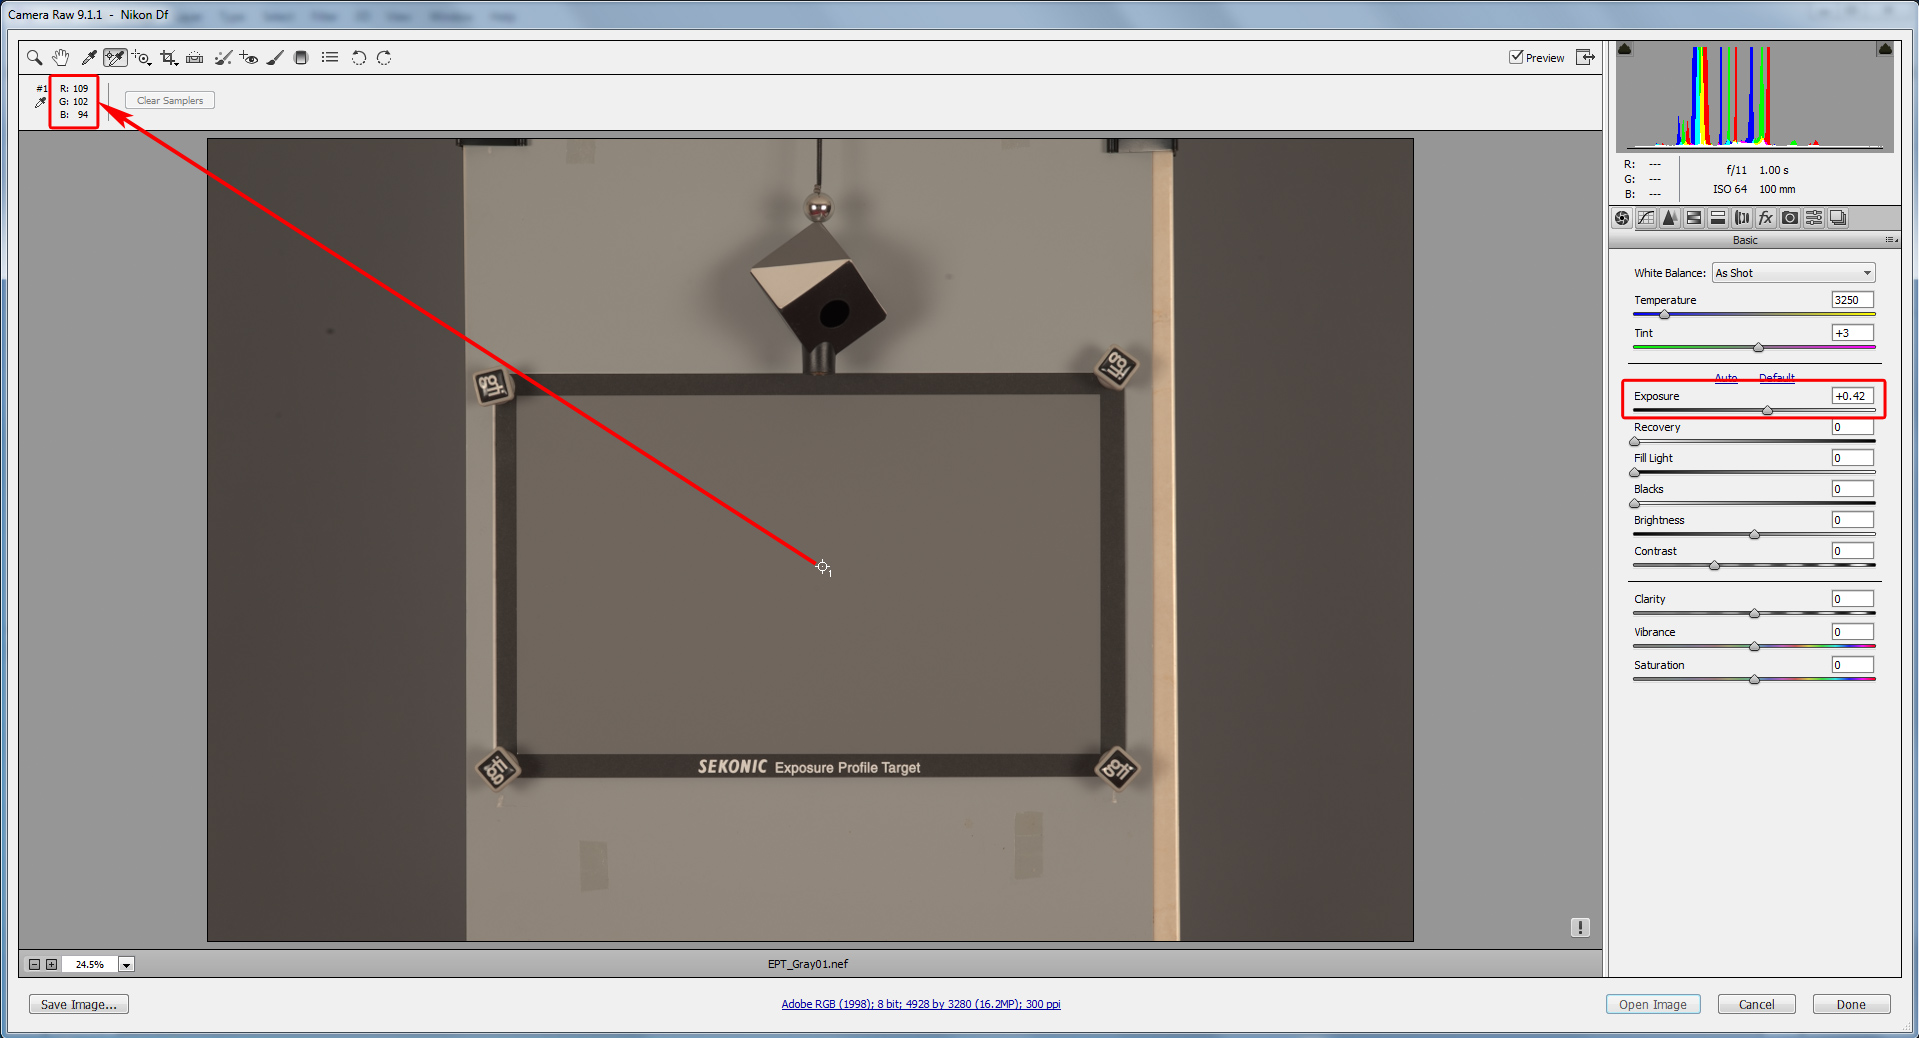
Figure 25. Shot with ISO 64. Gsampler = 102, BLE = -0.42
... ISO 80
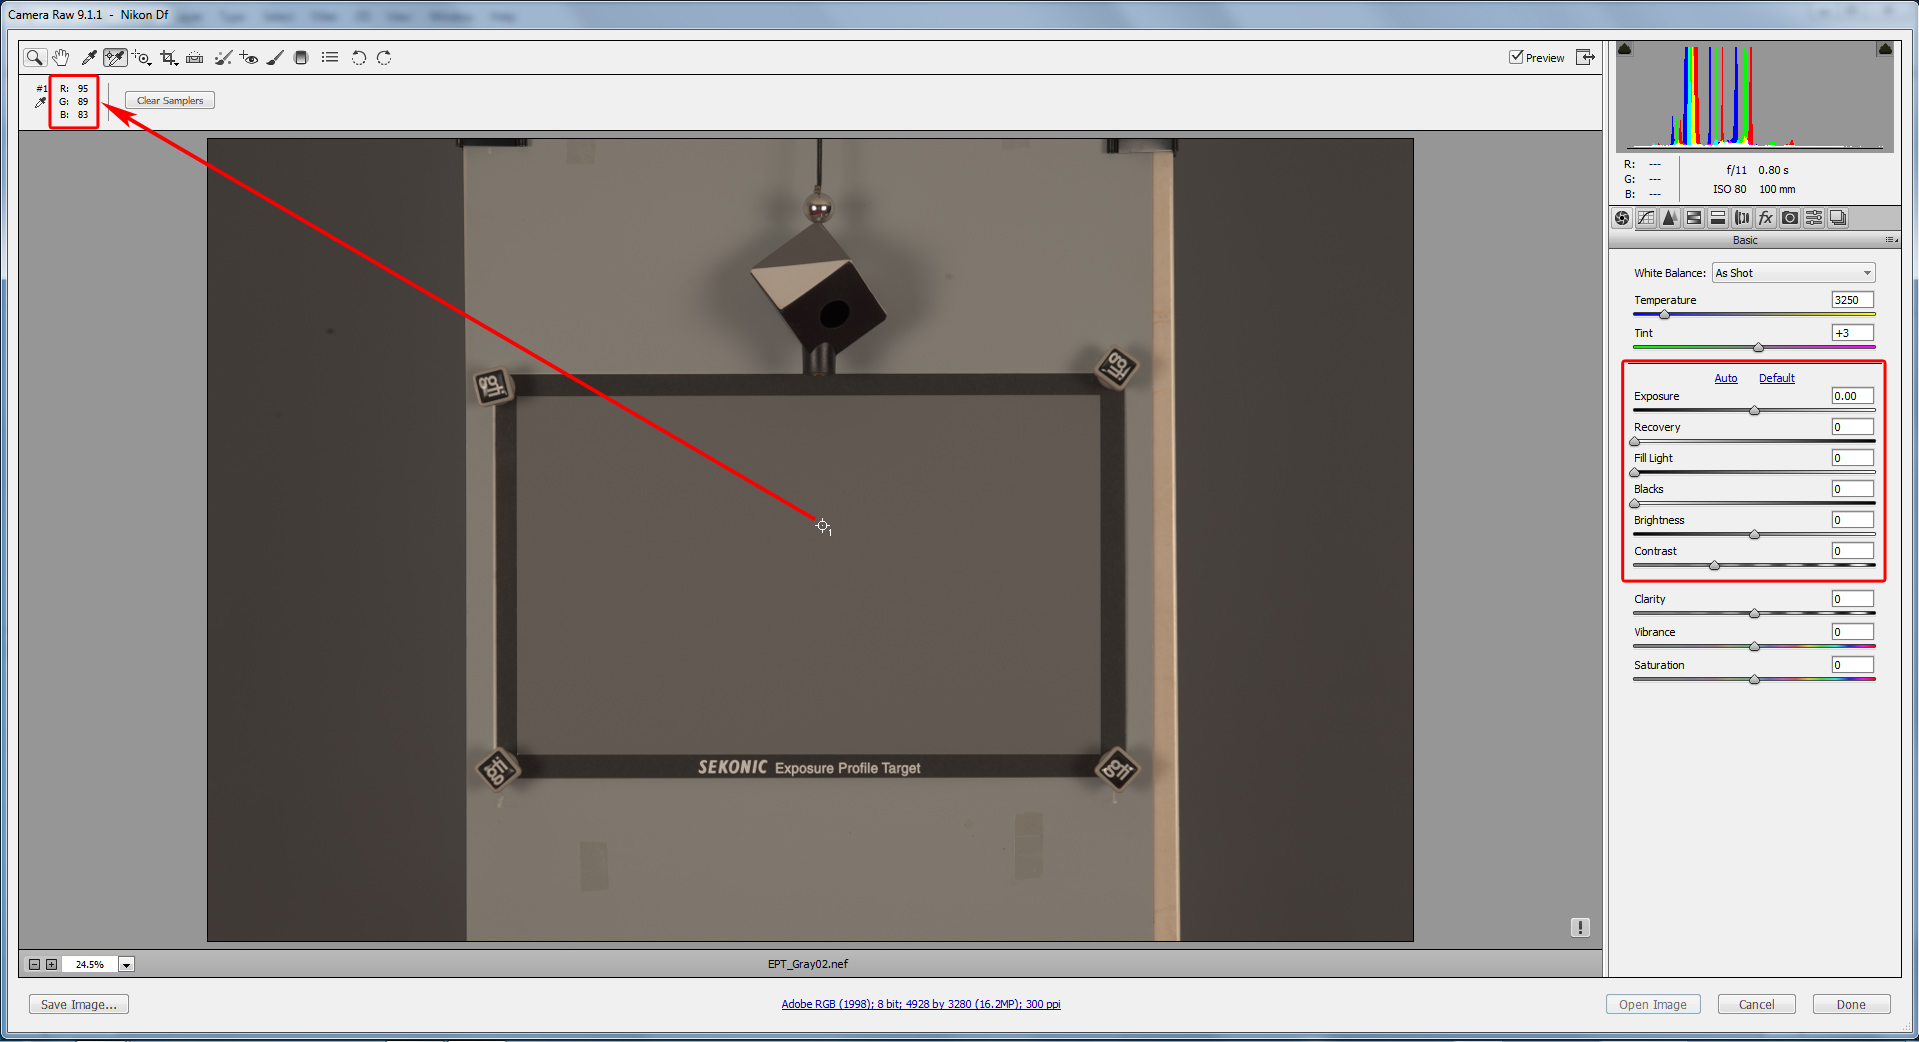
Figure 26. PV2010 with zeroed-out defaults. Shot with ISO 80. Gsampler = 89 instead of 91
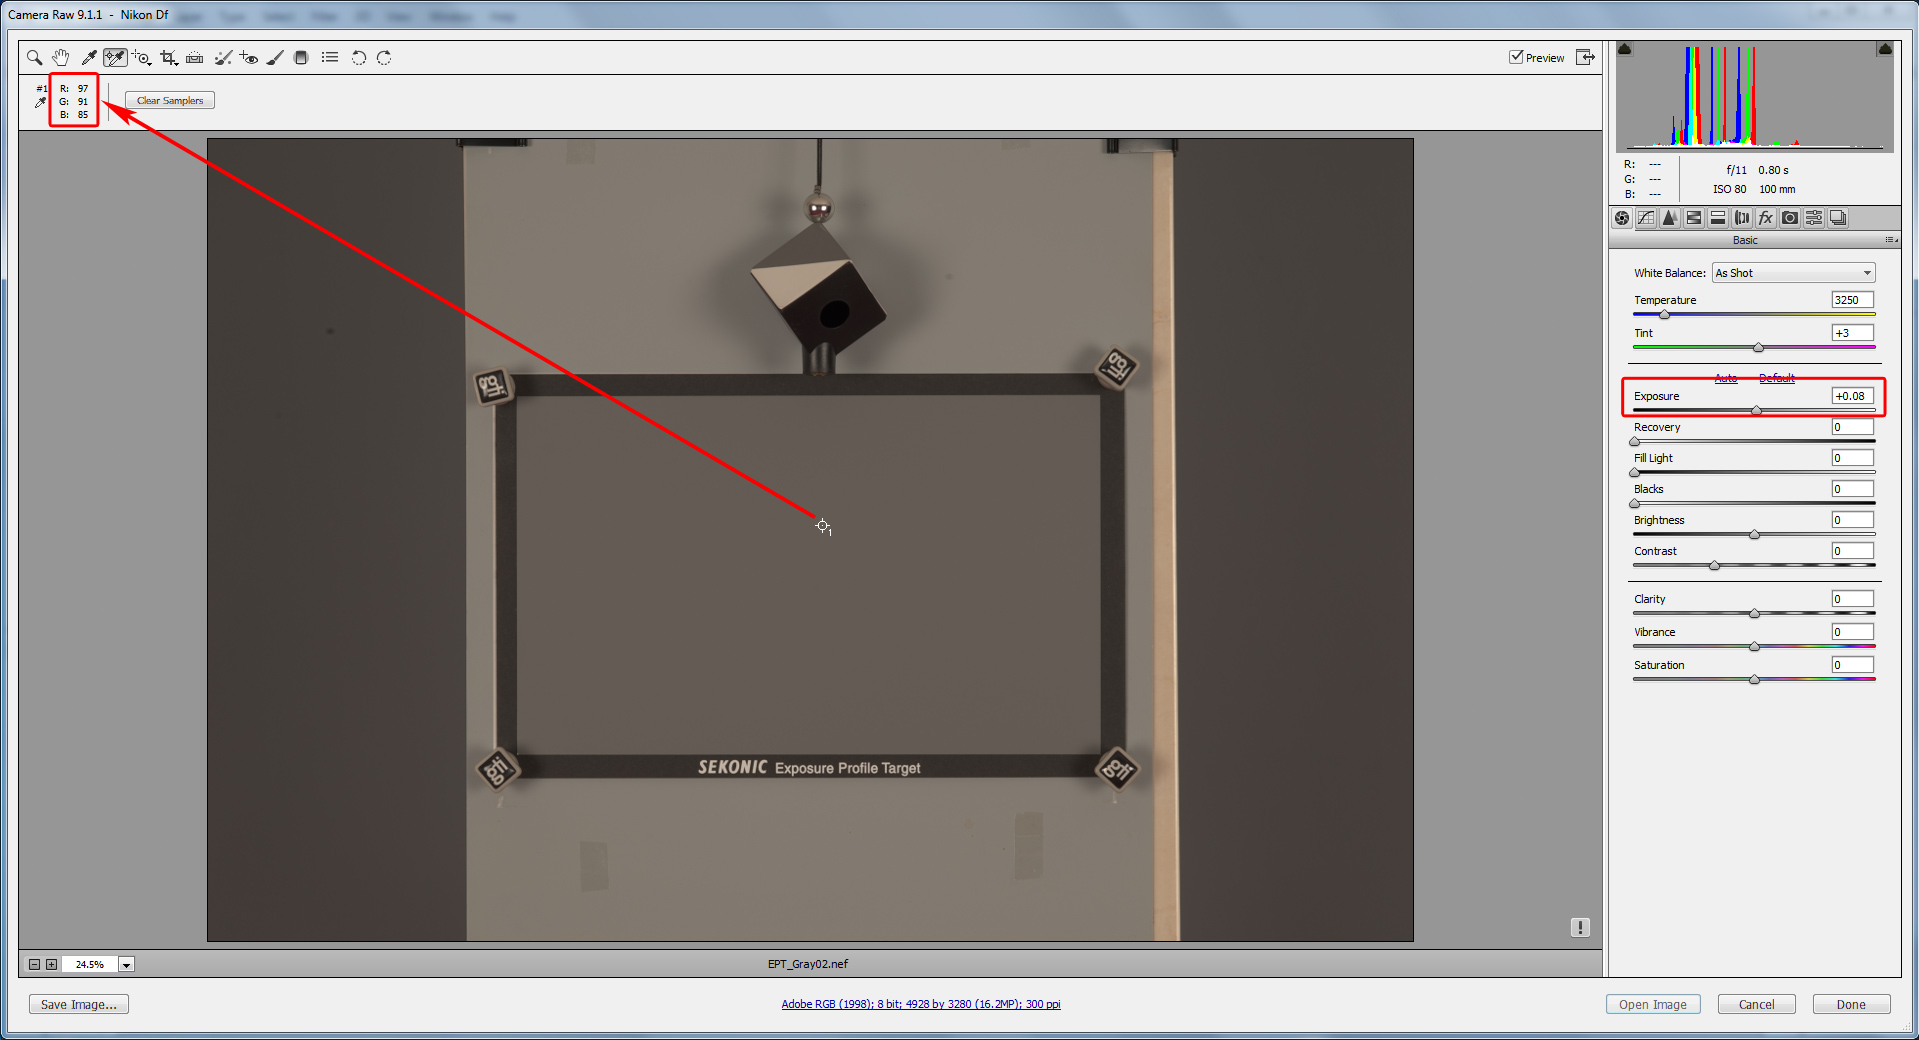
Figure 27. Shot with ISO 80. Gsampler = 91, BLE = -0.08
... and ISO 100
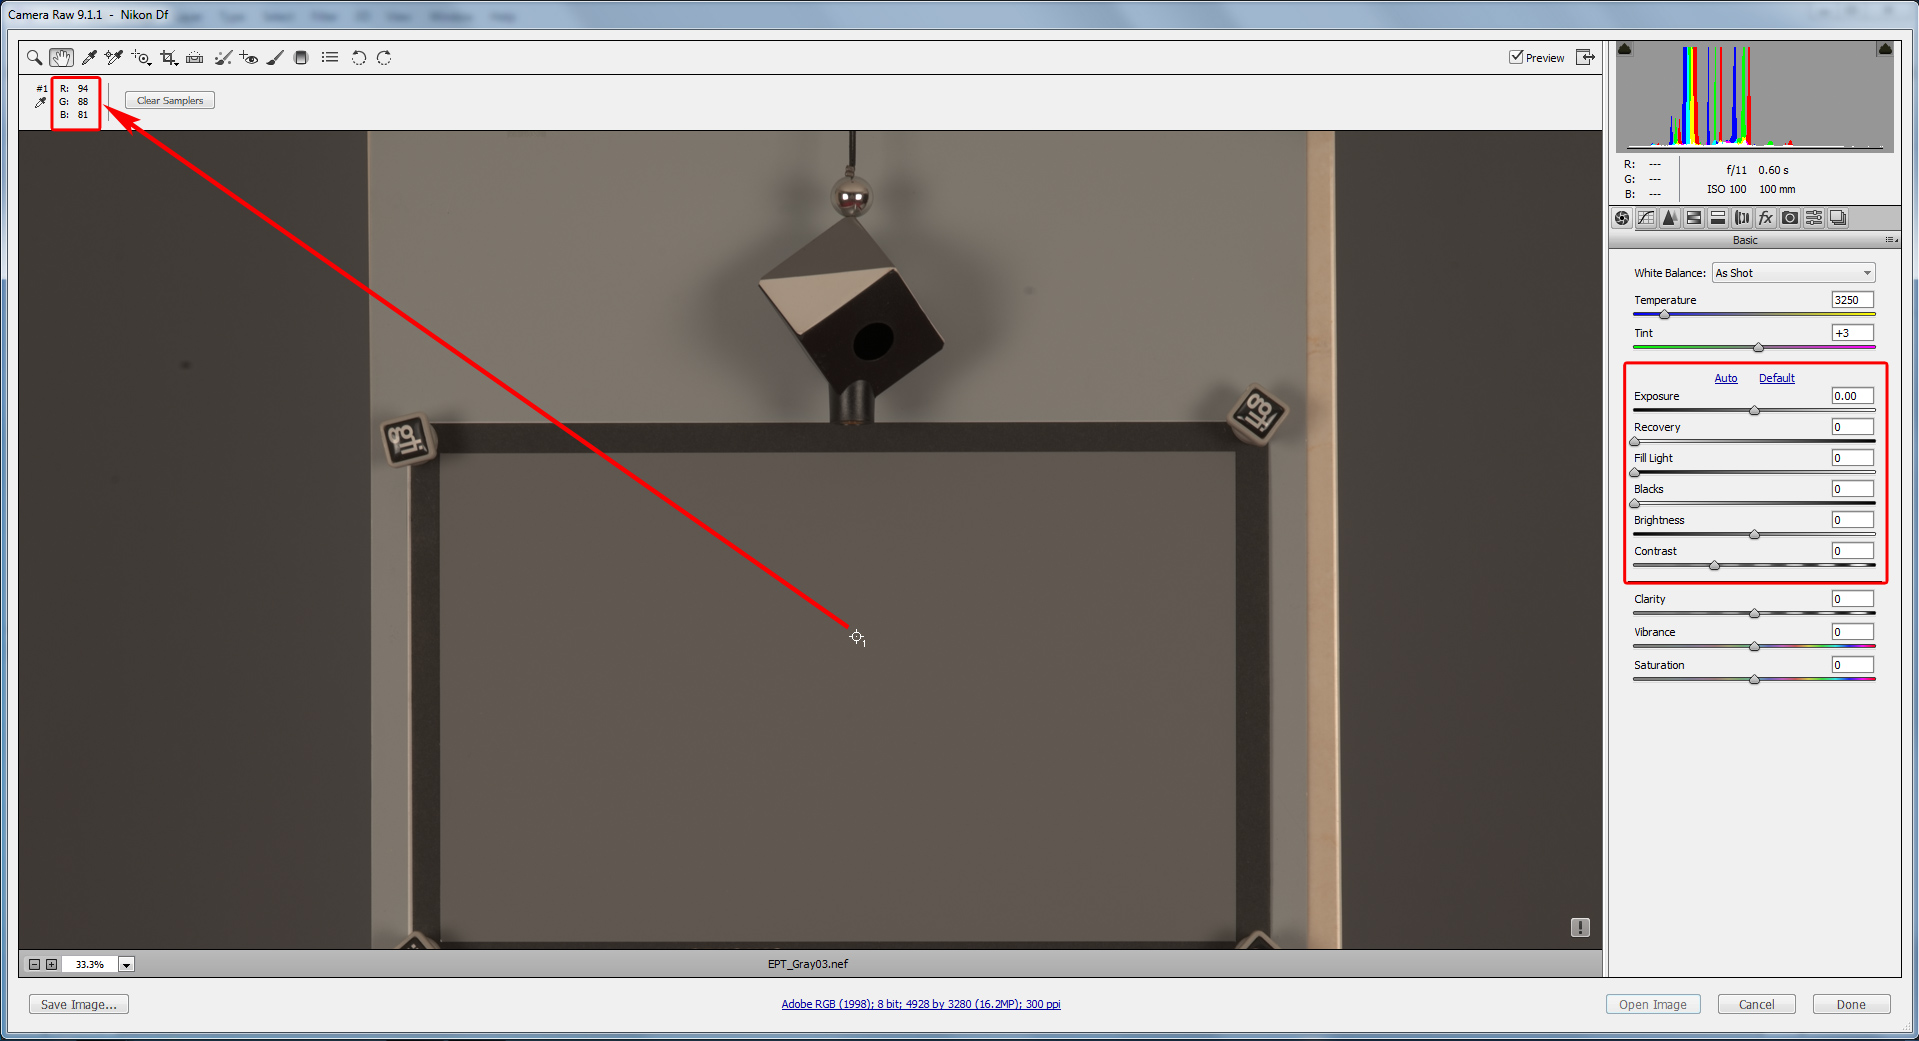
Figure 28. PV2010 with zeroed-out defaults. Shot with ISO 100. Gsampler = 88 instead of 81
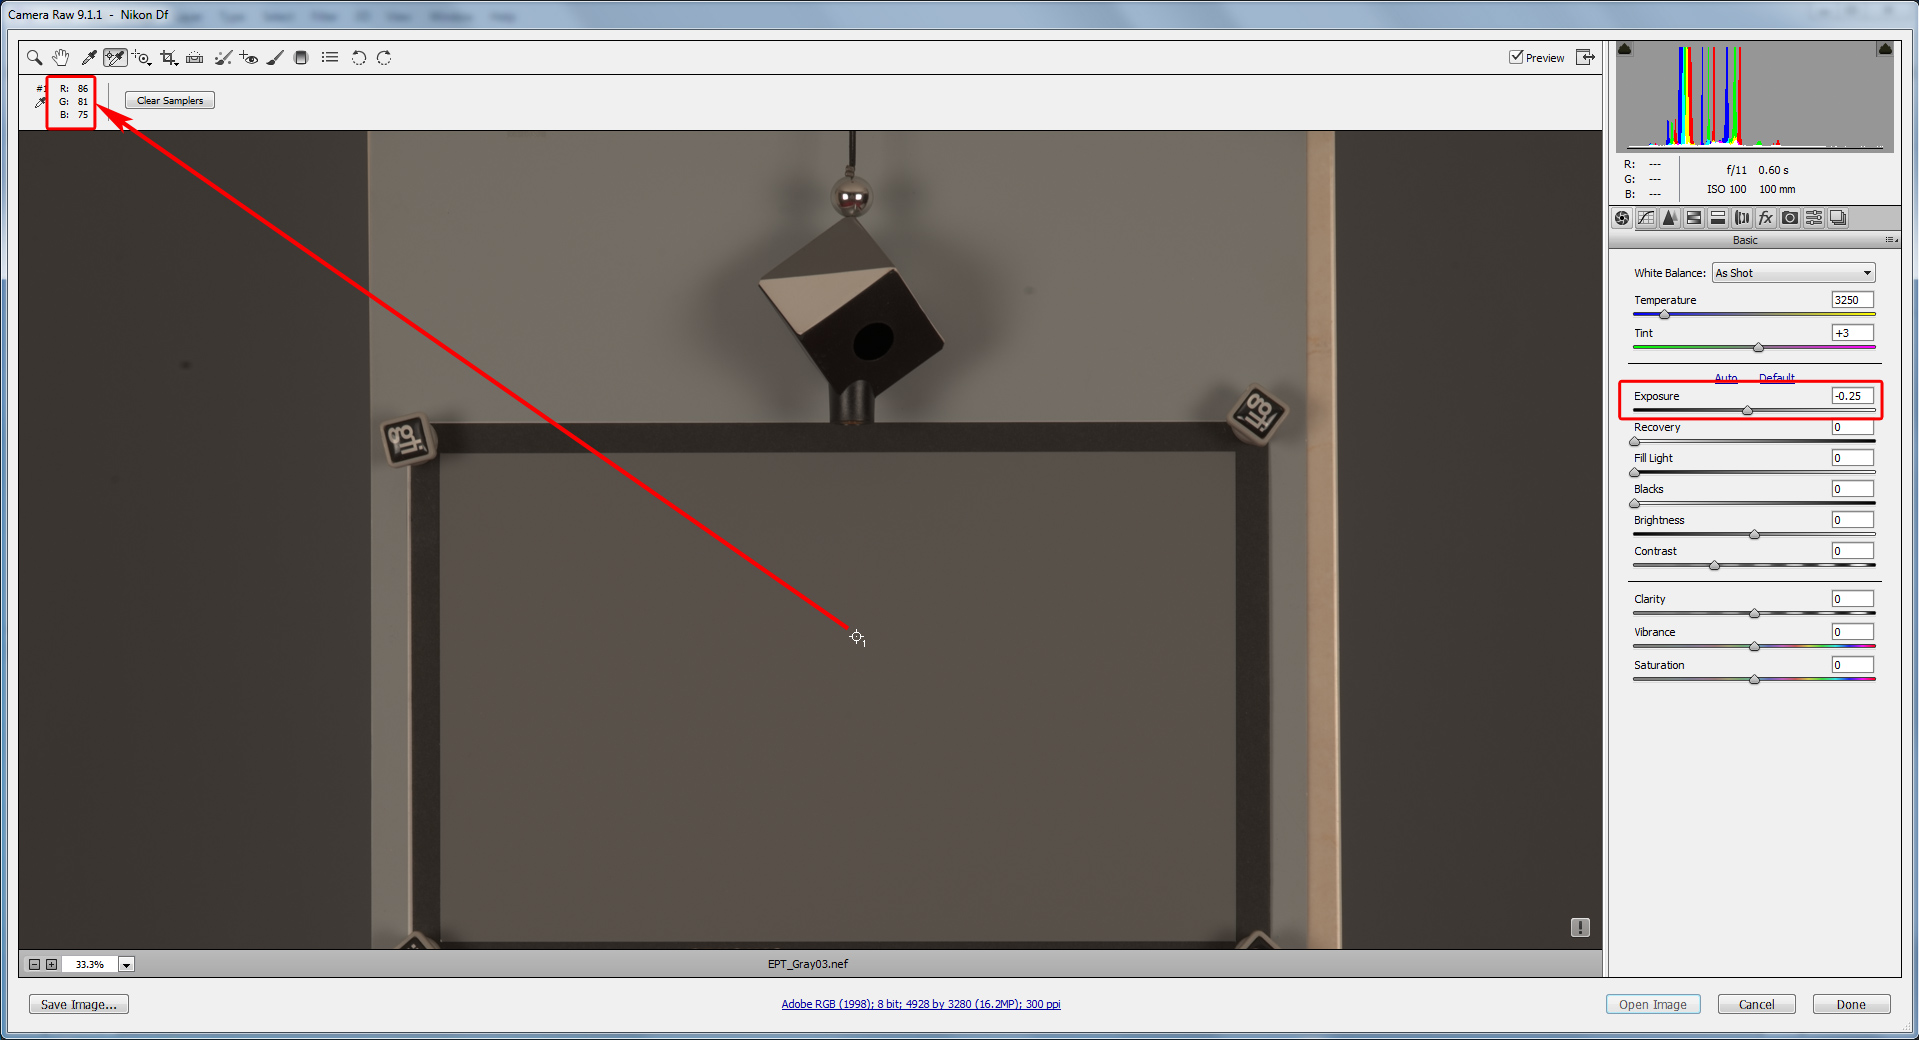
Figure 29. Shot with ISO 100. Gsampler = 81, BLE = 0.25
ISO 50, 64, and 80 present an interesting case. They are what Nikon are calling “Lo settings”; they do not actually rate those in ISO speed. The reason for this is that such “Lo” values are the result of changing the in-camera exposure meter calibration constant instead of the usual change of “gain”. Thus such ISO values result in less headroom in highlights, compared to “true” ISO settings. You can see that the difference between Baseline Exposure for “Lo-1” / ISO 50 (-0.75) and Baseline Exposure for ISO 100 (0.25) is 1 stop exactly; that is, headroom in highlights for “Lo-1” is one stop less than for ISO 100. As per above excerpt from Adobe, they vary the zero point of exposure compensation for the sake of uniformity, using negative Baseline Exposure for those “Lo” settings. This is reflected in the positive values for the exposure compensation we need – because our exposure compensation counteracts / overrides Adobes’ Baseline Exposure, and here the brightness needs to be pushed up after Adobe pulled it down.
From ISO 100 up to ISO 12800 BLE = 0.25; Adobe are making the shots at all regular ISO settings to appear brighter than they are.
Starting from ISO 16000, however, Adobe BLE data starts to deviate from the real-life data.
The problem with obtaining RGB measurements for such low exposure shots is that they contain a lot of noise. Since we don’t have the option of increasing the size of the color sampler in ACR to get good average values for the Green channel, we are going to use all 9 allowed color samplers, and average the readings.
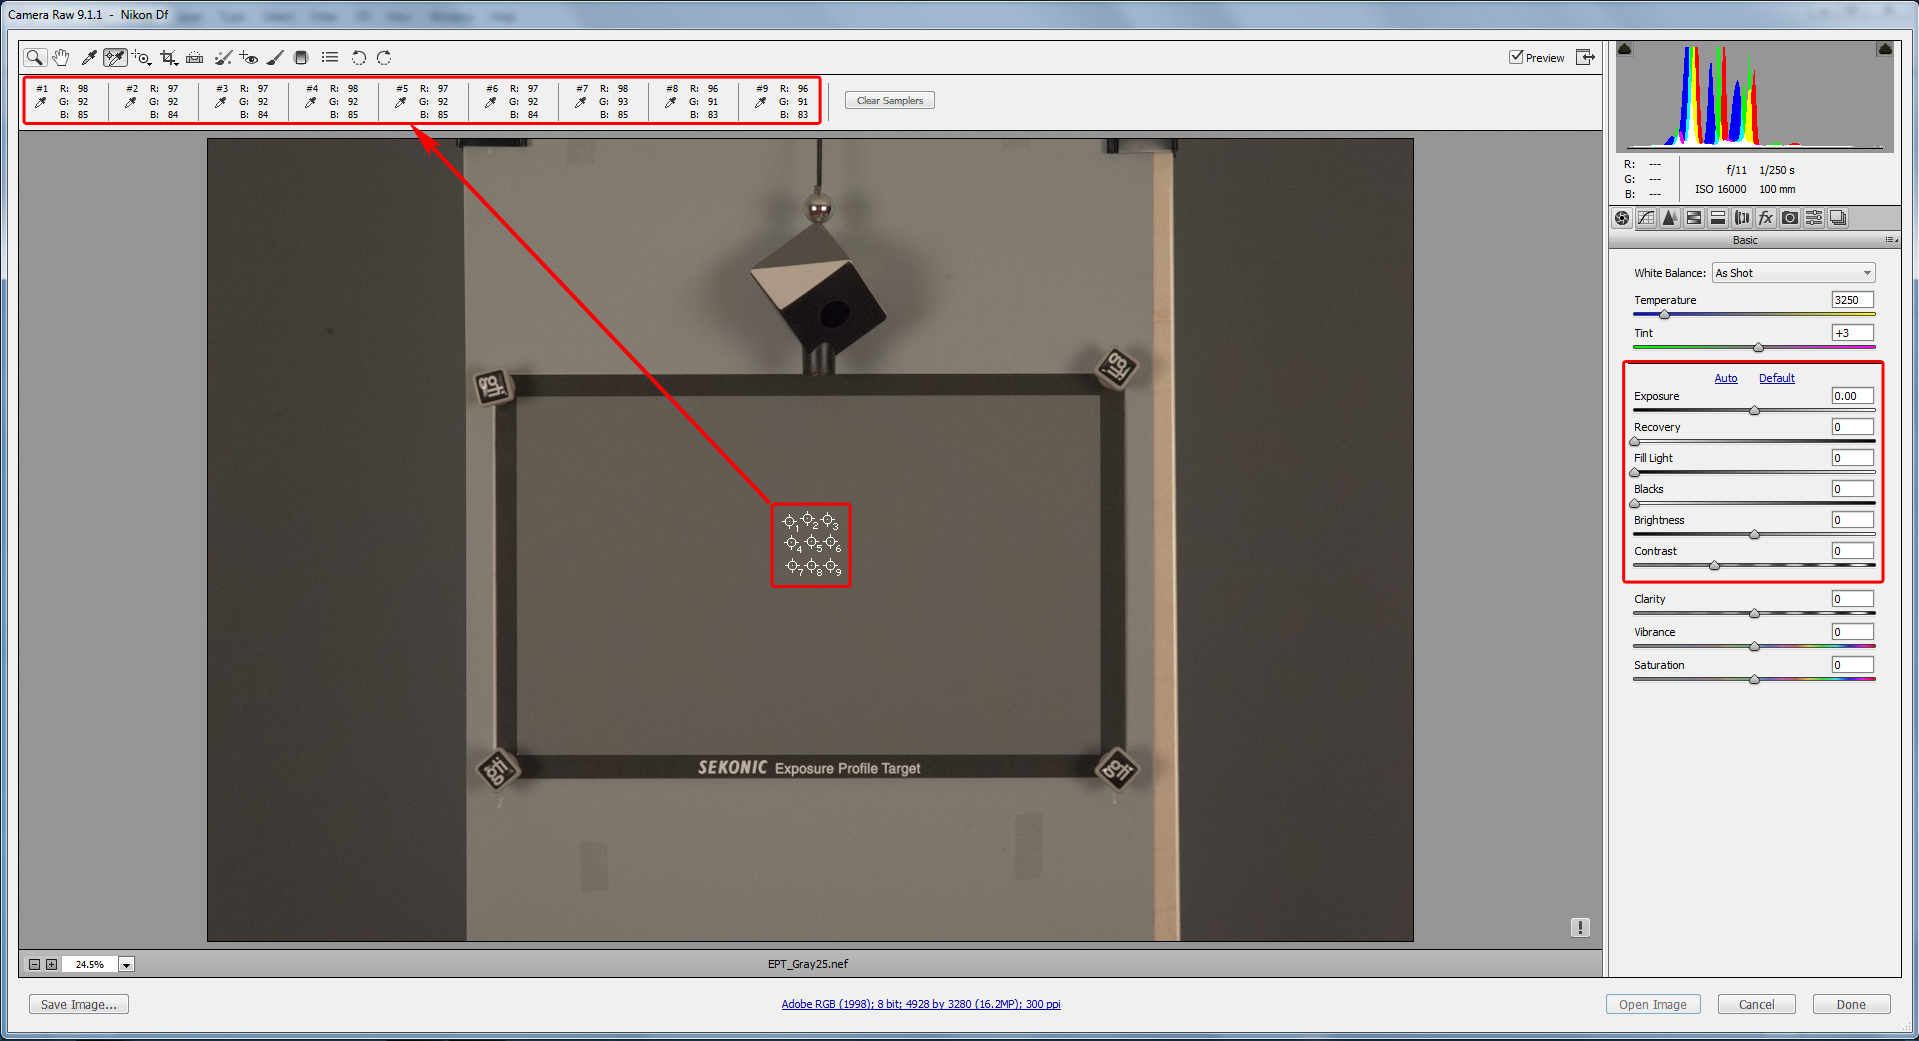
Figure 30. PV2010 with zeroed-out defaults. Shot with ISO 16000. Average Gsampler = 92 instead of 82
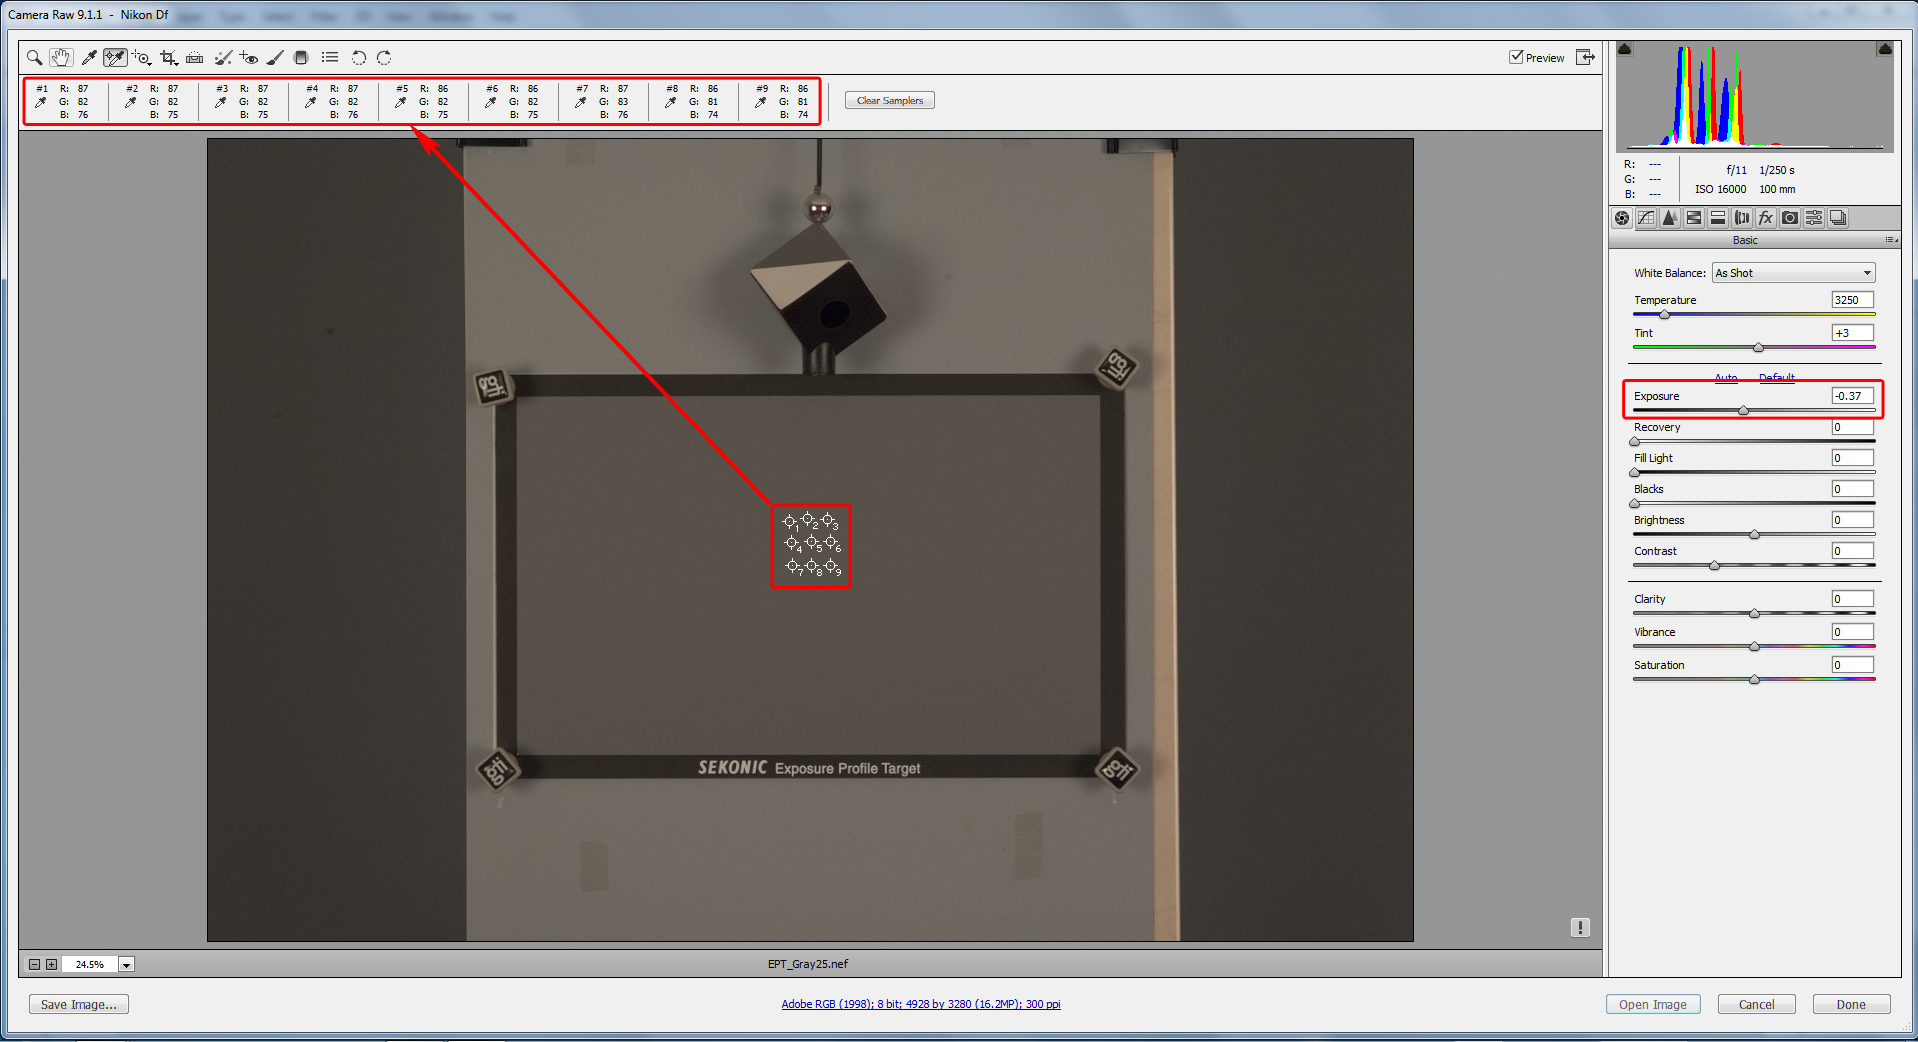
Figure 31. Shot with ISO 16000. Average Gsampler = 82, BLE = 0.37
After repeating the procedure for the remaining raw files, we will see that from ISO 16000 to ISO 204800, all of the Baseline Exposure values are equal to 0.37.
Now, let’s compare the Baseline Exposure values read from the .dng files’ EXIF data with the Baseline Exposure values experimentally obtained directly from the raw files.
We convert all of the raw shots to .dng, run EXIFTool using a command line similar to the one described above (Figure 1.), and tabulate all of the results in one spreadsheet.
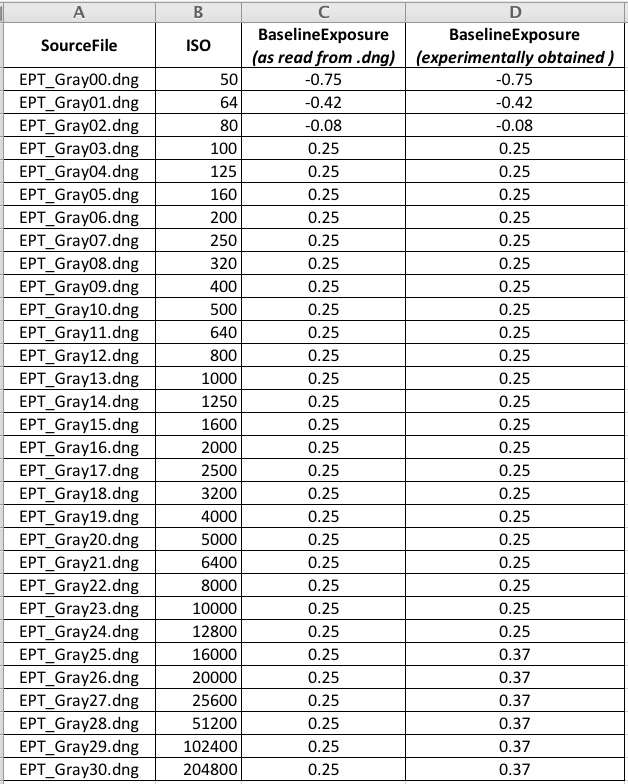
Figure 32. Baseliene Exposure values: read from EXIF data vs. experimentally obtained
This is exactly what we meant when we said that sometimes the BLE values recorded in a .dng’s EXIF data are wrong. The reason for the discrepancy is that for Nikons’ “Hi” ISO settings Adobe are using the same 15520 White Level (maximum) that they use for regular ISO settings, while in fact for “Hi” ISO it is 16383. So, anything between 15520 and 16383 will, most probably, simply be clipped in Adobes’ converters.
Later, you can group custom zeroed-out defaults for different ISO setting and rename them according to Baseline Exposure value. In our case, we will have 5 different presets – for ISOs 50, 64, and 80, as well as ISOs from 100 to 12800, and finally for ISOs starting from 16000.
The Unique Essential Workflow Tool
for Every RAW Shooter
FastRawViewer is a must have; it's all you need for extremely fast and reliable culling, direct presentation, as well as for speeding up of the conversion stage of any amounts of any RAW images of every format.

Now with Grid Mode View, Select/Deselect and Multiple Files operations, Screen Sharpening, Highlight Inspection and more.
28 Comments
Hi Iliah, Many thanks for
Submitted by jean pierre (not verified) on
Hi Iliah, Many thanks for this remember. I do have to admit: with your suggestion, raw-file works much much better and I can see an improvement of midtones! That is amazing.
And the tip with RAW-Digger is great.
I have one question. Do I have to convert to DNG, or can I use the raw-file directly with RAWDigger?
Dear Sir:
Submitted by Iliah Borg on
Dear Sir:
But of course you can use raw files directly, without converting them to DNG.
--
Best regards,
Iliah Borg
Hi Iliah, am I right that in
Submitted by aidmax (not verified) on
Hi Iliah, am I right that in case using Capture One converter we need to set Linear Curve in Base Characteristics and choose Adobe RGB (1998) in Proof Profile?
Dear Sir:
Submitted by Iliah Borg on
Dear Sir:
I use Linear curve in Capture One when calculating the exposure offsets; internally in their colour profiles Capture One designers use a tone curve very close to gamma 1.8, so you may want to consider something like ProPhoto RGB for proofing. Personally, I use BetaRGB modified with gamma 1.8
--
Best regards,
Iliah Borg
Dears,
Submitted by aidmax (not verified) on
Dears,
thank you for your answers. ProPhoto RGB and Linear curve showed me expected result, my camera (Ricoh GR) creates DNG raw files.
Great article. Thanks for
Submitted by Jay (not verified) on
Great article. Thanks for deep writings about raw converter.
One question: how the raw converters know what the BLE is for a camera/model/iso? Is there a big table for that? If that's the case, you don't need to use method 2 since the value should be fixed for a camera/model/iso.
> how the raw converters know
Submitted by Iliah Borg on
> how the raw converters know what the BLE is for a camera/model/iso?
For the same camera/model/ISO the recommended compensation varies depending on the camera settings for dynamic range, and sometimes even based on what dynamic range in the scene camera metered. The best way is not to compile the tables but to use the tags in Makernotes. That may involve some reverse-engeneering.
Some raw converters (like Adobe) use a combination of tables and tag values. Their BLE values are not always correct. Using the second method, one can determine the amount of override he needs to apply.
--
Best regards,
Iliah Borg
Thank you very much, Iliah.
Submitted by Jay (not verified) on
Thank you very much, Iliah. Is it safe to say that under iso 800, BLE from DNG is correct according to your tests? Also my experiences with Fujifilm X-T2 is that: -1-BLE(0.15)-bias(-0.7) = -0.45 way to bright if I spot meter on the highlight with detail with 2 2/3 compensation. I have to change the exposure to -2.15 to have a desire exposure in LR.
Brightness is about how the
Submitted by Iliah Borg on
Brightness is about how the raw data is rendered, the problem is not brightness per se but clipping. The clipping can be objectively checked in RawDigger or FastRawViewer (trials are 30 day, free, fully functional). If the data is not clipped, there is no harm in pulling "exposure compensation" silder to the left. If you want us to evaluate your files, please feel free to upload and send the links to support@rawdigger.com
--
Best regards,
Iliah Borg
Hi! can i use this for any
Submitted by Viktor Wågman (not verified) on
Hi! can i use this for any camera like fujifilm XT-1?
Exposure = -1 (yes, minus one stop)
Contrast = -33
Black = +25
Custom Curve (the converter, be it ACR or Lr, will automatically calculate it for you when switching from PV2010 to PV2012)
Best regards// Viktor
Dear Sir:
Submitted by Iliah Borg on
Dear Sir:
We would need raw files like those we used in the article to confirm. Could you please upload some and send us a link to support@rawdigger.com ?
--
Best regards,
Iliah Borg
Can it be a fuji xt1 Raw file
Submitted by Viktor Wågman (not verified) on
Can it be a fuji xt1 Raw file off anything? or should it be something special?
i send you files tomorrow..
Best regards/ viktor
did you get my RAW files? :)
Submitted by Viktor Wågman (not verified) on
did you get my RAW files? :)
Dear Sir:
Submitted by Iliah Borg on
Dear Sir:
Sorry, I'll get to it tomorrow, had too much workload during the week.
--
Best regards,
Iliah Borg
It´s okej! I'm just Checking!
Submitted by Viktor Wågman (not verified) on
It´s okej! I'm just Checking! :) have a graet DAY!
13% calibrated sensor?
Submitted by Martin van Gog (not verified) on
My camera, Sony A 77 II, has a 13% calibrated sensor instead of a standard 18%. Should I take into account the above article?.
with regards, Martin
Dear Sir:
Submitted by LibRaw on
Dear Sir:
For raw, 13% is within the standard. 18% is the standard for a processed image. The difference is 0.5 EV. However I doubt a77 II has metering calibrated for 13% in raw, it looks more like 10%, that is 0.85 EV down from 18%
Yes, the article is fully relevant for a77 II.
Hi, two questions:
Submitted by Joe (not verified) on
Hi, two questions:
1.) When capturing the images of the SpyderCube, is it important to ensure that the specular highlights are blown out (i.e. highlighted in RawDigger when OvExp is checked) before proceeding? Mine appear blown out based on the in-camera JPEG-based histogram, but are actually not in RawDigger.
2.) When saving the results for use on future images from the same camera/ISO, should we only save the Tone Curve, or also the altered settings (in my case, Exposure, Contrast and Blacks)?
Thanks for all the interesting articles!
Joe
Dear Sir:
Submitted by LibRaw on
Dear Sir:
1. If the maximum is not known one can't calculate how the exposure metering system positioned the midtone, so, yes, either you have the specular highlights on the main shot, or yoiu can take a separate shot where those highlights are blown out and take the maximum from that shot. There is also the matter of the determining if the highlights are blown out, we have an article https://www.rawdigger.com/howtouse/rawdigger-histograms-overexposure-shapes to help with that. If you want our input you can upload your raw files to some place and send us a link - support@rawdigger.com
2. All settings are saved.
3. You can do the measurements once since it is the raw data that is measure,
One more question -- are the
Submitted by Joe (not verified) on
One more question -- are the settings produced still valid if we switch to another profile within Lightroom (other than Adobe Standard). Or should we do the measurements for all profiles individually?
How to switch Process
Submitted by Ed Colman (not verified) on
Hi I am using Adobe Raw Converter 9.1.1 and cannot find how you select a Process such as 2010 or 2012. Thanks.
Dear Sir:
Submitted by LibRaw on
Dear Sir:
Processes are available in Adobe CameraRaw and Adobe Lightroom. Recently Adobe renamed the process, here is their article listing the corresponding names: https://helpx.adobe.com/in/creative-suite/using/process-versions.html
Can you please explained how
Submitted by ronald camilleri (not verified) on
Can you please explained how we need to do the same process using c1 instead of Lightroom ?
Thanks
Capture One
Submitted by Wirre (not verified) on
Hi How do i do the same process using c1 instead of Lightroom ? :D
BLE in FRV
Submitted by Howard (not verified) on
I found a BLE reported in the EXIF on my FastRawViewer's display for my Sony a6500 and my Sony RX10m4. Is this the same as what the above article shows how to calculate?
Thanks.
Yes, it is.
Submitted by LibRaw on
Yes, it is. We calculate it internally in FastRawViewer for non-DNG raw files. For DNG files, we read it from metadata.
Camera Raw 11.4
Submitted by Hermann Reuter (not verified) on
Hi, I just followed the procedure detailed in "4. Overriding Baseline Exposure Values in a Raw Converter" above.
Taking into account the change of names for the process versions I went from process 2 (2010) to process 3 (2012) and all the settings changed as described - except for the curves which shows linear - without any of the adjustments.
Is this a bug or a feature of the current ACR version?
Please set some sampling
Submitted by LibRaw on
Please set some sampling points on the image before switching process. After switching the process the values at sampling points should be very close to the original ones. That's the actual goal. If Adobe are maintaining those values without switching the curves, it's not a bug, it's an implementation difference.
Add new comment