Articles

Dealing with Damaged RAW Files

FastRawViewer. Damaged shot. RAW. Zoom to 24%

"Last weekend I took a 360 deg panorama and on processing the files discovered two frames had the partial magenta coloring.

There does seem to be a problem with the green channel but with the tools I have I can't get my head around it. Looks like I will have to contact Canon."

This article may seem as if it's about a curious incident, like a musing. However, it actually has very practical ramifications and uses to a photographer. Raw data damage can be symptomatic of an underlying problem, and a glance at the raw data can give one the facts that one needs to inform a company that your camera body has problems that need fixing.

Dynamic Range: Your Fair Share of Flare and Glare

Lens Flare

Fairly often, the dynamic range of a camera is calculated in a perfunctory manner, based only on measurements derived from the sensor and electronics, and ignoring the limitations to the dynamic range imposed by glare and flare.

Glare and flare, two effects very well known in photography, occur due to the reflections and scattering of the light in the optical system comprised of the lens, any filters or adapters on the lens, the camera chamber (which, incidentally, includes the autofocus/autoexposure module located at the bottom of the camera chamber in many dSLRs), and the sensor sandwich itself.

It is very important to realize that glare effects, being so fluid, are hard to automatically recognize and compensate for in RAW conversion and post-processing. Let’s make a rough estimation of the effect of the flare and glare using the following simple method:

Digging into Nikon RAW Size S NEFs

RawDigger. sNEF

With D4s camera Nikon introduced the new file format they refer to as RAW Size S NEF:

  • It contains not RGB but YCbCr data much like a JPEG;
  • The data is 11-bit;
  • The tone curve is applied to the data;
  • The in-camera white balance is applied to the data;
  • The pixel count is 4 times less than with regular NEF files;
  • The color information is shared between two adjacent pixels (in other words, chroma is recorded for each other pixel);
  • The file size is insignificantly smaller than full resolution 12-bit lossy compressed NEF;

RawDigger: detecting posterization in SONY cRAW/ARW2 files

RawDigger. Star Trails

Lossy compression of raw data is currently the only option available in Sony cameras of series NEX, SLT, RX, ILCE, ILCA, and the recent DSLR-A.

The first part of this article is showing how to detect artifacts caused by this compression. We will be discussing the technical details of this compression in the second part of this article.

In the vast majority of cases, the compression artifacts are imperceptible unless the heavy-handed contrast boost is introduced. There are, however, exceptions. With some unlucky starts in alignment, the artifacts can become plainly visible, even without much image processing.

All that is necessary for the artifacts to threaten the quality of the final image is a combination of high local contrast and a flat featureless background.

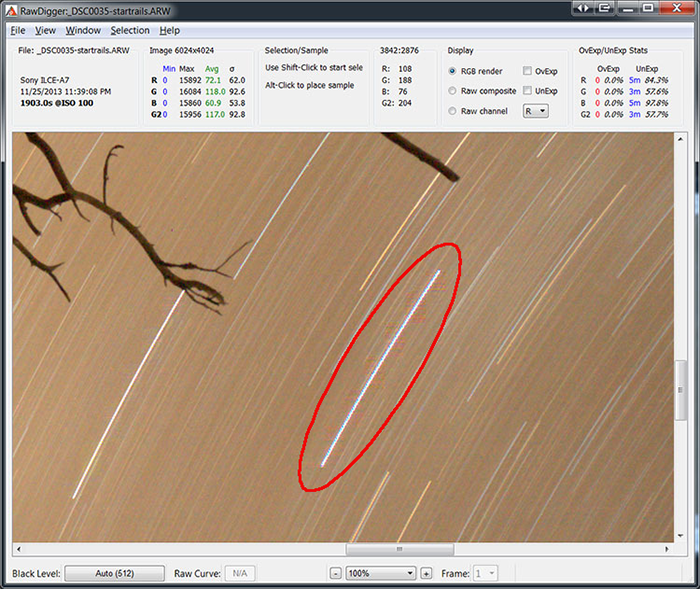
Lets have a look at the example, which was first published by Lloyd Chambers in his blog.

Exposure for RAW vs. Exposure for JPEG

RawDigger. Shot exposed for RAW

Adams has prescribed the Zones. 11 of them. This had consequences. In the digital case, it seems, severe ones.

To access all 11 zones on a sensor, the middle tone needs to be placed very low, 5 steps lower than sensor saturation.

The reduced number of tones (or, in other words, limited number of levels per stop or zone) turns into the loss of detail resolution. Pulling details and color from those underexposed middle tones and shadows is very painful. Noise starts to raise its head, color smudges and blotches appear, the details become rough, and the image loses plasticity.

The riddle of the intermediate ISO setting

ISO to Noise Ratio

If one is shooting in raw, they may be interested to see if there is any benefit in using intermediate ISO settings, such ISO 125, 160, etc.

There is, however, no single answer to this question. Why? Because everything depends on how you implement these intermediate ISO settings in the particular camera. Sometimes they are implemented the same way as the main ISO settings, but sometimes they are the result of certain manipulations, such as digital multiplication.

We are going to take series of shots varying ISO settings from the lowest to the highest using, of course, every intermediate ISO setting available. The subject of the shots doesn’t matter – hell; you can even shoot with the lens cap on.

Beware the Histogram

Rawdigger. Raw Histogram

The histogram for an image and the overexposure warning are meant (in theory) for objective verification of the image while shooting and adjustment of shooting parameters according to the indications in the preview window one can see the overexposed areas right away, and the histogram displays the overall distribution of tones on the shot.

The goal of this article is to elaborate on the procedure of juxtaposing the camera histogram and the real raw data, as opposed to merely provide settings and numbers. This, among other reasons, was why the shooting conditions were not exactly typical.

We used a 5D Mark II camera with a 2.0.9 firmware and at 200 ISO. For other cameras, different shooting conditions, possibly other ISOs, and other firmware, separate measurements are to be performed.

Pages